REASSEMBLY
Removal / installation · Vehicles built from Nov 2005
| 1. INSTALL OIL PAN STRAIGHT PIN |

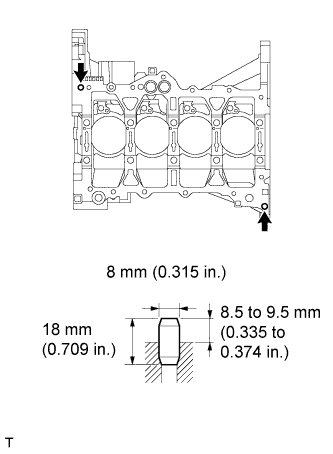  |
Using a plastic-faced hammer, tap in a new oil pan straight pin.
- Standard protrusion:
- 8.5 to 9.5 mm (0.335 to 0.374 in.)
| 2. INSTALL END PLATE STRAIGHT PIN |
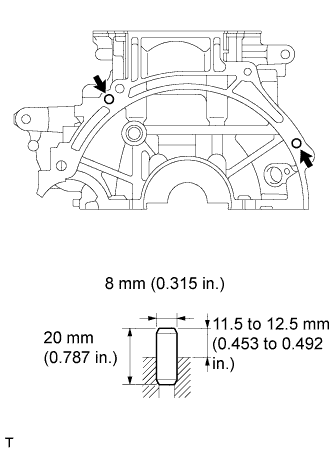 |
Using a plastic-faced hammer, tap in a new end plate straight pin.
- Standard protrusion:
- 11.5 to 12.5 mm (0.453 to 0.492 in.)
| 3. REMOVE OIL PUMP SET STRAIGHT PIN |
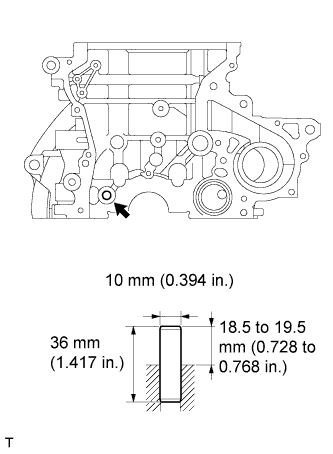 |
Using a plastic-faced hammer, tap in a new oil pump straight pin.
- Standard protrusion:
- 18.5 to 19.5 mm (0.728 to 0.768 in.)
| 4. INSTALL OIL PUMP SET RING PIN |
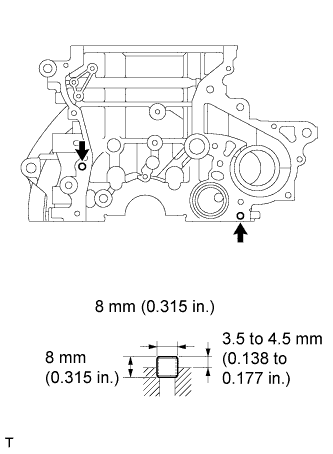 |
Using a plastic-faced hammer, tap in a new oil pump ring pin.
- Standard protrusion:
- 3.5 to 4.5 mm (0.138 to 0.177 in.)
| 5. INSTALL CYLINDER HEAD SET STRAIGHT PIN |
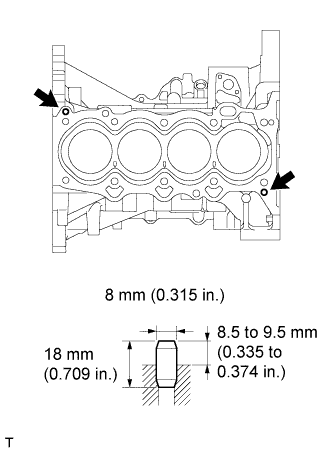 |
Using a plastic-faced hammer, tap in a new cylinder head straight pin.
- Standard protrusion:
- 8.5 to 9.5 mm (0.335 to 0.374 in.)
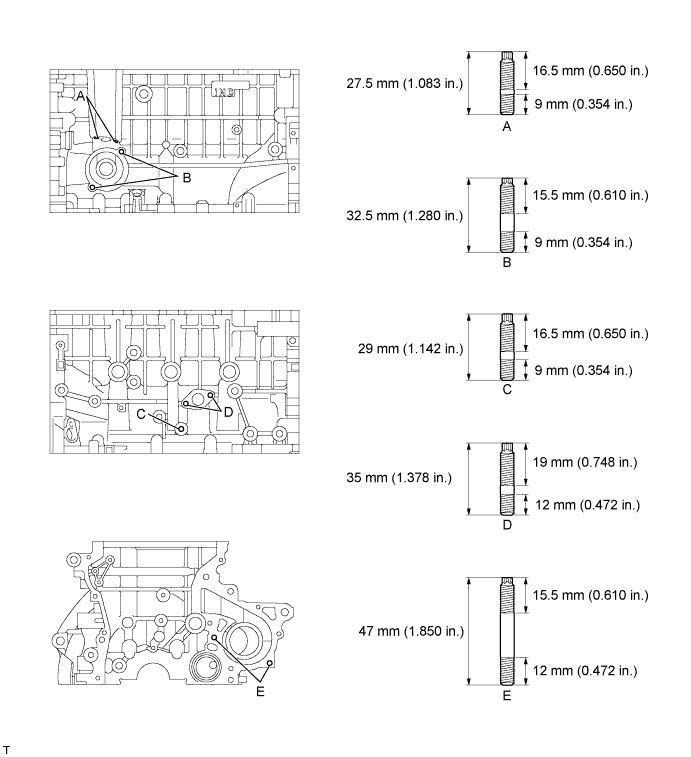
| 6. INSTALL STUD BOLT |
Install 9 stud bolts in the positions shown in the illustration.
- Torque:
- 5.0 N*m{ 51 kgf*cm , 44 in.*lbf }
| 7. INSTALL OIL JET |
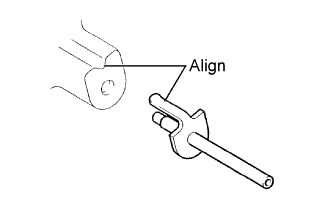 |
Align the concave portion of the cylinder block with the bracket of the oil jet, then tap in the oil jet (the service part).
- NOTICE:
- Do not tap the tip of the oil jet.
| 8. INSTALL OIL NOZZLE SUB-ASSEMBLY NO. 1 |
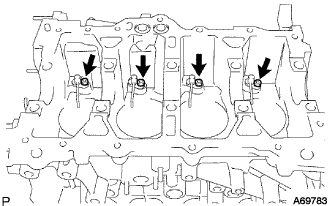 |
Using a hexagon wrench (5 mm), install the oil nozzle with the 4 bolts.
- Torque:
- 9.0 N*m{ 92 kgf*cm , 80 in.*lbf }
| 9. INSTALL CRANKSHAFT |
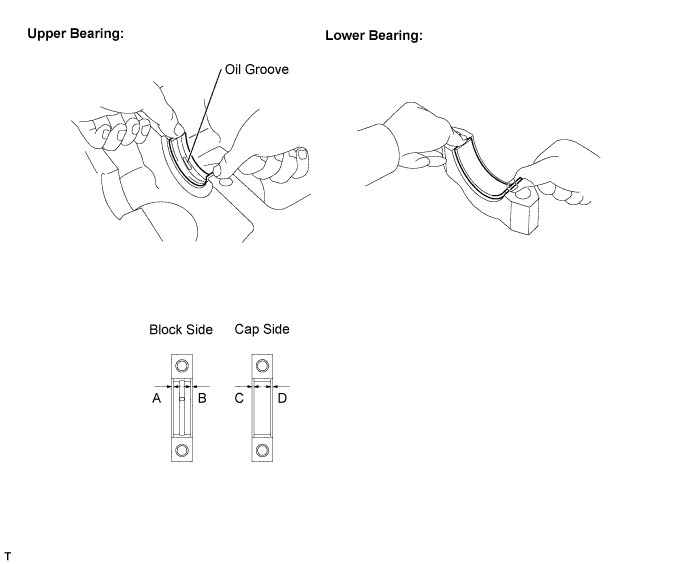
Install the upper bearing with the oil groove onto the cylinder block and the lower bearing onto the bearing cap.
- NOTICE:
- Do not apply engine oil to the contact surface of the cylinder block or the back side of the bearing.
- HINT:
- Mass production parts do not have claws as marks. If reusing a mass production part, measure the clearance of both sides so that the bearing is in the center of the bearing cap.
- Specified clearance:
- A - B = within 0.8 mm (0.032 in.)
C - D= within 0.4 mm (0.016 in.)
Install the thrust washer onto the cylinder block and the front and backside of bearing cap No. 3 with the oil groove facing outward.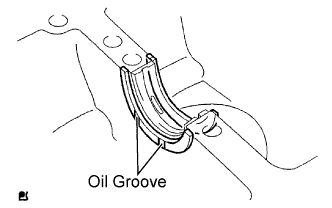
Apply oil to the upper bearing, then install the crankshaft onto the cylinder block.
Examine the front marks and numbers and check that the sequence is as shown in the illustration. Ther, install the bearing caps onto the cylinder block.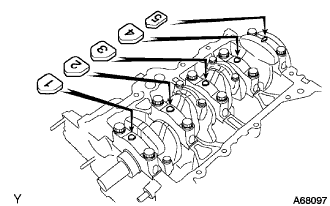
Apply a light coat of engine oil to the threads and contact surface of the bolt.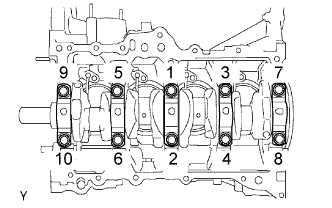
Using several steps. Temporarily tighten the bolts in several steps in the sequence shown in the illustration, and tighten them to the specified torque.
- Torque:
- 60 N*m{ 612 kgf*cm , 44 ft.*lbf }
- NOTICE:
- Check that the crankshaft turns smoothly while tightening the bolts.
Mark the front of the bearing cap bolts with paint.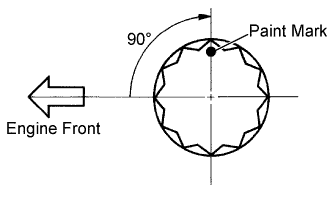
Retighten the bearing cap bolts by 90° in the same sequence as step (f).
Check that each paint mark is now at the 90° angle from the front.
| 10. INSTALL W/PIN PISTON SUB-ASSEMBLY |
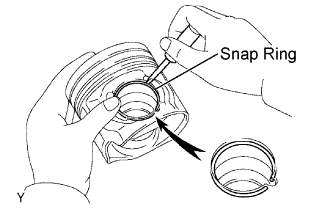 |
Using a small screwdriver, install a new snap ring at one end of the piston pin hole.
Align the front marks of the piston and connecting rod cap.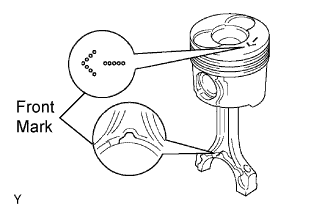
Apply a light coat of engine oil to the piston pin, then push the piston pin into the hole of the piston and connecting rod cap.
Using a small screwdriver, install a new snap ring on the other end of the piston pin hole.
- NOTICE:
- Do not change the combinations of the pistons and piston pins so that they can be returned to their original location when reassembled.
| 11. INSTALL CONNECTING ROD BEARING |
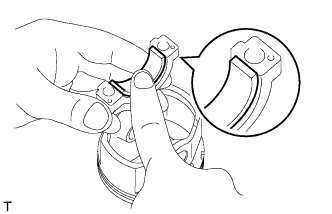 |
Align the connecting rod bearing and oil grooves, then install the bearing onto the connecting rod.
- NOTICE:
- Do not apply engine oil to the contact surfaces of the connecting rod, connecting rod cap or the back side of the bearing.
| 12. INSTALL PISTON RING SET |
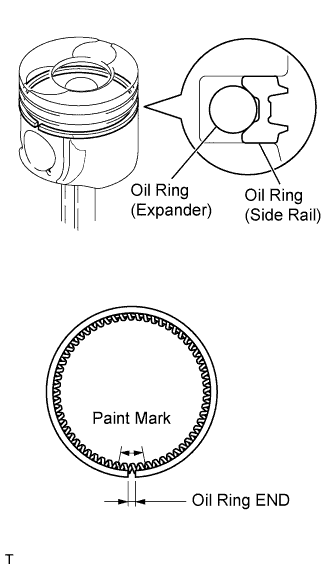 |
Install the coil ring and oil ring by hand.
- HINT:
- The upper and lower oil rings are the same.
- Be sure to install the oil ring (side rail) and oil ring (expander) as shown in the illustration.
- The upper and lower oil rings are the same.
Using a piston ring expander, install compression rings No. 1 and No. 2 with the code marks as shown in the illustration.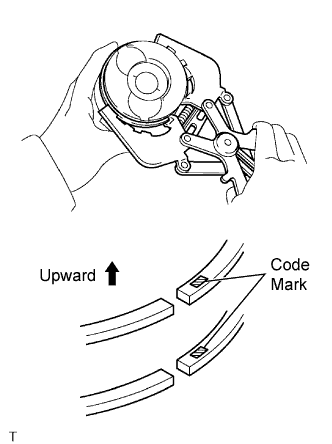
Part
Code Mark
Compression Ring No. 1
1R
Compression Ring No. 2
2R
Oil Ring
-
Position the piston rings so that the ring ends are as shown in the illustration.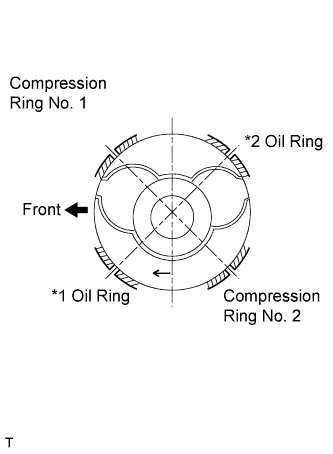
- NOTICE:
- Make sure that the gap in the oil ring is placed at either position *1 or *2.
| 13. INSTALL PISTON SUB-ASSEMBLY W/CONNECTING ROD |
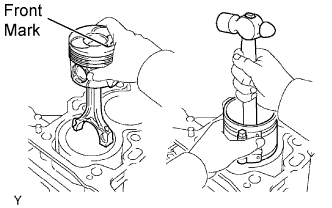 |
Apply engine oil to the cylinder walls, pistons and surfaces of the connecting rod bearings.
Check that the gap in the piston ring is located correctly.
Check the front marks. Using a piston ring compressor, install the piston with connecting rod.
Check that the connecting rod and its cap are in the correct combination and that the front marks are facing correctly, then install the connecting rod cap onto the connecting rod.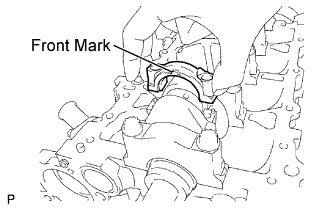
- NOTICE:
- The connecting rods and their caps should be reinstalled in their original combinations.
Apply a light coat of engine oil to the threads and contact surface of the bolts.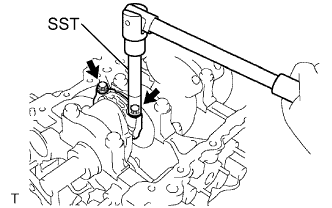
Using several steps, temporarily tighten the bolts in the sequence shown in the illustration, and tighten them to the specified torque.
- Torque:
- 15 N*m{ 153 kgf*cm , 11 in.*lbf }
Mark the front of the bolts with paint.
Retighten the bolts by additional 90°.
Check that the crankshaft turns smoothly.
| 14. INSTALL OIL PAN SUB-ASSEMBLY |
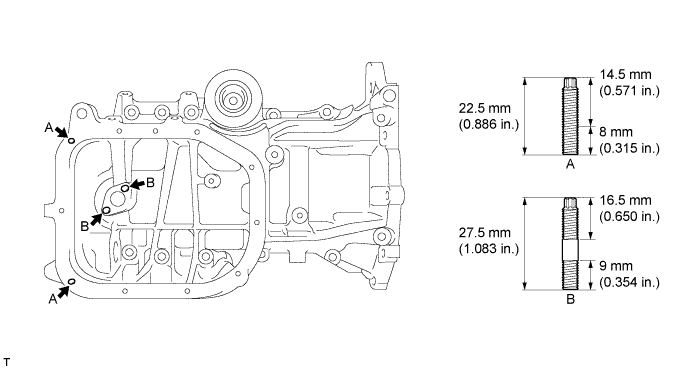
Using "Torx" socket wrench E5, install the 4 stud bolts.
- Torque:
- 5.0 N*m{ 51 kgf*cm , 44 in.*lbf }
Apply a continuous bead of seal packing (Diameter 2.0 to 3.0 mm (0.079 to 0.118 in.)) to the oil pan as illustrated.
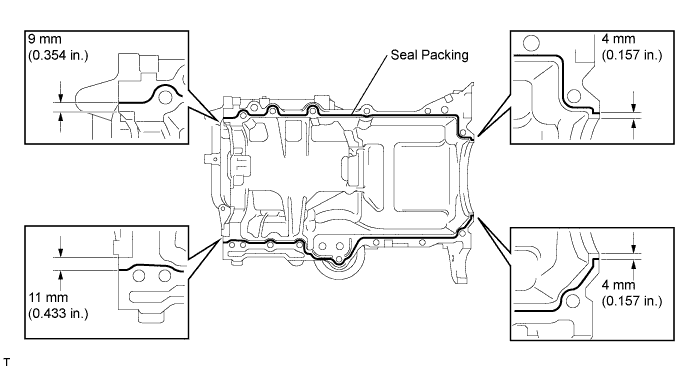
- Seal packing:
- Part No. 08826-00080 or the equivalent
- NOTICE:
- Remove any oil from the contact surface.
- Install the oil pan within 3 minutes, and tighten the bolts within 15 minutes of applying the seal packing.
- Remove any oil from the contact surface.
Install 2 new O-rings onto the cylinder block, then install the oil pan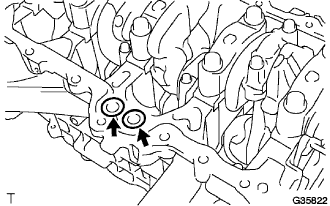
- NOTICE:
- Clean the contact surface of the new O-rings.
- Make sure that the O-rings are not twisted when installing the oil pan.
- Clean the contact surface of the new O-rings.
Using several steps, temporarily tighten the 13 bolts in the sequence shown in the illustration, then tighten the bolts to the specified torque.
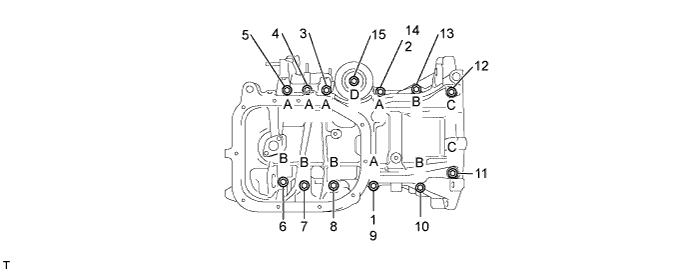
- Torque:
- 24 N*m{ 245 kgf*cm , 18 in.*lbf }
- HINT:
- The bolt lengths are as follows.
- Bolt A 49 mm (1.93 in.)
- Bolt B 88 mm (3.46 in.)
- Bolt C 143.3 mm (5.64 in.)
- Bolt D 35 mm (1.38 in.)
| 15. INSTALL ENGINE REAR OIL SEAL |
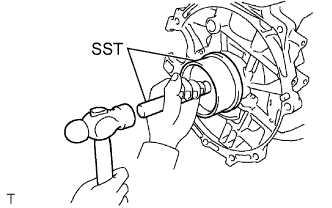 |
Apply MP grease to a new oil seal lip.
- NOTICE:
- Keep the lip free of foreign matter.
Using SST and a hammer, tap in the new oil seal until its surface is flush the cylinder block edge.
- SST
- 09223-15030
09950-70010 (09951-07100)
- NOTICE:
- Tap the oil seal from the vertical position.
- Wipe any extra grease off the crankshaft.
- Tap the oil seal from the vertical position.
| 16. INSTALL OIL STRAINER SUB-ASSEMBLY |
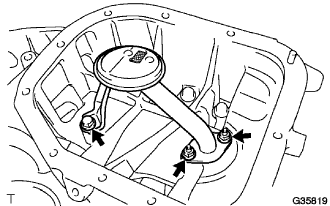 |
Install a new gasket, then install the oil strainer with the bolt and 2 nuts.
- Torque:
- 11 N*m{ 112 kgf*cm , 8 in.*lbf }
| 17. INSTALL OIL PAN SUB-ASSEMBLY NO. 2 |
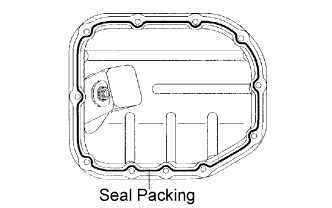 |
Apply a continuous bead of seal packing (Diameter 2.5 to 3.5 mm (0.0984 to 0.1378 in.)) to the oil pan as illustrated.
- Seal packing:
- Part No.08826-00080 or the equivalent
- NOTICE:
- Remove any oil from the contact surface.
- Install the oil pan within 3 minutes, and tighten the bolts within 15 minutes of applying the seal packing.
- Remove any oil from the contact surface.
Install oil pan No. 2 with the 9 bolts and 2 nuts.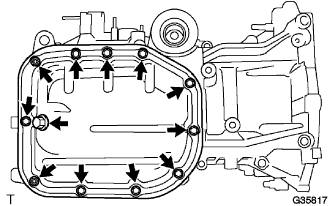
- Torque:
- 9.0 N*m{ 92 kgf*cm , 80 in.*lbf }
Install a new gasket and oil pan drain plug.
- Torque:
- 38 N*m{ 387 kgf*cm , 28 ft.*lbf }
| 18. INSTALL OIL FILTER UNION |
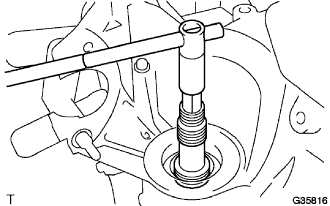 |
Using a 12 mm socket hexagon wrench, install the oil filter union.
- Torque:
- 30 N*m{ 306 kgf*cm , 22 ft.*lbf }
| 19. INSTALL OIL COOLER ASSEMBLY |
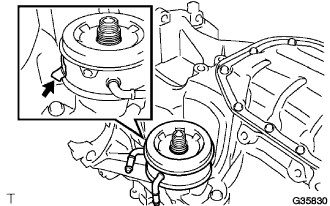 |
Clean the oil cooler installation surface of the engine.
Apply a light coat of engine oil to the O-ring of the oil cooler.
Place the stopper portion on the oil pan side, and fix the oil cooler with the nut.
Using SST, tighten the nut to the specified torque.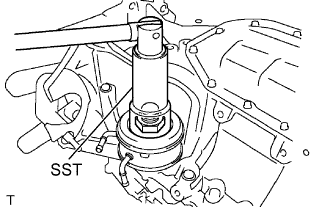
- SST
- 09229-55010
- Torque:
- 66 N*m{ 673 kgf*cm , 49 ft.*lbf }
| 20. INSTALL OIL FILTER SUB-ASSEMBLY |
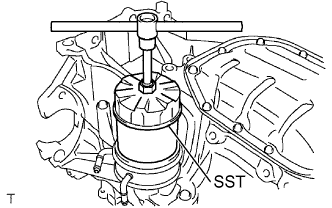 |
Check and clean the oil filter installation surface.
Apply clean engine oil to the gasket of a new oil filter.
Lightly screw the oil filter into place, then tighten it until the gasket comes into contact with the seat.
Using SST, tighten it an additional 3/4 turn.
- SST
- 09228-07501
- Torque:
- 13 N*m{ 133 kgf*cm , 10 in.*lbf }
| 21. INSTALL CYLINDER HEAD GASKET |
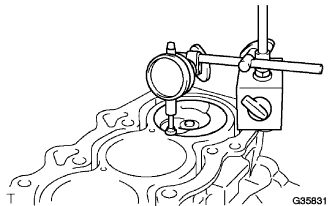 |
Inspect the protrusion height of the piston heads.
Place a dial indicator on the cylinder block as shown in the illustration.
- NOTICE:
- Make sure that the dial indicator is at right angles to cylinder block upper surface.
Measure the protrusion height of the piston head for each cylinder in 2 places as shown in the illustration.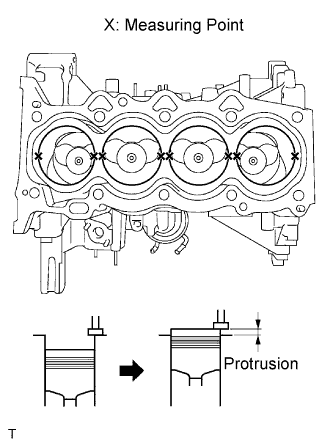
Select a new cylinder head gasket.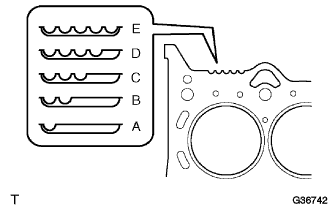
Select the highest protrusion height among the 8 measurements records. It is used to select a new cylinder head gasket.
Piston protrusion: Piston protrusion
mm (in.)
Gasket cutout
Gasket size
0.375 to 0.425
(0.015 to 0.017)
1
A
0.425 to 0.475
(0.017 to 0.019)
2
B
0.475 to 0.525
(0.019 to 0.021)
3
C
0.525 to 0.575
(0.021 to 0.023)
4
D
0.575 to 0.625
(0.023 to 0.025)
5
E
Install the cylinder head gasket.
Apply seal packing (Diameter 3.5 to 4.5 mm (0.138 to 0.177 in.)) to the cylinder block side as shown in the illustration.
- Seal packing:
- Part No. 08826-00080 or the equivalent
- NOTICE:
- Remove any oil from the contact surface.
Place a new cylinder head gasket on the cylinder block with the Lot No. stamp facing upward.
Apply seal packing (Diameter 3.5 to 4.5 mm (0.138 to 0.177 in.)) to the top surface of the cylinder head again as shown in the illustration.
- Seal packing:
- Part No. 08826-00080 or the equivalent
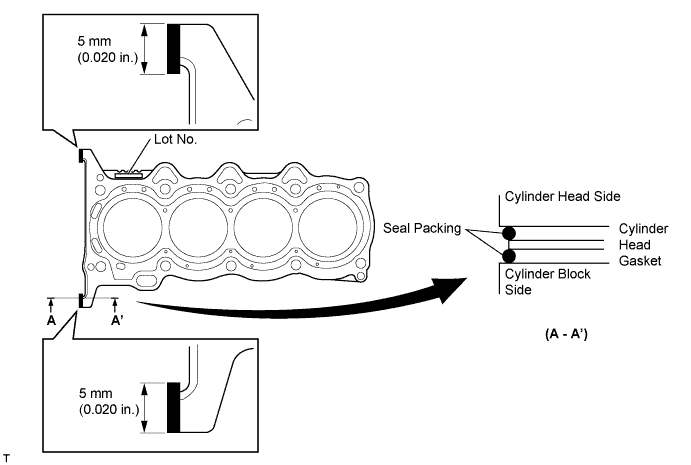
Install the cylinder head onto the cylinder block.
- NOTICE:
- Remove any oil from the contact surface.
- Install the cylinder head within 3 minutes, and tighten the bolts within 15 minutes of applying the seal packing.
- Remove any oil from the contact surface.
| 22. INSTALL CYLINDER HEAD SUB-ASSEMBLY |
 |
- HINT:
- The cylinder head bolts are tightened in 2 successive steps.
Apply a light coat of engine oil to the threads of the cylinder head bolts.
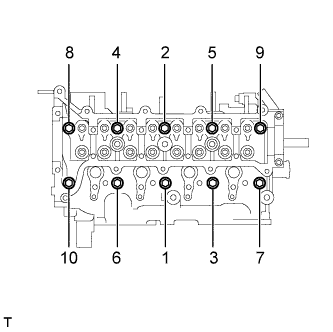
Using several steps, uniformly install and tighten the 10 cylinder head bolts and plate washers in the sequence shown in the illustration. (*1)
- Torque:
- 68 N*m{ 693 kgf*cm , 50 ft.*lbf }
Mark the front of the cylinder head bolts with paint.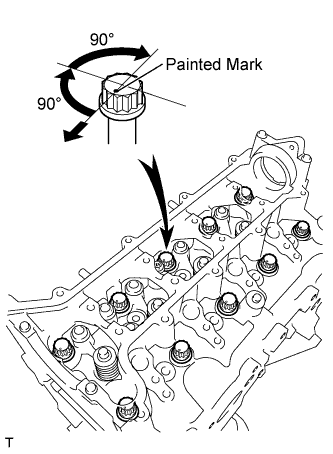
Using the same sequence as step (*1), retighten the cylinder head bolts by additional 90° and one more additional 90° as shown in the illustration.
Check that each paint mark is now 180° opposite from the front.
| 23. INSTALL VALVE ROCKER ARM SUB-ASSEMBLY NO. 1 |
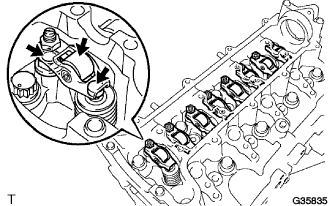 |
Apply engine oil to the stem end caps, valve rocker arm pivot top surfaces and valve rocker arm roller portions.
Install the 8 valve rocker arms.
| 24. INSTALL CAMSHAFT |
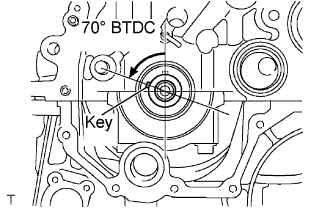 |
Turn the crankshaft to set the key in the 70° BTDC position.
Apply engine oil to the camshaft journal portion and cam portion.
Examine the front marks and numbers and check that the sequence is as shown in the illustration. Then, temporarily tighten the camshaft with the camshaft bearing caps and bolts.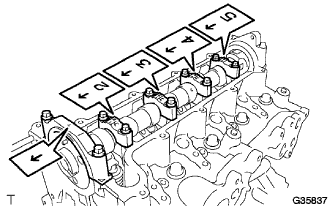
- NOTICE:
- Do not tilt the valve rocker arm when installing the camshaft onto the cylinder head.
Using several steps, temporarily tighten the bolts in the sequence shown in the illustration, and then tighten the bolts to the specified torque.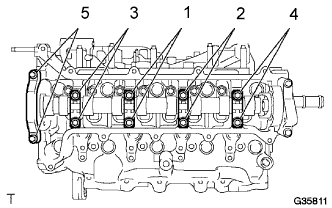
- Torque:
- 19 N*m{ 194 kgf*cm , 14 ft.*lbf }
| 25. INSTALL CHAIN SUB-ASSEMBLY |
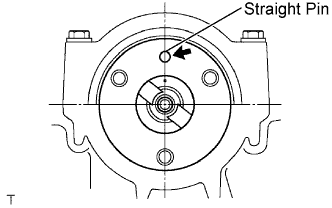 |
Turn the camshaft to set the straight pin in the position shown in the illustration.
Turn the crankshaft to set the key in the position shown in the illustration.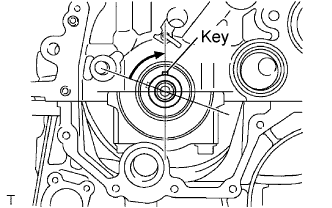
Align the yellow mark plate on the chain with the timing marks on the crankshaft timing sprocket and camshaft timing sprocket.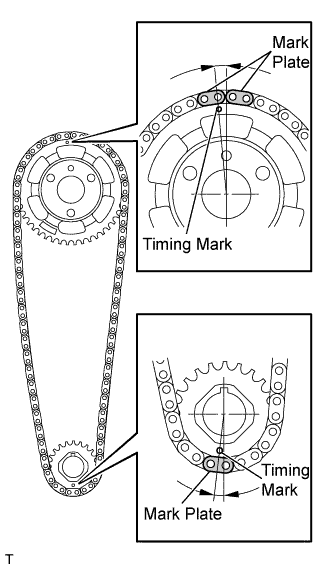
Install the chain, camshaft timing sprocket and crankshaft sprocket together onto the engine.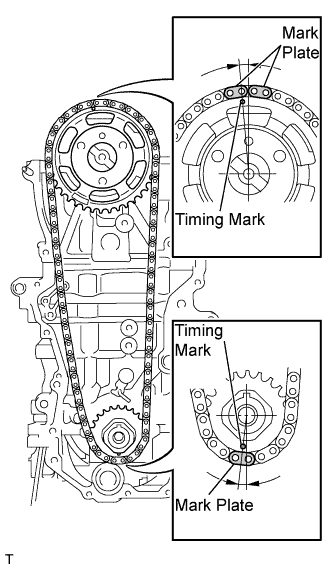
Using SST, fix the camshaft timing sprocket, and install the camshaft timing sprocket with 3 new bolts.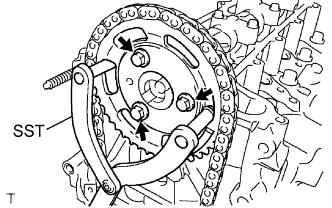
- SST
- 09960-10010
(09962-01000, 09963-01000)
- Torque:
- 20 N*m{ 204 kgf*cm , 15 in.*lbf }
| 26. INSTALL CHAIN VIBRATION DAMPER NO. 1 |
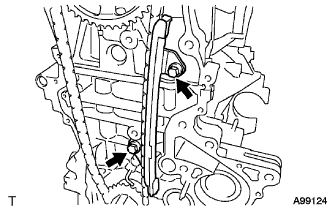 |
Install the chain vibration damper with the 2 bolts.
- Torque:
- 20 N*m{ 204 kgf*cm , 15 in.*lbf }
| 27. INSTALL CHAIN TENSIONER SLIPPER |
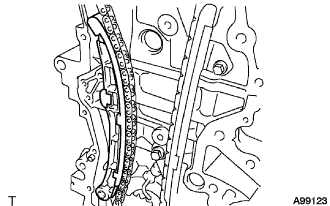 |
Install the chain tensioner slipper onto the cylinder block.
| 28. INSTALL CHAIN TENSIONER ASSEMBLY NO. 1 |
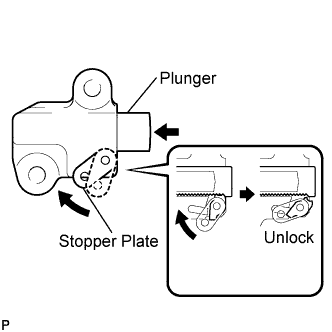 |
Pull up the stopper plate to unlock the plunger.
Push the plunger to the end with the plunger unlocked.
Pull down the stopper plate, with the plunger pushed to the end, to lock the plunger.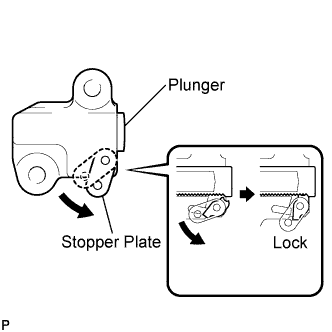
Insert a 2.5 mm (0.098 in.) diameter bar into the hole in the stopper plate with the plunger locked.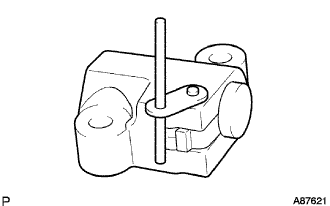
- HINT:
- If the stopper plate is not completely pulled down and a 2.5 mm (0.098 in.) diameter bar cannot be inserted, unlock and pull out the plunger slightly. The stopper plate will be completely pulled down and a 2.5 mm (0.098 in.) diameter bar can be inserted easily.
Install the chain tensioner with the 2 bolts.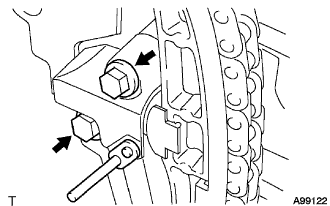
- Torque:
- 9.0 N*m{ 92 kgf*cm , 80 in.*lbf }
Remove the 2.5 mm (0.098 in.) diameter bar from the chain tensioner.
Check that the mark plate and timing mark are in the positions shown in the illustration.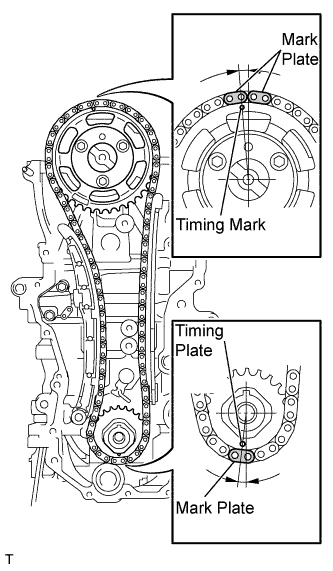
| 29. INSTALL OIL PUMP SEAL |
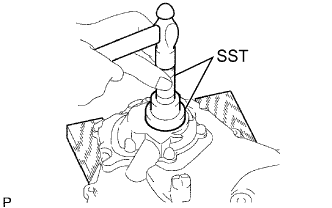 |
Using SST and a hammer, tap in the new oil seal until its surface is flush with the oil pump edge.
- SST
- 09223-15030
- NOTICE:
- Tap the oil seal in from a vertical position.
Apply MP grease to a new oil seal lip.
- NOTICE:
- Keep the lip free of foreign matter.
| 30. INSTALL OIL PUMP ASSEMBLY |
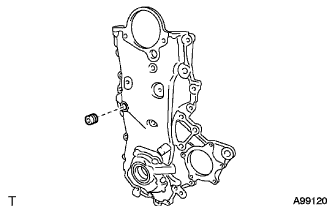 |
Apply adhesive to 2 or 3 threads of the service hole screw plug bolt end.
- Adhesive:
- Part No. 08833-00070, THREE BOND 1324, or the equivalent
- NOTICE:
- Remove any oil from the bolts and bolt holes.
Using an 8 mm socket hexagon wrench, install the service hole screw plug.
- Torque:
- 15 N*m{ 153 kgf*cm , 11 ft.*lbf }
Install 2 new O-rings in the 2 locations shown in the illustration.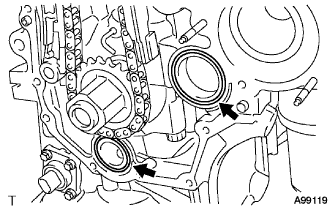
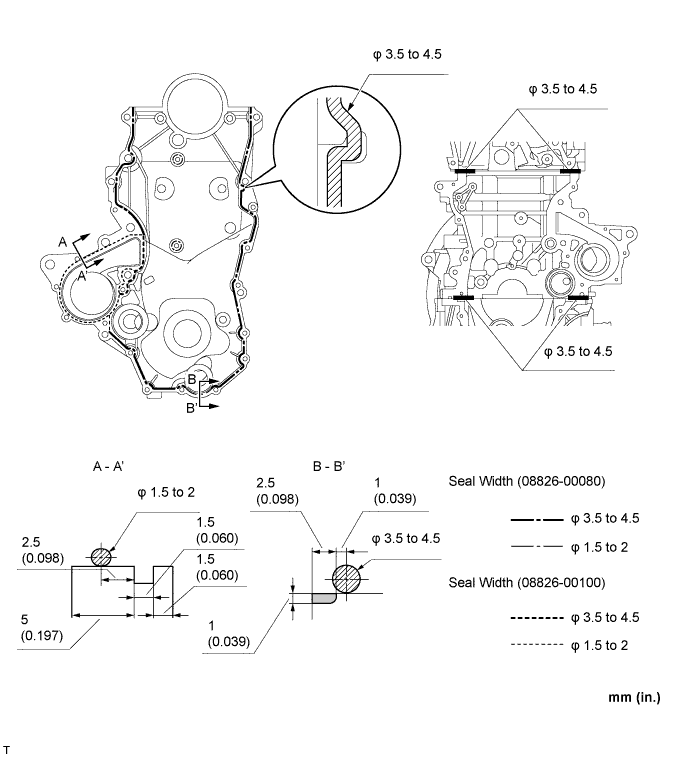
Apply seal packing to the engine body and oil pump as shown in the illustration below.
- NOTICE:
- Remove any oil from the contact surface.
- Install the oil pan within 3 minutes, and tighten the bolts within 15 minutes of applying the seal packing.
- Remove any oil from the contact surface.
- Seal packing:
- Water pump part No. 08826-00100 or the equivalent
- Other part No. 08826-00080 or the equivalent
Align the keyway of the oil pump drive rotor with the rectangular portion of the crankshaft, then slide the oil pump into place.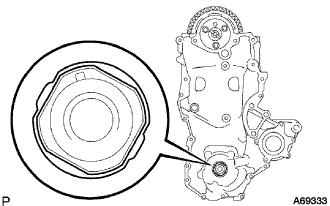
Install the oil pump assembly with the 16 bolts and nut as illustrated.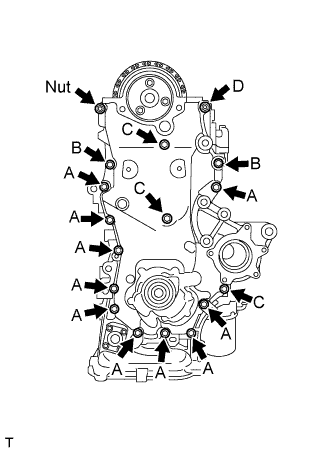
- Torque:
- Bolt A:
- 11 N*m{ 112 kgf*cm , 8 ft.*lbf }
- Bolt B:
- 24 N*m{ 245 kgf*cm , 18 ft.*lbf }
- Bolt C:
- 11 N*m{ 112 kgf*cm , 8 ft.*lbf }
- Bolt D:
- 24 N*m{ 245 kgf*cm , 18 ft.*lbf }
- Nut:
- 24 N*m{ 245 kgf*cm , 18 ft.*lbf }
- NOTICE:
- Make sure that the chain does not come into contact with the seal packing when installing the oil pump.
- Install the engine mounting bracket RH and water pump within 15 minutes of installing the oil pump.
- Make sure that the chain does not come into contact with the seal packing when installing the oil pump.
- HINT:
- The lengths are as follows.
- Bolt A 20 mm (0.79 in.)
- Bolt B 30 mm (1.18 in.)
- Bolt C 35 mm (1.38 in.)
- Bolt D 20 and 14 mm (0.79 and 0.55 in.) double ended bolt
| 31. INSTALL WATER PUMP ASSEMBLY |
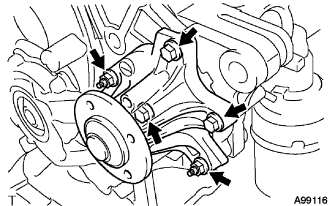 |
Install a new gasket, then install the water pump with the 3 bolts and 2 nuts.
- Torque:
- 11 N*m{ 112 kgf*cm , 8 ft.*lbf }
| 32. INSTALL CRANKSHAFT DAMPER SUB-ASSEMBLY |
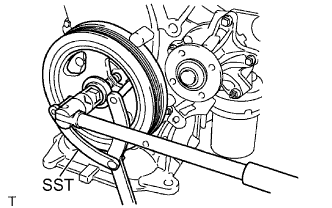 |
Align the key with the key groove of the crankshaft damper, and slide the crankshaft damper to the crankshaft.
Using SST, secure the crankshaft damper.
- SST
- 09960-10010
(09962-01000, 09963-01000)
Tighten the bolt to the specified torque.
- Torque:
- 180 N*m{ 1,835 kgf*cm , 133 ft.*lbf }
| 33. INSTALL TRANSVERSE ENGINE ENGINE MOUNTING BRACKET |
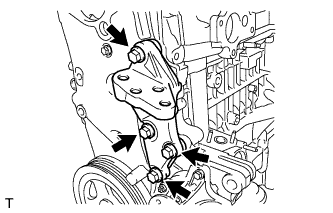 |
Install the engine mounting bracket with the 4 bolts.
- Torque:
- 55 N*m{ 561 kgf*cm , 41 ft.*lbf }
| 34. INSTALL WATER PUMP PULLEY |
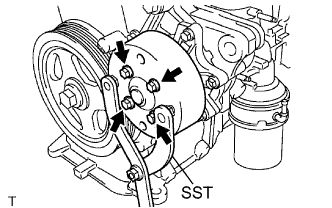 |
Temporarily install the water pump pulley with the 4 bolts.
Using SST, secure the water pump pulley.
- SST
- 09960-10010
(09962-01000, 09963-00700)
Tighten the 4 bolts to the specified torque.
- Torque:
- 15 N*m{ 153 kgf*cm , 11 ft.*lbf }
| 35. INSTALL THERMOSTAT |
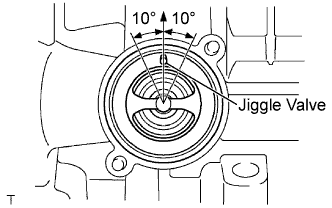 |
Install a new gasket onto the thermostat.
Install the thermostat with the jiggle valve facing upward.
- HINT:
- The jiggle valve should be set within 10° of the vertical as illustrated.
Install the water inlet with the 2 nuts.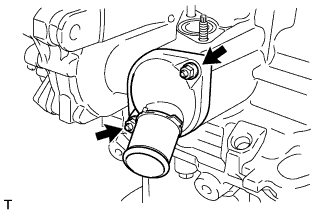
- Torque:
- 9.0 N*m{ 92 kgf*cm , 80 in.*lbf }
| 36. INSPECT VALVE CLEARANCE |
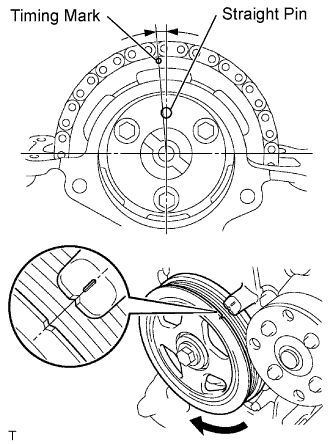 |
Set the No. 1 cylinder to TDC/Compression.
Turn the crankshaft pulley until the grooves of the crankshaft damper and oil pump are aligned.
Check that the timing mark of the camshaft timing sprocket and the straight pin hole in the camshaft timing sprocket are in the positions shown in the illustration.
- HINT:
- If not, turn the crankshaft damper 1 revolution (360°) to align them as above.
Check the valve clearance of the No. 1 cylinder exhaust valve and the No. 2 cylinder intake valve.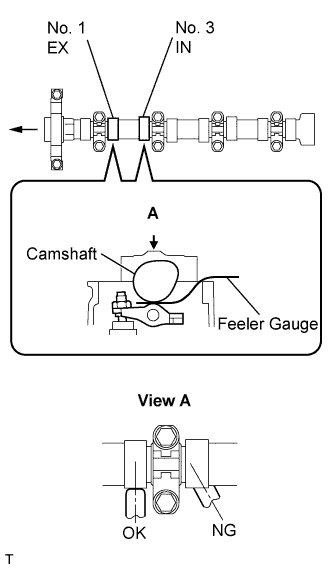
Using a feeler gauge, measure the clearance between the camshaft and valve rocker arm No. 1.
- Valve clearance (Cold):
- 0.11 to 0.17 mm (0.004 to 0.007 in.) for intake
- 0.14 to 0.20 mm (0.006 to 0.008 in.) for exhaust
- NOTICE:
- Insert the feeler gauge into the center of the roller surface, parallel to valve rocker arm No. 1.
- Do not apply excessive force to the valve adjusting screw when using adjusting tools such as SST and a screwdriver.
- Insert the feeler gauge into the center of the roller surface, parallel to valve rocker arm No. 1.
- HINT:
- If the clearance is not as specified, record the out-of-specification measurement, then adjust the valve clearance.
Check the valve clearance of the No. 1 cylinder intake valve and the No. 3 cylinder exhaust valve.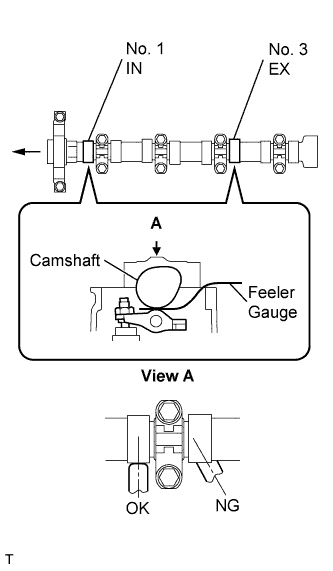
Turn the crankshaft a further 180° clockwise.
Using a feeler gauge, measure the clearance between the camshaft and valve rocker arm No. 1 as shown in the illustration.
- Valve clearance (Cold):
- 0.11 to 0.17 mm (0.004 to 0.007 in.) for intake
- 0.14 to 0.20 mm (0.006 to 0.008 in.) for exhaust
- NOTICE:
- Insert the feeler gauge into the center of the roller surface, parallel to valve rocker arm No. 1.
- Do not apply excessive force to the valve adjusting screw when using adjusting tools such as SST and a screwdriver.
- Insert the feeler gauge into the center of the roller surface, parallel to valve rocker arm No. 1.
- HINT:
- If the clearance is not as specified, record the out-of-specification measurement, then adjust the valve clearance.
Check the valve clearance of the No. 3 cylinder intake valve and the No. 4 cylinder exhaust valve.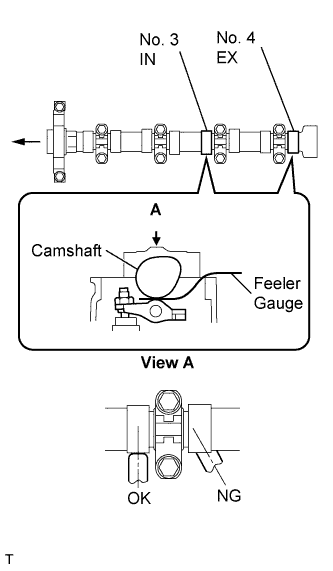
Turn the crankshaft by a further 180° clockwise.
Using a feeler gauge, measure the clearance between the camshaft and valve rocker arm No. 1 as shown in the illustration.
- Valve clearance (Cold):
- 0.11 to 0.17 mm (0.004 to 0.007 in.) for intake
- 0.14 to 0.20 mm (0.006 to 0.008 in.) for exhaust
- NOTICE:
- Insert the feeler gauge into the center of the roller surface, parallel to valve rocker arm No. 1.
- Do not apply excessive force to the valve adjusting screw when using adjusting tools such as SST and a screwdriver.
- Insert the feeler gauge into the center of the roller surface, parallel to valve rocker arm No. 1.
- HINT:
- If the clearance is not as specified, record the out-of-specification measurement, then adjust the valve clearance.
Check the valve clearance of the No. 2 cylinder intake valve and the No. 4 cylinder intake valve.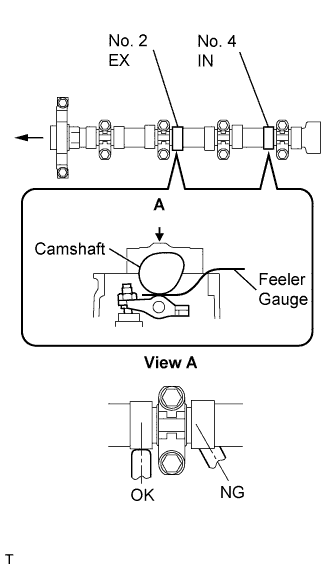
Turn the crankshaft by a further 180° clockwise.
Using a feeler gauge, measure the clearance between the camshaft and valve rocker arm No. 1 as shown in the illustration.
- Valve clearance (Cold):
- 0.11 to 0.17 mm (0.004 to 0.007 in.) for intake
- 0.14 to 0.20 mm (0.006 to 0.008 in.) for exhaust
- NOTICE:
- Insert the feeler gauge into the center of the roller surface, parallel to valve rocker arm No. 1.
- Do not apply excessive force to the valve adjusting screw when using adjusting tools such as SST and a screwdriver.
- Insert the feeler gauge into the center of the roller surface, parallel to valve rocker arm No. 1.
- HINT:
- If the clearance is not as specified, record the out-of-specification measurement, then adjust the valve clearance.
| 37. ADJUST VALVE CLEARANCE |
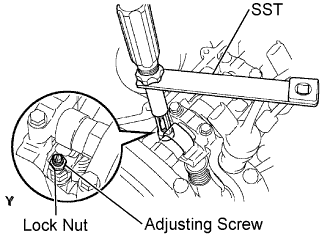 |
Using SST and a screwdriver, loosen the valve adjusting nut while keeping the valve adjusting screw in position.
- SST
- 09248-56010
Adjust the valve clearance (intake side).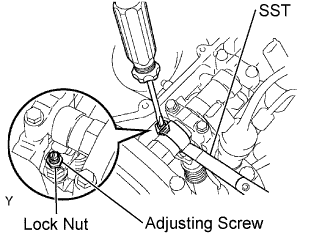
Insert a thickness gauge (0.14 mm (0.006 in.)) between the camshaft and valve rocker arm No. 1, and turn the valve adjusting screw to adjust it.
- Valve clearance (Cold):
- 0.14 mm (0.006 in.)
Using SST and a screwdriver, tighten the valve adjusting nut while keeping the adjusting screw in position.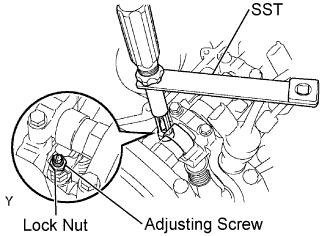
- Torque:
- with SST:
- 13 N*m{ 133 kgf*cm , 9.6 ft.*lbf }
- with out SST:
- 20 N*m{ 204 kgf*cm , 15 ft.*lbf }
- SST
- 09248-56010
Adjust the valve clearance (exhaust side).
- Valve clearance (Cold):
- 0.17 mm (0.007 in.)
- HINT:
- Perform the same procedure as for the intake valve clearance adjustment.
| 38. INSTALL CYLINDER HEAD COVER SUB-ASSEMBLY |
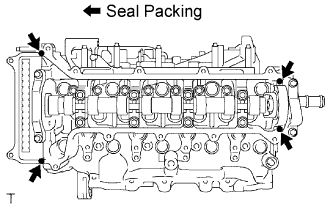 |
Install the cylinder head gasket onto the cylinder head cover.
Apply seal packing to the 4 locations shown in the illustration, then install the cylinder head cover.
- Seal packing:
- Part No. 08826-00080 or the equivalent
- NOTICE:
- Remove any oil from the contact surface.
- Install the cylinder head cover within 3 minutes, and tighten the bolts within 15 minutes of applying the seal packing.
- Remove any oil from the contact surface.
Temporarily tighten the cylinder head cover with the 12 bolts.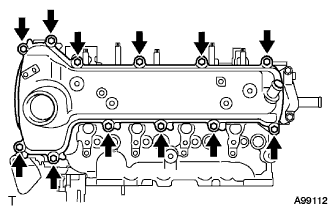
Tighten the bolts to the specified torque as shown in the illustration.
- Torque:
- 13 N*m{ 133 kgf*cm , 10 ft.*lbf }
| 39. INSTALL OIL FILLER CAP SUB-ASSEMBLY |
Install the oil filler cap gasket onto the oil filler cap.
Install the oil filler cap onto the cylinder head cover.