REASSEMBLY
Removal / installation · Vehicles built from Nov 2006
| 1. INSTALL STIFFENING CRANKCASE ASSEMBLY |

Apply seal packing in a continuous bead (diameter: 2.5 mm (0.098 in.)) to the places shown in the illustration.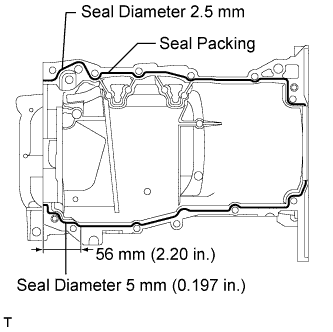

- Seal packing:
- Toyota Genuine Seal Packing Black, Three bond 1207B or equivalent
- NOTICE:
- Remove any oil from the contact surface.
- Install the crankcase within 3 minutes of applying the seal packing.
- Do not start the engine for at least 2 hours after installing the stiffening crankcase.
- Remove any oil from the contact surface.
Install the stiffening crankcase with the 11 bolts.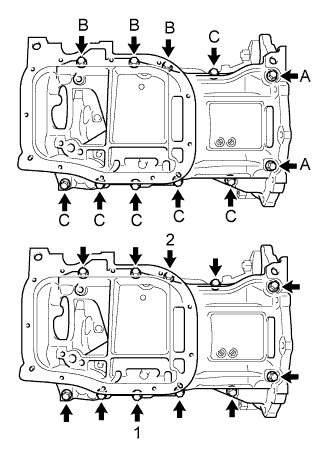
- Torque:
- 21 N*m{ 214 kgf*cm , 16 ft.*lbf }
- Bolt length:
Item
Length
Bolt A
138 mm (5.43 in.)
Bolt B
35 mm (1.38 in.)
Bolt C
70 mm (2.76 in.)
Recheck the torque for bolts 1 and 2.
- Torque:
- 21 N*m{ 214 kgf*cm , 16 ft.*lbf }
Wipe off any excess seal packing with a clean piece of cloth.
| 2. INSTALL OIL PUMP ASSEMBLY |
Install the oil pump assembly with the 3 bolts.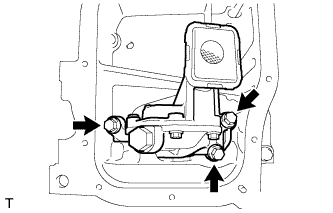
- Torque:
- 21 N*m{ 214 kgf*cm , 16 ft.*lbf }
| 3. INSTALL NO. 2 OIL PAN SUB-ASSEMBLY |
Remove any old packing material from the contact surface.
Apply seal packing in a continuous bead (diameter: 4 mm (0.157 in.)) to the places shown in the illustration.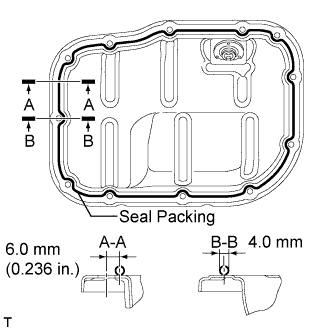
- Seal packing:
- Toyota Genuine Seal Packing Black, Three bond 1207B or equivalent
- NOTICE:
- Remove any oil from the contact surface.
- Install the No. 2 oil pan sup-assembly within 3 minutes and tighten the bolts within 15 minutes of applying the seal packing.
- Do not expose the seal to engine oil for 2 hours after installation.
- Remove any oil from the contact surface.
Install the No. 2 oil pan sub-assembly with the 10 bolts and 2 nuts.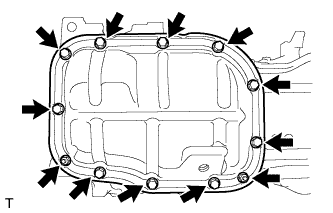
- Torque:
- 10 N*m{ 102 kgf*cm , 7 ft.*lbf }
| 4. INSTALL OIL PAN DRAIN PLUG |
Install a new gasket and the oil pan drain plug.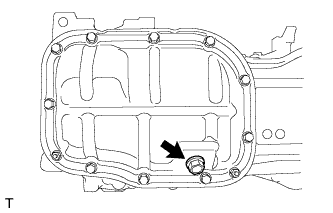
- Torque:
- 37 N*m{ 377 kgf*cm , 27 ft.*lbf }
| 5. INSTALL CYLINDER BLOCK WATER DRAIN COCK ASSEMBLY |
Apply adhesive to the threads of the drain cock.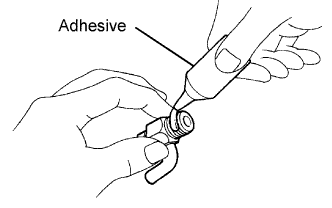
- Adhesive:
- Toyota Genuine Adhesive 1344, Three Bond 1344 or equivalent
Install the water drain cock as shown in the illustration.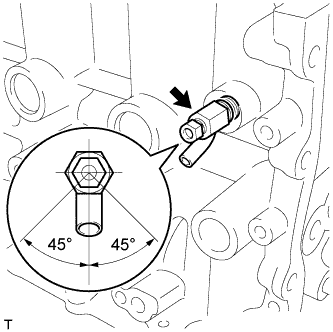
- Torque:
- 20 N*m{ 204 kgf*cm , 15 ft.*lbf }
- NOTICE:
- Do not rotate the drain cock more than 1 revolution (360°) after tightening it to the specified torque.
- Install the water drain cock within 3 minutes after applying the adhesive.
- Do not start the engine for at least 2 hours after installing the water drain cock.
- Do not rotate the drain cock more than 1 revolution (360°) after tightening it to the specified torque.
Install the water drain cock plug to the water drain cock.
- Torque:
- 13 N*m{ 130 kgf*cm , 9 ft.*lbf }
| 6. INSTALL VENTILATION VALVE SUB-ASSEMBLY |
Apply adhesive to the threads of the ventilation valve.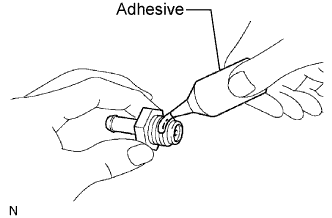
Install the ventilation valve.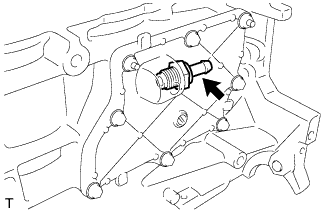
- Torque:
- 20 N*m{ 204 kgf*cm , 15 ft.*lbf }
- Adhesive:
- Toyota Genuine Adhesive 1324, Three Bond 1324 or equivalent
- NOTICE:
- Install the crankcase within 3 minutes after applying the adhesive.
- Do not start the engine for at least 2 hours after installing the ventilation valve.
- Install the crankcase within 3 minutes after applying the adhesive.
| 7. INSTALL CYLINDER HEAD GASKET |
Place a new cylinder head gasket on the cylinder block with the Lot No. stamp facing upward.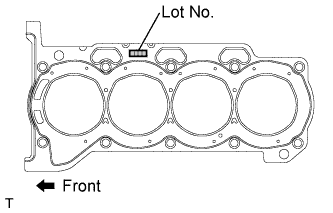
- NOTICE:
- Remove any oil from the contact surface.
- Pay attention to the mounting orientation of the cylinder head gasket.
- Do not damage the cylinder gasket when installing the cylinder head onto the cylinder block.
- Remove any oil from the contact surface.
| 8. INSTALL CYLINDER HEAD SUB-ASSEMBLY |
- HINT:
- The cylinder head bolts are tightened in 2 successive steps.
Apply a light coat of engine oil to the threads of the cylinder head bolts.
Using several steps, install and tighten the 10 cylinder head bolts and plate washers uniformly with as a 10 mm bi-hexagon wrench in the sequence shown in the illustration.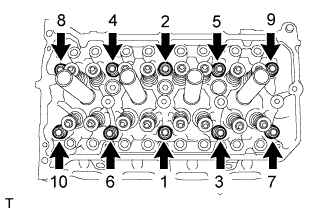
- Torque:
- 49 N*m{ 500 kgf*cm , 36 ft.*lbf }
Mark the front of the cylinder head bolt with paint.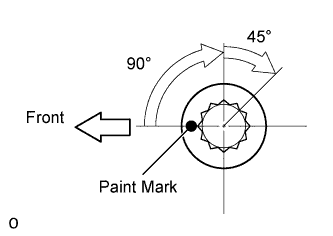
Retighten the cylinder head bolts by additional 90° and one more additional 45° as shown in the illustration.
Check that the paint mark is now at a 135° angle from the front.
| 9. INSTALL VALVE LASH ADJUSTER ASSEMBLY |
- NOTICE:
- Keep the lash adjuster free of dirt and foreign objects.
- Only use clean engine oil.
- Keep the lash adjuster free of dirt and foreign objects.
Place the lash adjuster into a container filled with engine oil.
Insert the SST's tip into the lash adjuster's plunger and use the tip to press down on the check ball inside the plunger.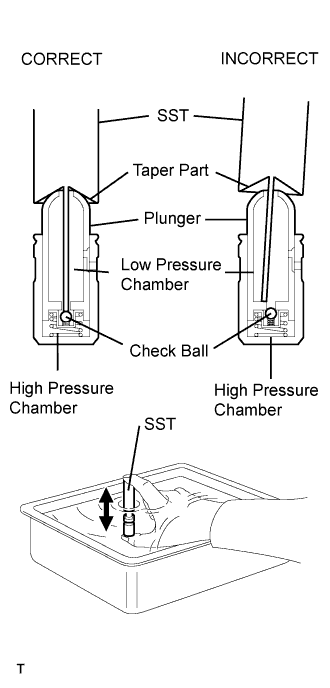
- SST
- 09276-75010
Squeeze the SST and lash adjuster together to move the plunger up and down 5 or 6 times.
Check the movement of the plunger and bleed the air.
- OK:
- Plunger moves up and down.
- NOTICE:
- When bleeding air from the high-pressure chamber, make sure that the tip of the SST is actually pressing the check ball as shown in the illustration. If the check ball is not pressed, air will not bleed.
After bleeding the air, remove the SST. Then, try to press the plunger quickly and firmly with a finger.
- OK:
- Plunger is very difficult to move.
Install the lash adjusters.
- NOTICE:
- Install the lash adjuster into its original position.
| 10. INSTALL NO. 1 VALVE ROCKER ARM SUB-ASSEMBLY |
Apply engine oil to the lash adjuster tip and valve stem cap end.
Install the valve rocker arms as shown in the illustration.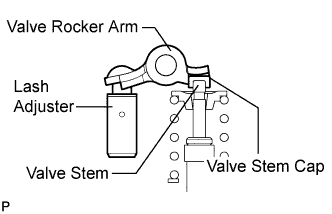
| 11. INSTALL NO. 1 CAMSHAFT BEARING |
Clean the both surfaces of the bearing.
Install the 2 No. 1 camshaft bearings.
Using vernier calipers, measure the distance between the bearing cap's edge and the camshaft bearing's edge.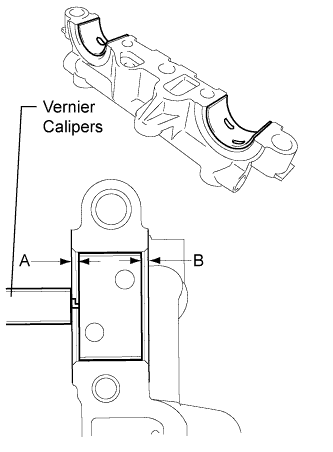
- Dimension (A - B):
- 0.7 mm (0.0276 in.) or less
- NOTICE:
- Position the bearing to the center of the bearing cap by measuring dimension A - B.
| 12. INSTALL OIL CONTROL VALVE FILTER |
Check that there is no foreign matter on the mesh part of the filter.
Install the oil control valve filter.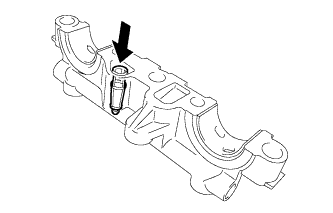
- NOTICE:
- Do not touch the mesh when installing the oil control valve filter.
| 13. INSTALL NO. 2 CAMSHAFT BEARING |
Clean the both surfaces of the bearing.
Install the 2 No. 2 camshaft bearings.
Using vernier calipers, measure the distance between the bearing cap's edge and the camshaft bearing's edge.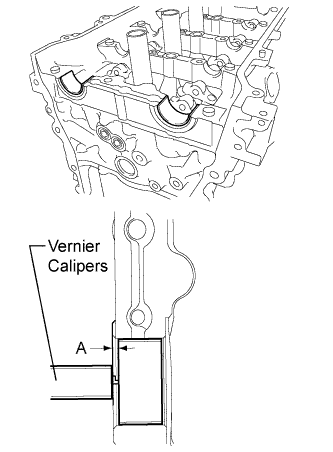
- Dimension (A):
- 1.05 to 1.75 mm (0.042 to 0.068 in.)
- NOTICE:
- Position the bearing to the center of the bearing cap by measuring dimension A.
| 14. INSTALL NO. 2 CAMSHAFT |
Clean the camshaft journals.
Apply a light coat of engine oil to the camshaft journals, camshaft housings and bearing caps.
Install the No. 2 camshaft to the camshaft housing.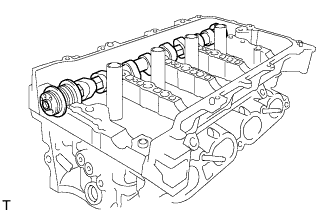
| 15. INSTALL CAMSHAFT |
Clean the camshaft journals.
Apply a light coat of engine oil to the camshaft journals, camshaft housings and bearing caps.
Install the camshaft to the camshaft housing.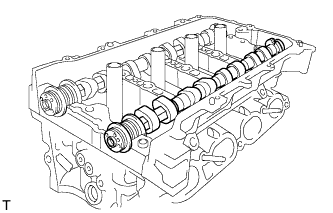
| 16. INSTALL CAMSHAFT BEARING CAP |
Apply engine oil to the camshaft journals, camshaft housing and bearing caps.
Check the marks and numbers on the camshaft bearing caps and place them in the proper position and direction.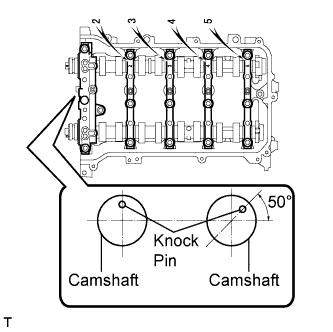
- HINT:
- Make sure that the knock pin of the camshaft is positioned as shown in the illustration.
Tighten the 10 bolts in the order shown in the illustration.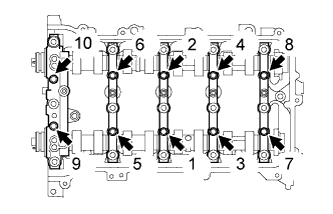
- Torque:
- 16 N*m{ 163 kgf*cm , 12 ft.*lbf }
| 17. INSTALL CAMSHAFT HOUSING SUB-ASSEMBLY |
Make sure that the valve rocker arm is installed as shown in the illustration.
Apply seal packing in a continuous line as shown in the illustration.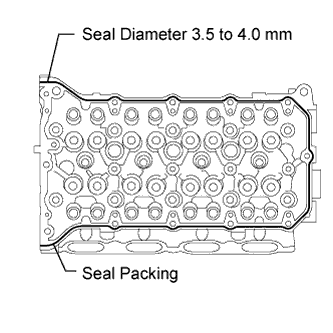
- Seal packing:
- Toyota Genuine Seal Packing Black, Three Bond 1207B or equivalent
- Seal diameter:
- 3.5 to 4.0 mm (0.138 to 0.158 in.)
- NOTICE:
- Remove any oil from the contact surface.
- Install the camshaft housing sub-assembly RH within 3 minutes of applying the seal packing.
- Do not start the engine for at least 2 hours after installing.
- Remove any oil from the contact surface.
Set the camshaft and No. 2 camshaft as shown in the illustration.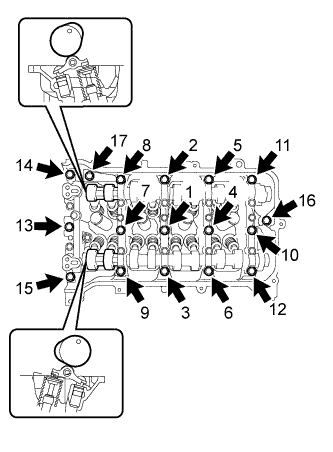
Install the camshaft housing and tighten the 17 bolts in the order shown in the illustration.
- Torque:
- 27 N*m{ 275 kgf*cm , 20 ft.*lbf }
- NOTICE:
- After installing the camshaft housing, make sure that the cam lobes are positioned as shown in the illustration.
- If any of the bolts are loosened during installation, remove the camshaft housing, clean the installation surfaces, and reapply seal packing.
- If the camshaft housing is removed because any of the bolts are loosened during installation, make sure that the previously applied seal packing does not enter any oil passages.
- After installing the camshaft housing, wipe off any seal packing that seeped out from between the housing and the cylinder head.
- After installing the camshaft housing, make sure that the cam lobes are positioned as shown in the illustration.
| 18. INSTALL CAMSHAFT TIMING GEAR ASSEMBLY |
Check that the knock pin is installed on the camshaft.
Put the camshaft timing gear and camshaft together with the straight pin and key groove misaligned, as shown in the illustration.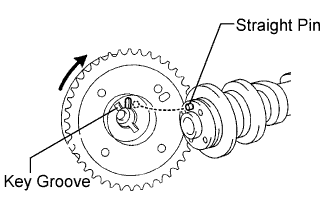
- NOTICE:
- Do not forcefully push in the camshaft timing gear assembly. This may cause the camshaft knock pin tip to damage the installation surface of the camshaft timing gear assembly.
Turn the camshaft timing gear as shown in the illustration while pushing it gently against the camshaft. Push further at the position where the pin fits into the groove.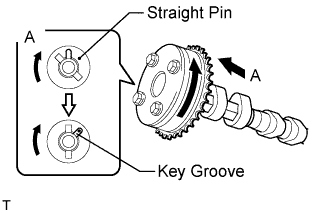
- NOTICE:
- Do not turn the camshaft timing gear in the retard direction (the right angle).
Check that there is no clearance between the gear and camshaft.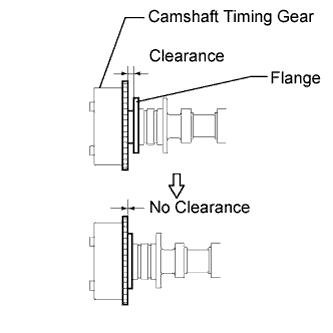
Tighten the flange bolt with the camshaft timing gear fixed in place.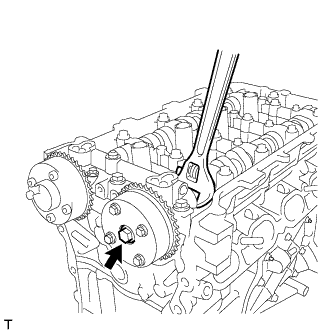
- Torque:
- 54 N*m{ 551 kgf*cm , 40 ft.*lbf }
Check that the camshaft timing gear can move to the retard angle side (the right direction) and is locked in the most retarded position.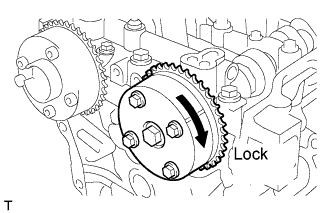
| 19. INSTALL CAMSHAFT TIMING EXHAUST GEAR ASSEMBLY |
Check that the knock pin is installed on the camshaft.
Put the camshaft timing exhaust gear and camshaft together by aligning the key groove and straight pin.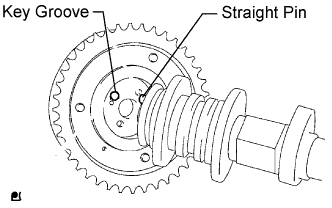
Lightly press the gear against the camshaft, and turn the gear. Push further at the position where the pin enters the groove.
- NOTICE:
- Be sure not to turn the camshaft timing exhaust gear in the retard direction (the right angle).
Check that there is no clearance between the gear's flange and the camshaft.
Tighten the flange bolt with the camshaft timing exhaust gear fixed.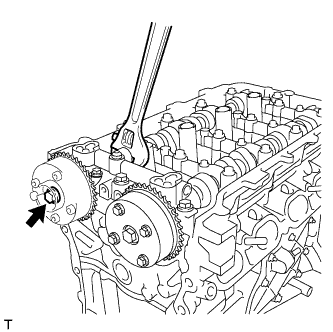
- Torque:
- 54 N*m{ 551 kgf*cm , 40 ft.*lbf }
Check the camshaft timing exhaust gear lock.
Make sure that the camshaft timing exhaust gear is locked.
| 20. INSTALL NO. 1 CRANKSHAFT POSITION SENSOR PLATE |
Install the sensor plate with the "F" mark facing forward.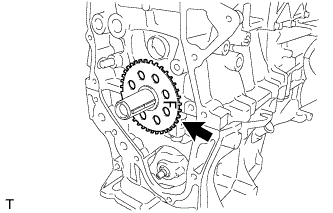
| 21. INSTALL CRANKSHAFT TIMING GEAR KEY |
Using a plastic-faced hammer, tap in the 2 crankshaft timing gear keys.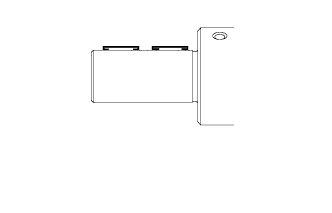
- HINT:
- Tap in the crankshaft timing gear keys until they come in contact with the crankshaft.
| 22. INSTALL NO. 2 CHAIN SUB-ASSEMBLY |
Set the crankshaft key as shown in the illustration.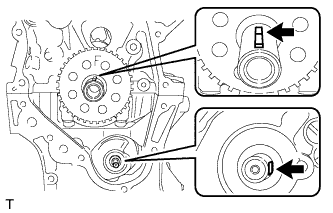
Turn the drive shaft so that the cutout faces right.
Align the yellow mark links with the timing marks of each gear as shown in the illustration.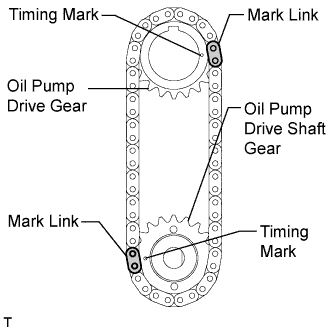
Install the gears onto the crankshaft and oil pump shaft with the chain on the gears.
Temporarily tighten the oil pump drive shaft gear with the nut.
Insert the damper spring into the adjusting hole, and then install the chain tensioner plate with the bolt.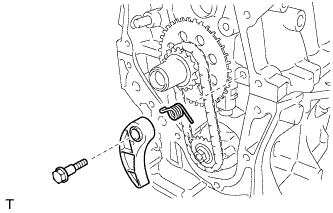
- Torque:
- 10 N*m{ 102 kgf*cm , 7 ft.*lbf }
Align the adjusting hole of the oil pump drive shaft gear with the groove of the oil pump.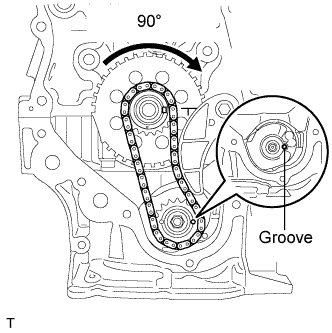
Insert a 4 mm diameter bar into the adjusting hole of the oil pump drive shaft gear to lock the gear in position, and then tighten the nut.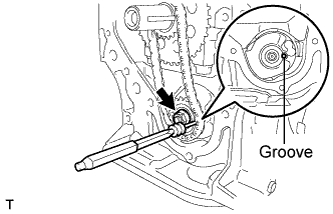
- Torque:
- 28 N*m{ 286 kgf*cm , 21 ft.*lbf }
| 23. INSTALL CRANKSHAFT TIMING GEAR OR SPROCKET |
Install the crankshaft timing gear or sprocket.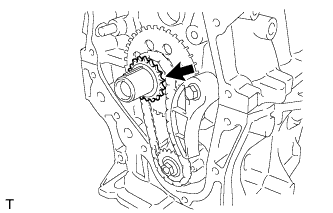
| 24. INSTALL NO. 1 CHAIN VIBRATION DAMPER |
Install the No. 1 chain vibration damper with the 2 bolts.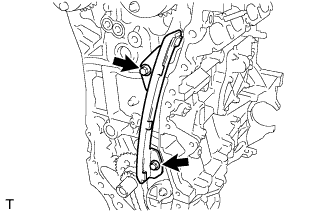
- Torque:
- 21 N*m{ 214 kgf*cm , 16 ft.*lbf }
| 25. INSTALL NO. 2 CHAIN VIBRATION DAMPER |
Install the No. 2 chain vibration damper with the 2 bolts.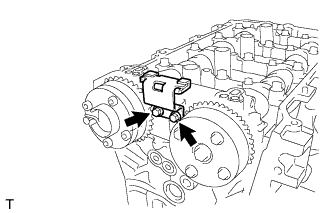
- Torque:
- 10 N*m{ 102 kgf*cm , 7 ft.*lbf }
| 26. INSTALL CHAIN SUB-ASSEMBLY |
Check the No. 1 cylinder TDC/compression.
Temporarily tighten the crankshaft pulley bolt.
Turn the crankshaft counterclockwise until the timing gear key is facing up.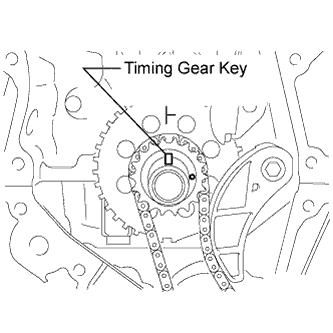
Remove the crankshaft pulley bolt.
Check the timing mark on each camshaft timing gear.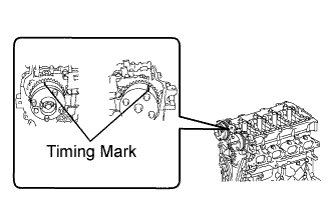
Align the mark plate (orange) with the timing mark as shown in the illustration and install the chain.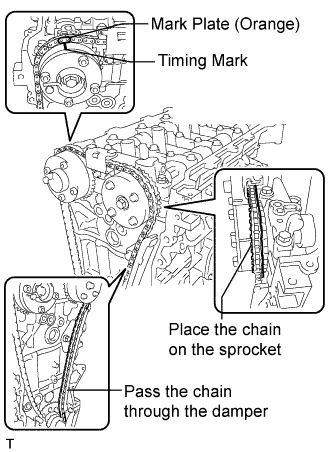
- HINT:
- Be sure to position the mark plate at the front of the engine.
- The mark plate on the camshaft side is colored orange.
- Do not pass the chain around the sprocket of the camshaft timing gear assembly. Only place it on the sprocket.
- Pass the chain through the No. 1 vibration damper.
- Be sure to position the mark plate at the front of the engine.
Place the chain on the crankshaft without passing it around the shaft.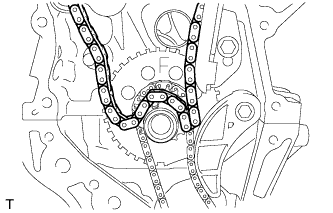
Hold the hexagonal portion of the camshaft with a wrench and turn the camshaft timing gear assembly counterclockwise to align the mark plate (orange) and timing mark.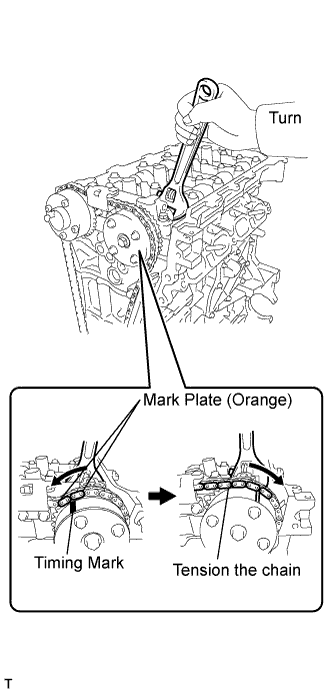
- HINT:
- Be sure to position the mark plate at the front of the engine.
- The mark plate on the camshaft side is colored orange.
- Be sure to position the mark plate at the front of the engine.
Hold the hexagonal portion of the camshaft with a wrench and turn the camshaft timing gear assembly clockwise.
- HINT:
- When tensioning the chain, turn the camshaft timing gear assembly clockwise slowly to prevent the chain from being misaligned.
Align the mark plate (yellow) and timing mark and install the chain to the crankshaft timing gear.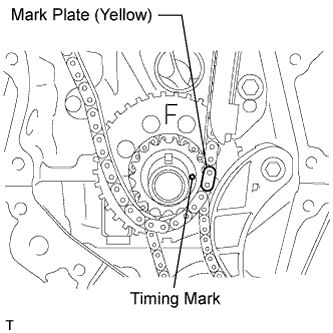
- HINT:
- The mark plate on the crankshaft side is colored yellow.
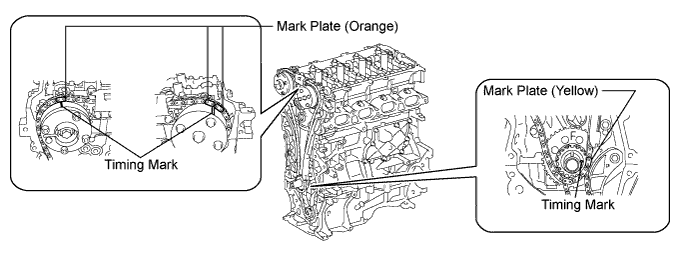
Recheck each timing mark at TDC/compression.
| 27. INSTALL CHAIN TENSIONER SLIPPER |
Install the chain tensioner slipper.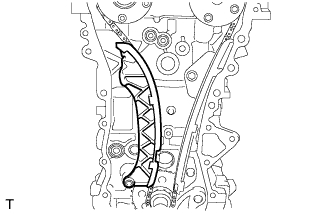
| 28. INSTALL NO. 1 GENERATOR BRACKET |
Install the No. 1 generator bracket with the 4 bolts.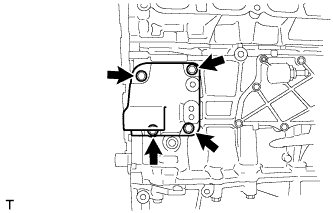
- Torque:
- 21 N*m{ 214 kgf*cm , 16 ft.*lbf }
| 29. INSTALL WATER INLET HOUSING |
Install a new gasket and the water inlet housing with the 3 bolts.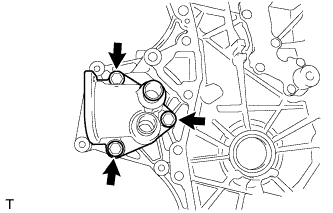
- Torque:
- 21 N*m{ 214 kgf*cm , 16 ft.*lbf }
| 30. INSTALL TIMING CHAIN OR BELT COVER SUB-ASSEMBLY |
Remove any old packing (FIPG) material and be careful not to drop any oil on the contact surfaces of the timing chain cover, cylinder head and cylinder block.
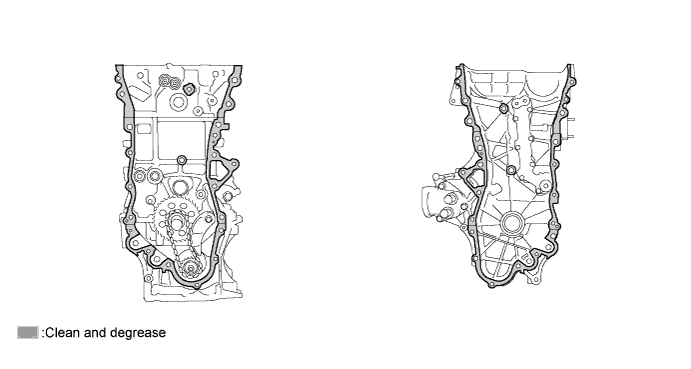
Install 3 new O-rings.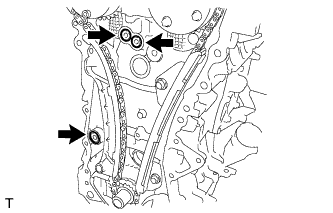
Apply seal packing as shown in the illustration.
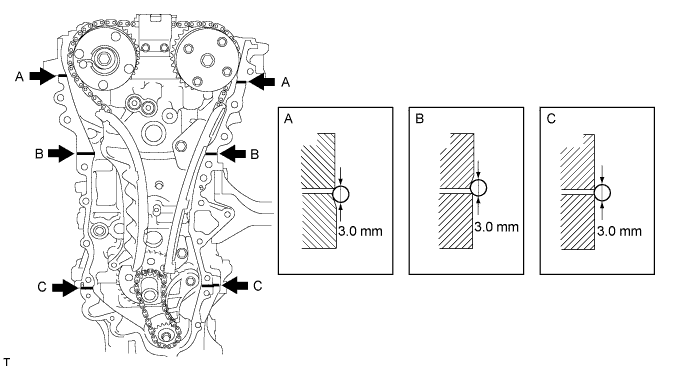
- Seal packing:
- Toyota Genuine Seal Packing Black, Three Bond 1207B or equivalent
- Seal diameter:
- 3.0 mm (0.118 in.)
- NOTICE:
- Remove any oil from the contact surface.
- Install the chain cover within 3 minutes of applying the seal packing.
- Do not start the engine for at least 2 hours after installing.
- Remove any oil from the contact surface.
Apply seal packing in a continuous line to the timing chain cover as shown in the following illustration.
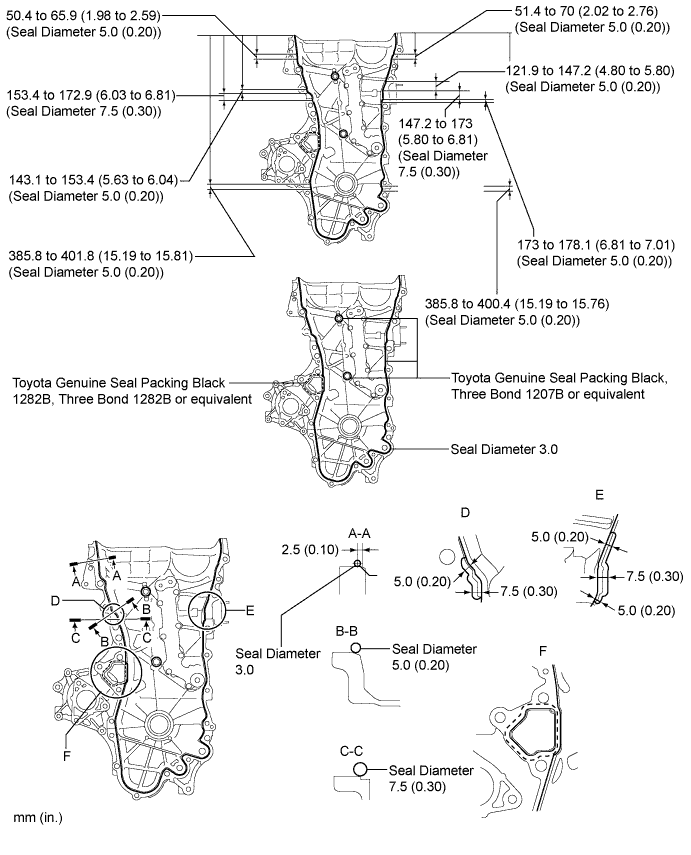
- NOTICE:
- When the contact surfaces are wet, wipe them with oil-free cloth before applying seal packing.
- Install the chain cover within 3 minutes and tighten the bolts within 15 minutes of applying the seal packing.
- Do not start the engine for at least 2 hours after installation.
- When the contact surfaces are wet, wipe them with oil-free cloth before applying seal packing.
- Apply seal packing as follows:
Area
Seal Packing Diameter
Application Position from Inside Seal Line
Seal packing
Continuous Line Area
3.0 mm (0.118 in.)
2.5 mm (0.098 in.)
Toyota Genuine Seal Packing Black, Three Bond 1207B or equivalent
Dashed Line Area
4.0 mm (0.156 in.)
3.0 mm (0.118 in.)
Toyota Genuine Seal Packing Black 1282B, Three Bond 1282B or equivalent
Install a new gasket.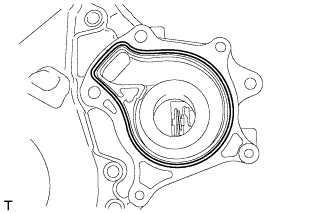
- NOTICE:
- Remove any oil from the contact surface.
Install 2 new O-rings.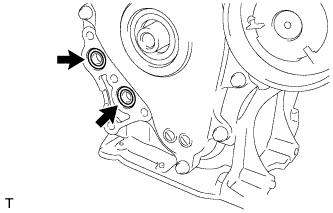
Install the timing chain cover with the 19 bolts as shown in the illustration.
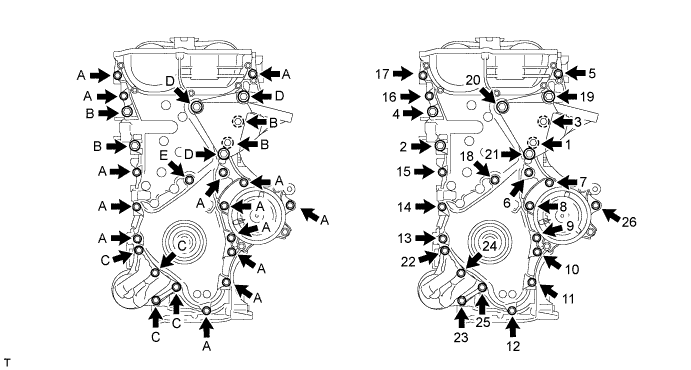
- Torque:
- Bolt A and C:
- 21 N*m{ 214 kgf*cm , 16 ft.*lbf }
- Bolt B and D:
- 43 N*m{ 439 kgf*cm , 32 ft.*lbf }
- Bolt E:
- 10 N*m{ 102 kgf*cm , 7 ft.*lbf }
- NOTICE:
- When the contact surfaces are wet, wipe them with oil-free cloth before applying seal packing.
- Install the chain cover within 3 minutes and tighten the bolts within 15 minutes of applying seal packing.
- Do not start the engine for at least 2 hours after installation.
- Tighten bolt D through the engine mounting bracket, pressing it against the timing chain or belt cover sub-assembly.
- Tighten bolt C through the oil filter bracket, pressing it against the timing chain or belt cover sub-assembly.
- When the contact surfaces are wet, wipe them with oil-free cloth before applying seal packing.
- Bolt length:
Item
Length
Bolt A and C
35 mm (1.38 in.)
Bolt B
55 mm (2.16 in.)
Bolt D
80 mm (3.15 in.)
Bolt E
40 mm (1.57 in.)
Install the water pump with the 3 bolts.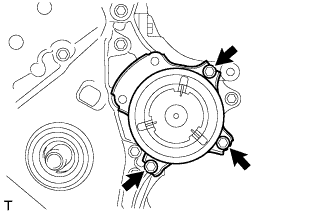
- Torque:
- 24 N*m{ 245 kgf*cm , 18 ft.*lbf }
| 31. INSTALL THERMOSTAT |
Install a new gasket onto the thermostat.
Install the thermostat with the jiggle valve facing upward.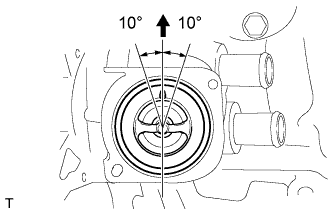
- HINT:
- The jiggle valve may be set within 10° on either side, as shown in the illustration.
| 32. INSTALL WATER INLET |
Install the water inlet with the 2 nuts.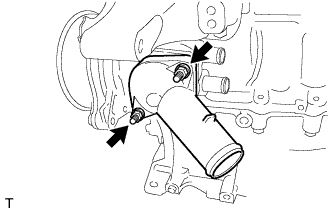
- Torque:
- 10 N*m{ 102 kgf*cm , 7 ft.*lbf }
| 33. INSTALL CRANKSHAFT PULLEY |
Align the pin hole in the crankshaft pulley with the pin position and install the crankshaft pulley.
Provisionally install the bolt.
Using SST, tighten the bolt while holding the crankshaft pulley.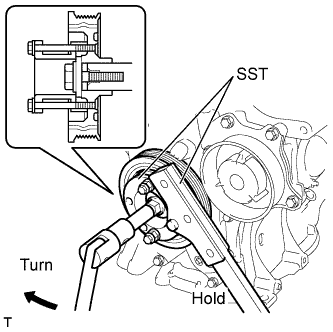
- SST
- 09213-54015
(91651-60855)
09330-00021
- Torque:
- 190 N*m{ 1940 kgf*cm , 140 ft.*lbf }
- NOTICE:
- Check the SST installation positions when installing them, to avoid the SST fixing bolts from coming into contact with the timing chain or belt cover sub-assembly.
| 34. INSTALL ENGINE OIL PRESSURE SWITCH ASSEMBLY |
Apply adhesive to 2 or 3 threads of the oil pressure switch.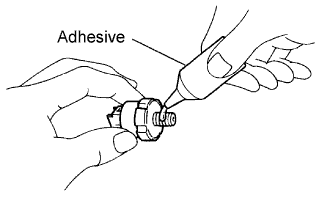
- Adhesive:
- Toyota Genuine Adhesive 1344, Three Bond 1344 or equivalent
Using a 24 mm deep socket wrench, install the oil pressure switch.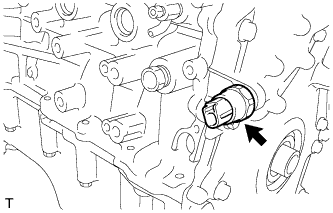
- Torque:
- 15 N*m{ 153 kgf*cm , 11 ft.*lbf }
- NOTICE:
- Install the oil pressure switch within 3 minutes of applying the adhesive.
- Do not start the engine within 1 hour of installation.
- Install the oil pressure switch within 3 minutes of applying the adhesive.
| 35. INSTALL ENGINE WATER TEMPERATURE SENSOR |
Install a new gasket to the engine water temperature sensor.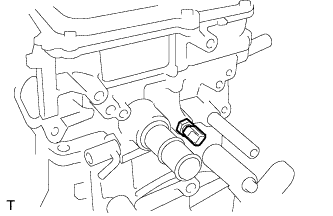
Install the engine water temperature sensor.
- Torque:
- 20 N*m{ 204 kgf*cm , 15 ft.*lbf }
| 36. INSTALL KNOCK SENSOR |
Install the knock sensor with the bolt.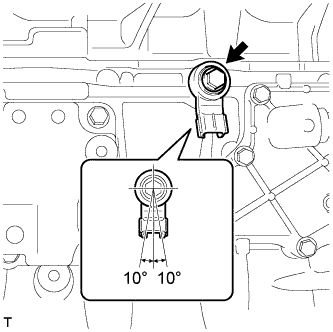
- Torque:
- 21 N*m{ 214 kgf*cm , 16 ft.*lbf }
- NOTICE:
- Make sure that the knock sensor is in the correct position.
| 37. INSTALL NO. 1 TAPER SCREW PLUG |
Apply adhesive to 2 or 3 threads of the plug, and install the plug.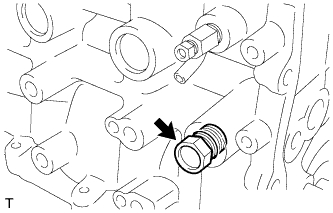
- Torque:
- 43 N*m{ 439 kgf*cm , 32 ft.*lbf }
- NOTICE:
- Install the plug within 3 minutes of applying the adhesive.
- Do not start the engine within 1 hour of installation.
- Install the plug within 3 minutes of applying the adhesive.
- Adhesive:
- Toyota Genuine Adhesive 1324, Three Bond 1324 or equivalent
| 38. INSTALL CRANKSHAFT POSITION SENSOR |
Apply a light coat of engine oil to the O-ring of the sensor.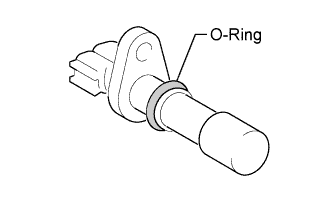
Install the crankshaft position sensor with the bolt.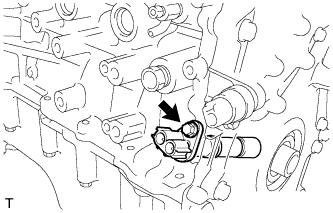
- Torque:
- 10 N*m{ 102 kgf*cm , 7 ft.*lbf }
| 39. INSTALL NO. 1 CHAIN TENSIONER ASSEMBLY |
Release the ratchet pawl, then fully push in the plunger and hook the hook on the pin so that the plunger is in the position shown in the illustration.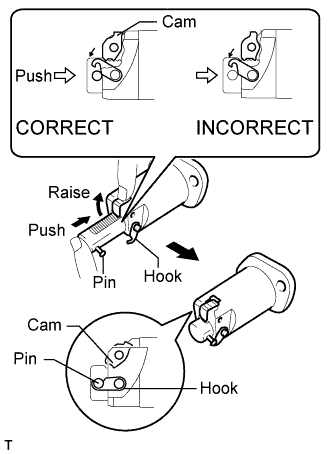
- NOTICE:
- Make sure that the cam engages the first tooth of the plunger to allow the hook to pass over the pin.
Install a new gasket, bracket and the No. 1 chain tensioner with the 2 nuts.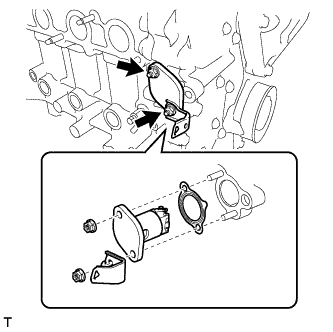
- Torque:
- 10 N*m{ 102 kgf*cm , 7 ft.*lbf }
- NOTICE:
- If the hook releases the plunger while the chain tensioner is being installed, set the hook again.
Turn the crankshaft counterclockwise, then disconnect the plunger knock pin from the hook.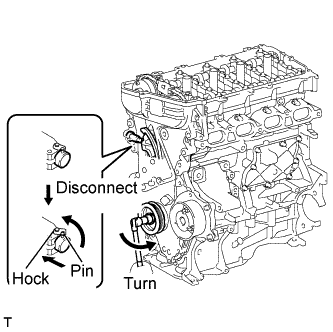
Turn the crankshaft clockwise, then check that the plunger is extended.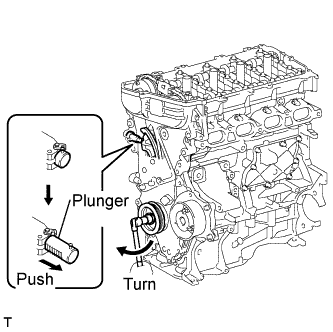
| 40. INSTALL OIL FILTER SUB-ASSEMBLY |
Clean the inside of the oil filter cap, threads and O-ring groove.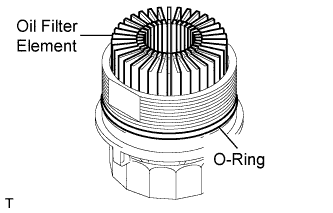
Apply a small amount of engine oil to a new O-ring and install it onto the oil filter cap.
Set a new oil filter element into the oil filter cap.
Remove any dirt or foreign matter from the installation surface of the engine.
Apply a small amount of engine oil to the O-ring again and install the oil filter cap.
Using SST, tighten the oil filter cap.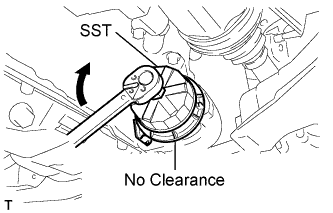
- SST
- 09228-06501
- Torque:
- 25 N*m{ 255 kgf*cm , 18 ft.*lbf }
- NOTICE:
- Make sure that the oil filter is installed securely as shown in the illustration.
- Be careful that the O-ring does not get caught between the parts.
- Make sure that the oil filter is installed securely as shown in the illustration.
| 41. INSTALL CYLINDER HEAD COVER GASKET |
Install the gasket to the cylinder head cover.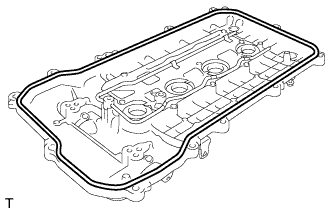
- NOTICE:
- Remove any oil from the contact surface.
| 42. INSTALL CYLINDER HEAD COVER SUB-ASSEMBLY |
Install 3 new gaskets onto the No. 1 camshaft bearing cap.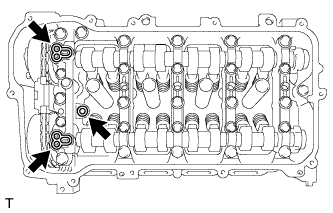
Apply seal packing as shown the illustration.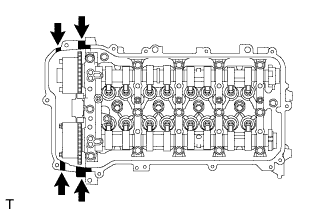
- Seal packing:
- Toyota Genuine Seal Packing Black, Three Bond 1207B or equivalent
- NOTICE:
- Remove any oil from the contact surface.
- Install the cylinder head cover within 3 minutes and tighten the bolts within 15 minutes of applying seal packing.
- Do not start the engine for at least 2 hours after the installation.
- Remove any oil from the contact surface.
Install the cylinder head cover with a new seal washer and the 13 bolts.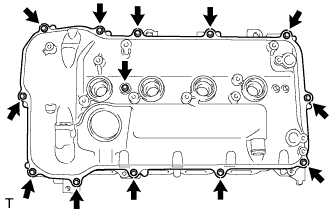
- Torque:
- 10 N*m{ 102 kgf*cm , 7 ft.*lbf }
| 43. INSTALL CAMSHAFT TIMING OIL CONTROL VALVE ASSEMBLY |
Apply a light coat of engine oil to 2 new O-rings, then install each of them onto the camshaft timing oil control valve.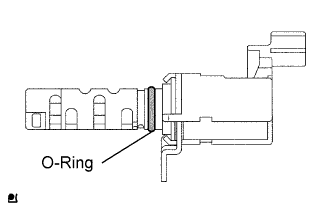
Install the 2 camshaft timing oil control valves and bracket with the 2 bolts.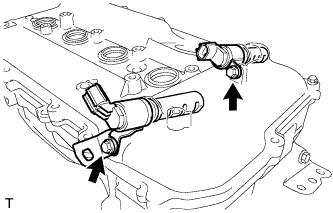
- Torque:
- 10 N*m{ 102 kgf*cm , 7 ft.*lbf }
| 44. INSTALL CAMSHAFT POSITION SENSOR |
Apply a light coat of engine oil to the O-ring of the sensor.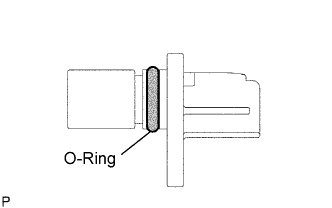
Install the 2 sensors with the 2 bolts.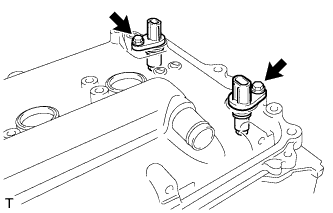
- Torque:
- 10 N*m{ 102 kgf*cm , 7 ft.*lbf }
| 45. INSTALL SPARK PLUG |
Using a socket wrench 14 mm, install the 4 spark plugs.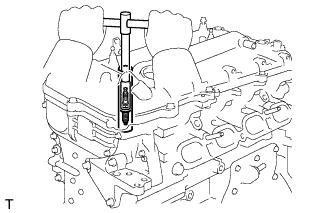
- Torque:
- 20 N*m{ 204 kgf*cm , 15 ft.*lbf }
| 46. INSTALL OIL FILLER CAP GASKET |
Install the gasket to the cap.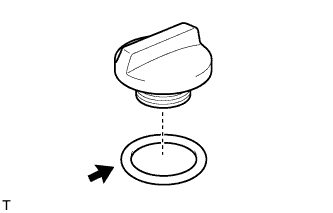
| 47. INSTALL OIL FILLER CAP SUB-ASSEMBLY |
Install the oil filler cap.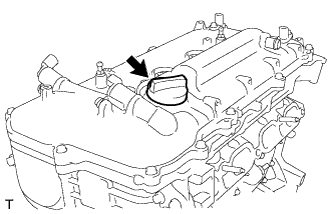
| 48. INSTALL ENGINE HANGER |
Install the 2 engine hangers with the 2 bolts.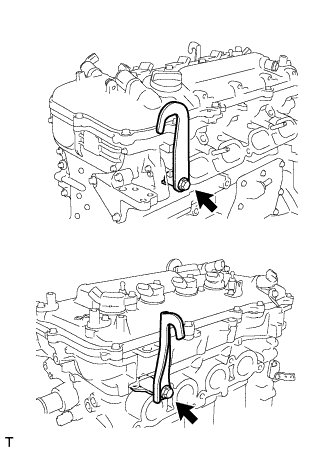
- Torque:
- 43 N*m{ 439 kgf*cm , 32 ft.*lbf }