INSTALLATION
Removal / installation · Vehicles built from Nov 2006
| 1. INSTALL GENERATOR ASSEMBLY |

Provisionally install the generator assembly with the bolt.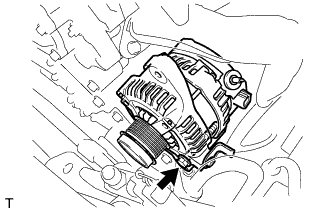

Provisionally install the fan belt adjusting bar and generator assembly with the 2 bolts.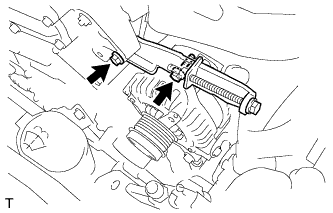
Tighten the bolt A to the specified torque.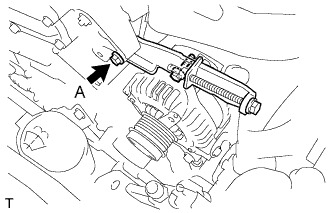
- Torque:
- 19 N*m{ 189 kgf*cm , 14 ft.*lbf }
Connect the connector and wire harness clamp.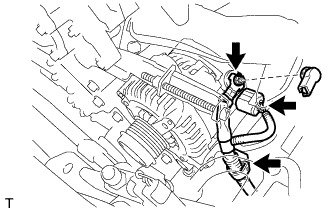
Install terminal B with the nut.
- Torque:
- 9.8 N*m{ 100 kgf*cm , 87 in.*lbf }
Install the terminal cap.
| 2. INSTALL TRANSVERSE ENGINE ENGINE MOUNTING BRACKET |
Install the engine mounting bracket with the 3 bolts.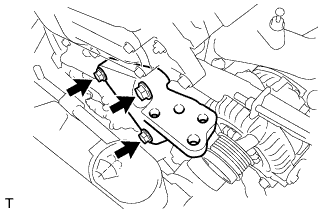
- Torque:
- 43 N*m{ 438 kgf*cm , 32 ft.*lbf }
| 3. INSTALL ENGINE MOUNTING INSULATOR SUB-ASSEMBLY RH |
Install the engine mounting insulator sub-assembly RH with the 6 bolts and nut.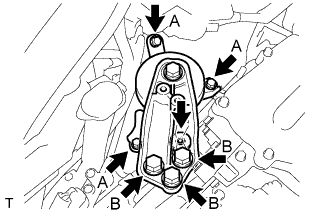
- Torque:
- 45 N*m{ 459 kgf*cm , 33 ft.*lbf } for bolt A
- 88 N*m{ 898 kgf*cm , 65 ft.*lbf } for bolt B
- 52 N*m{ 530 kgf*cm , 38 ft.*lbf } for nut
Install the engine mounting stay RH with the 2 bolts.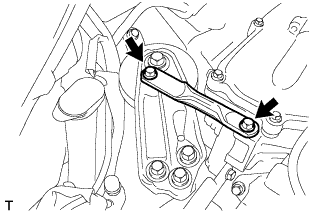
- Torque:
- 26 N*m{ 265 kgf*cm , 19 ft.*lbf }
| 4. INSTALL FAN AND GENERATOR V BELT |
Provisionally install the fan and generator V belt onto each pulley.
- NOTICE:
- Make sure that the V belt is securely fitted into the rib groove of the pulley.
| 5. ADJUST FAN AND GENERATOR V BELT |
Turn adjusting bolt C and adjust the tension of the V belt.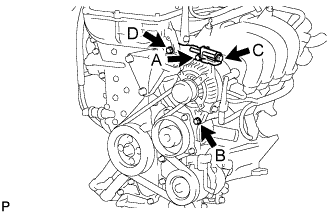
- NOTICE:
- Check that bolt D is tightened to the specified torque of 19 N*m (189 kgf*cm, 14 ft.*lbf).
Tighten fixing bolts A and B.
- Torque:
- 19 N*m{ 189 kgf*cm , 14 ft.*lbf } for bolt A
- 43 N*m{ 438 kgf*cm , 32 ft.*lbf } for bolt B
| 6. INSPECT FAN AND GENERATOR V BELT |
Check the V belt deflection and tension.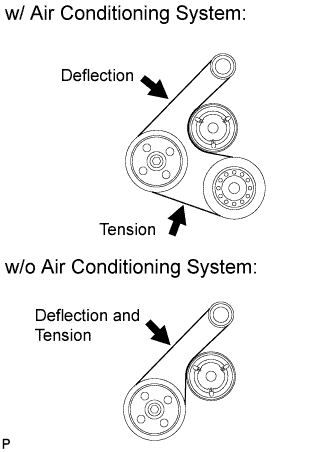
- Deflection:
Item
Specified Condition
New belt
7.5 to 8.6 mm (0.296 to 0.338 in.)
Used belt
8.0 to 10.0 mm (0.315 to 0.397 in.)
- Tension:
Item
Specified Condition
New belt
688 to 884 N (70 to 90 kg, 155 to 199 ld)
Used belt
402 to 598 N (40 to 61 kg, 90 to 134 ld)
- HINT:
- Check the V belt deflection at the specified point.
- When installing a new belt, set its tension to the specified value.
- When inspecting a belt which has been used for over 5 minutes, apply the Used Belt specifications.
- When reinstalling a belt which has been used for over 5 minutes, adjust its deflection and tension to the intermediate values of the Used Belt specifications.
- V belt tension and deflection should be checked after 2 revolutions of engine cranking.
- When checking the tension, use a sonic tension meter.
- Check the V belt deflection at the specified point.
- Weight:
- 15 g/rib*m
- Width:
- 6 ribs (21.36 mm)
- Span:
- 188 mm (w/ A/C)
- 282 mm (w/o A/C)
| 7. INSTALL NO. 2 CYLINDER HEAD COVER |
Disengage the 4 fittings shown and install the No. 2 cylinder head cover by applying pressure to it.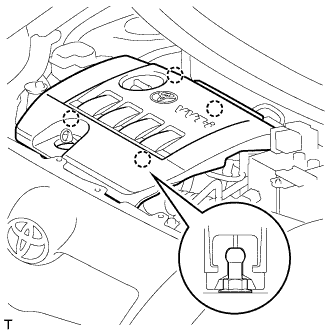
- HINT:
- Make sure that the oil and the engine oil level dipstick are correctly installed before installing the No. 2 cylinder head cover.
| 8. INSTALL ENGINE UNDER COVER RH |
- Torque:
- 5.0 N*m{ 51 kgf*cm , 44 in.*lbf }
| 9. CONNECT CABLE TO NEGATIVE BATTERY TERMINAL |
- Torque:
- 5.4 N*m{ 55 kgf*cm , 48 in.*lbf }