CURTAIN SHIELD AIRBAG ASSEMBLY (for Hatchback 3 Door) > INSTALLATION |
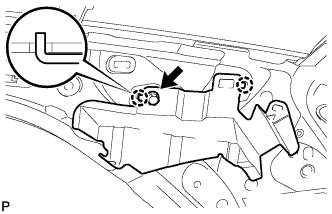
| 1. INSTALL ROOF SIDE RAIL BRACKET RH |
|
Insert the 2 hooks into the body holes and install the roof side rail bracket.
Install the wire harness clamp.
| 2. INSTALL CURTAIN SHIELD AIRBAG BRACKET RH |
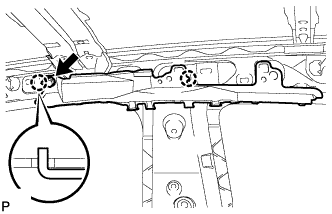 |
Insert the 2 hooks into the body holes and install the curtain shield airbag bracket.
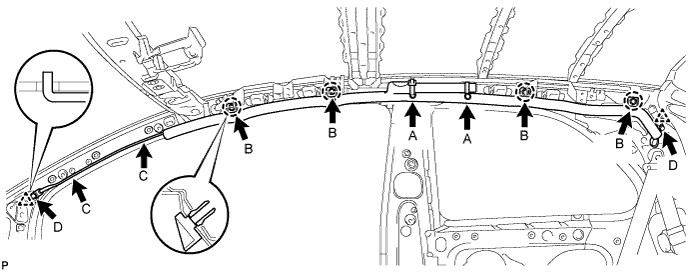
| 3. INSTALL CURTAIN SHIELD AIRBAG ASSEMBLY |
Tighten the 2 bolts A.
Tighten the 4 screws B.
Install front strap C.
Tighten the 2 bolts D.
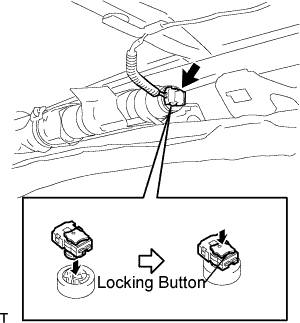 |
Connect the airbag connector.
| 4. INSTALL ROOF HEADLINING ASSEMBLY |
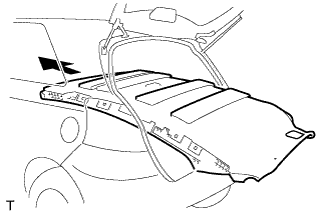 |
Pull the roof headlining back into the vehicle through the back door.
w/ Curtain Shield Airbag:
for 3 Point Type Rear Center Seat Belt:
for 2 Point Type Rear Center Seat Belt:
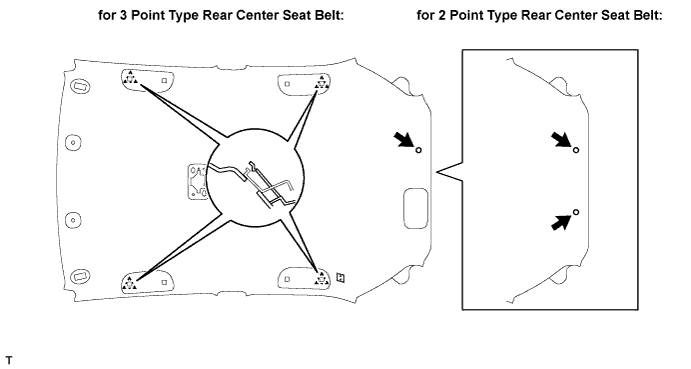
w/o Curtain Shield Airbag:
for 3 Point Type Rear Center Seat Belt:
for 2 Point Type Rear Center Seat Belt:
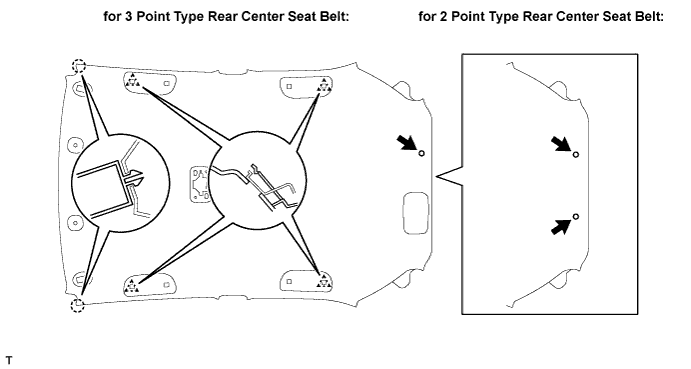
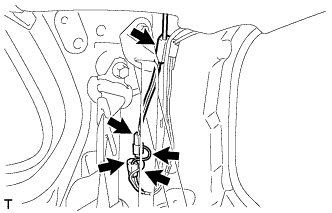 |
Install the 2 connectors.
Connect the 2 connectors.
Install the antenna cord onto the antenna cord clamp.
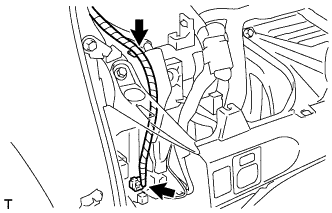 |
for LHD:
Connect the connector.
Install the wiring harness clamp.
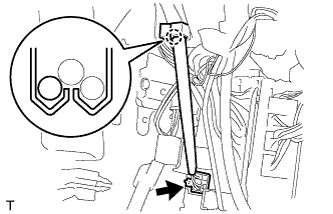 |
for RHD:
Connect the connector.
Install the No. 1 roof wire into the claw of the junction block.
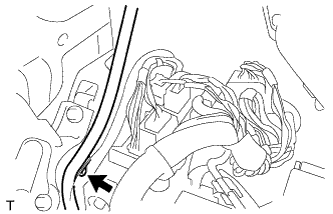 |
Install the wiring harness clamp.
| 5. INSTALL INSTRUMENT PANEL BOX (for LHD) |
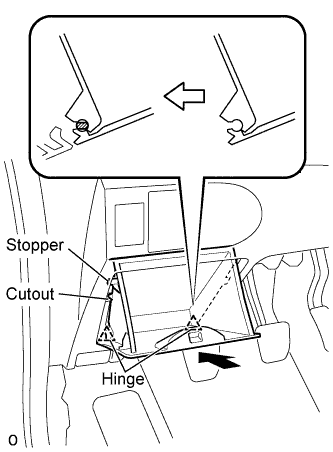 |
Insert the stopper of the instrument panel box from the cutout of the instrument panel lower.
Engage the 2 hinges with the instrument panel open.
Close the instrument panel box.
| 6. INSTALL INSTRUMENT PANEL SUB-ASSEMBLY UPPER |
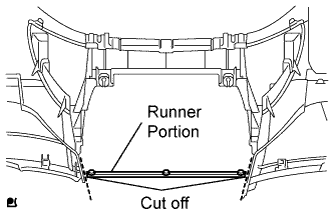 |
Using a nipper, cut off both ends of the runner portion shown in the illustration (When installing a new one).
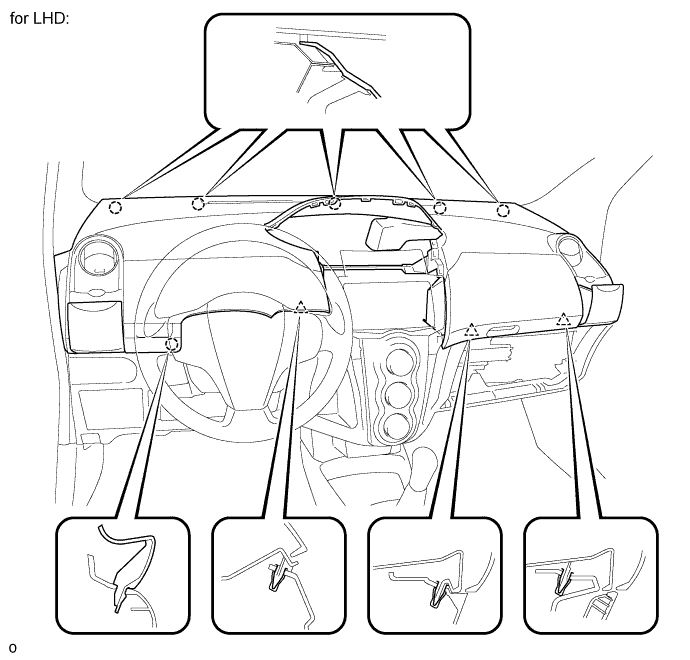
Engage the 5 claws at the upper side of the instrument panel.
Engage the claw and the 3 clips at the lower side of the instrument panel.
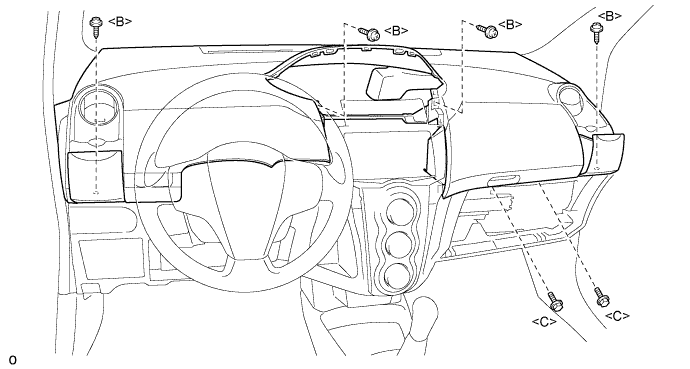
Install the instrument panel upper with the 2 <C> bolts and the 4 <B> screws.
Connect the connectors.
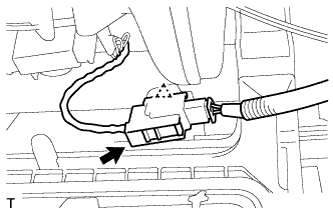 |
Connect the passenger airbag connector and clamp.
| 7. INSTALL SWITCH HOLE BASE (for LHD) |
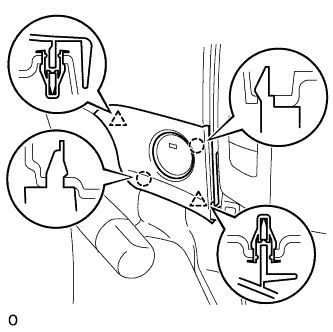 |
Disengage the 2 clips and 2 claws and install the switch hole base.
| 8. INSTALL GLOVE COMPARTMENT DOOR ASSEMBLY |
|
Using a nipper, cut off both ends of the runner portion shown in the illustration (When installing a new one).
Engage the 5 claws at the upper side of the instrument panel.
Engage the claw and the 3 clips at the lower side of the instrument panel.
Install the instrument panel upper with the 2 <C> bolts and the 4 <B> screws.
Connect the connectors.
|
Connect the passenger airbag connector and clamp.
| 9. INSTALL COMBINATION METER ASSEMBLY |
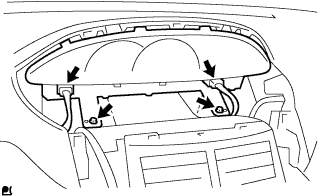 |
Install the combination meter assembly with the 2 screws.
Connect the 2 connectors.
| 10. INSTALL INSTRUMENT CLUSTER FINISH PANEL NO.1 |
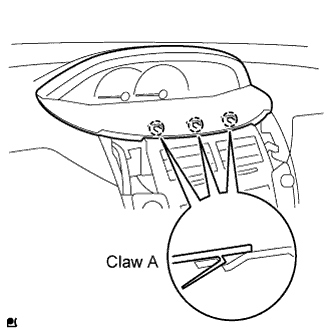 |
Fit the 3 A claws of the instrument cluster finish panel into the upper instrument cluster finish panel center.
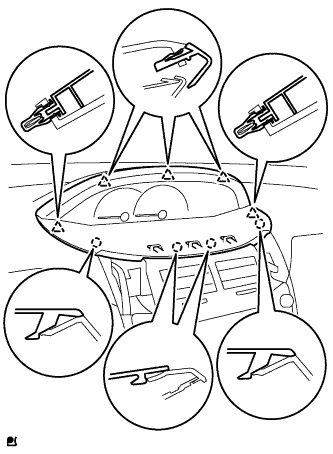 |
Engage the 4 claws and 5 clips and install the instrument cluster finish panel.
| 11. INSTALL INSTRUMENT PANEL FINISH PANEL END RH |
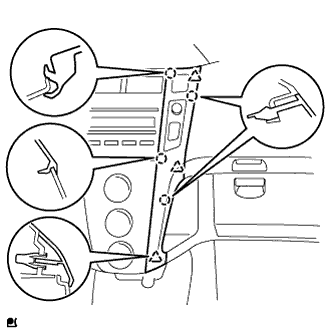 |
with CD player
Connect the connector.
Engage the 4 claws and 3 clips and install the instrument panel finish panel end RH.
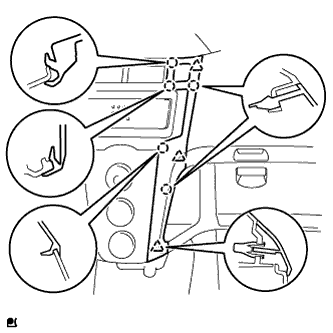 |
Except CD player
Connect the connector.
Engage the 5 claws and 3 clips and install the instrument panel finish panel end RH.
| 12. INSTALL INSTRUMENT PANEL FINISH PANEL END LH |
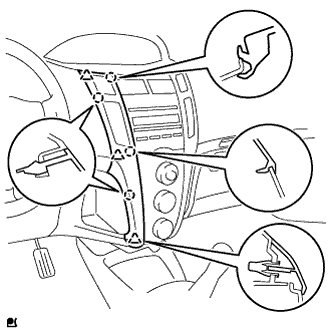 |
with CD player
Connect the connector.
Engage the 4 claws and 3 clips and install the instrument panel finish panel end LH.
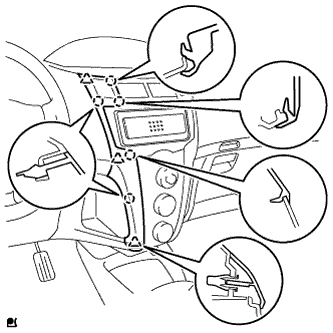 |
Except CD player
Connect the connector.
Engage the 5 claws and 3 clips and install the instrument panel finish panel end LH.
| 13. INSTALL FRONT PILLAR GARNISH RH |
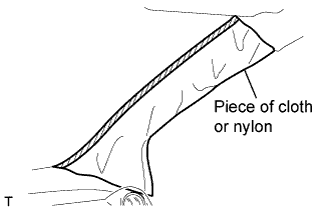 |
w/ Curtain Shield Airbag:
Remove the piece of cloth or nylon.
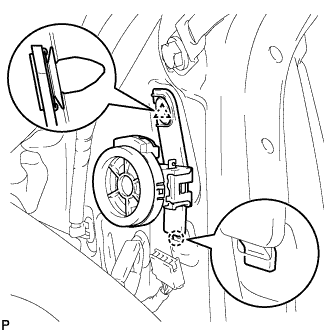 |
w/ Front No. 2 Speaker:
Insert the hook into the body hole.
Engage the clip and install the front speaker.
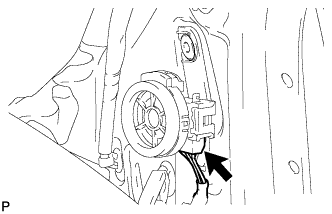 |
Connect the speaker connector.
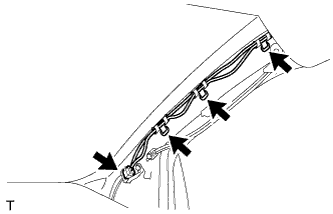 |
Install the 3 antenna cord clamps.
Connect the connector.
w/ Curtain Shield Airbag:
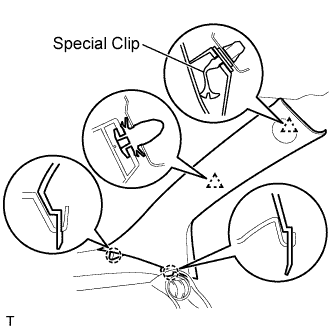 |
Install a new special clip and the clip onto a new front pillar garnish.
Engage the 2 clips and the 2 claws and install the front pillar garnish.
w/o Curtain Shield Airbag:
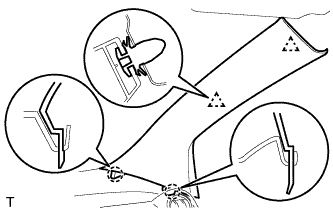 |
Engage the 2 clips and the 2 claws and install the front pillar garnish.
| 14. INSTALL FRONT PILLAR GARNISH LH |
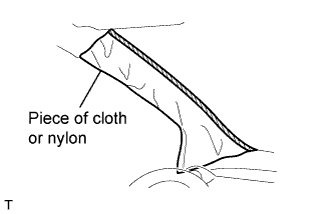 |
w/ Curtain Shield Airbag:
Remove the piece of cloth or nylon.
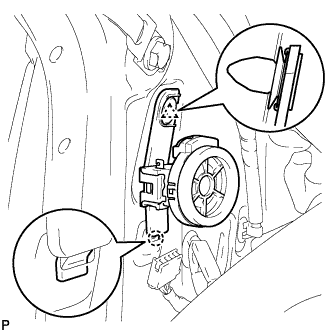 |
w/ Front No. 2 Speaker:
Insert the hook into the body hole.
Engage the clip and install the front speaker.
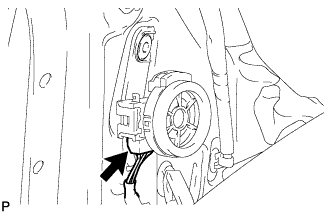 |
Connect the speaker connector.
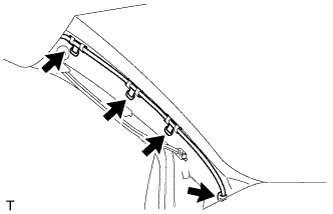 |
Install the 4 wire harness clamps.
w/ Curtain Shield Airbag:
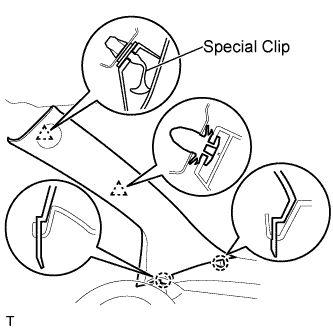 |
Install a new special clip and the clip onto a new front pillar garnish.
Engage the 2 clips and the 2 claws and install the front pillar garnish.
w/o Curtain Shield Airbag:
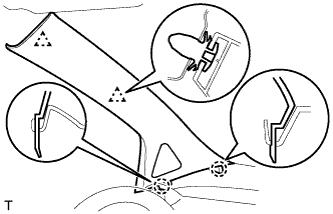 |
Engage the 2 clips and the 2 claws and install the front pillar garnish.
| 15. INSTALL MAP LIGHT ASSEMBLY |
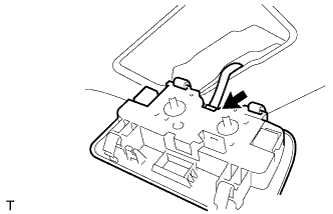 |
Connect the map light connector.
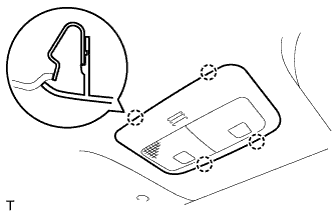 |
Engage the 4 claws and install the map light.
| 16. INSTALL ROOM LIGHT ASSEMBLY |
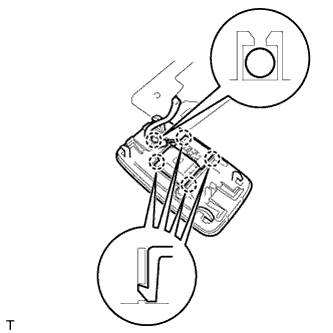 |
Engage the 4 claws and install the room light switch base.
Install the roof wire onto the claw of the room light.
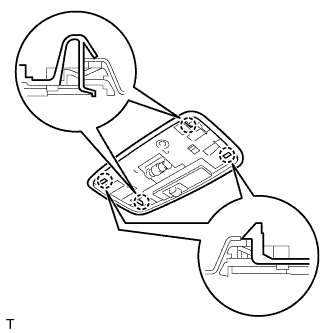 |
Engage the 4 claws and install the room light.
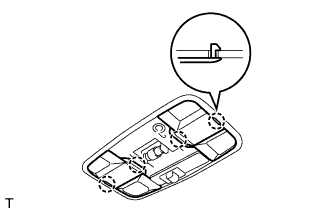 |
Engage the 4 claws and install the 2 covers.
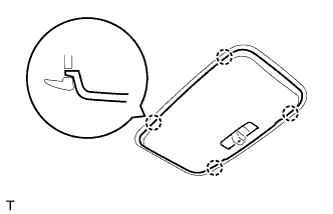 |
Engage the 4 claws and install the room light lens.
| 17. INSTALL VISOR HOLDER RH |
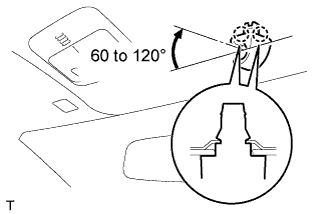 |
Engage the 2 claws by turning the visor holder clockwise between 60 to 120° and install the visor holder.
| 18. INSTALL VISOR HOLDER LH |
| 19. INSTALL VISOR ASSEMBLY RH |
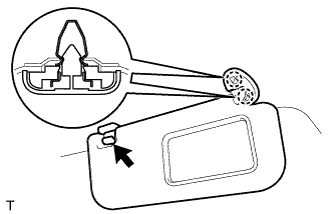 |
Engage the 2 springs and install the visor.
Install the visor shaft into the visor holder.
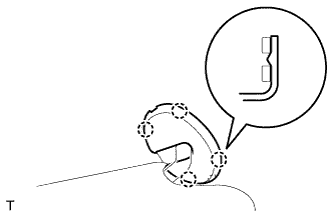 |
Engage the 4 claws and install the visor bracket cover.
| 20. INSTALL VISOR ASSEMBLY LH |
| 21. INSTALL ASSIST GRIP SUB-ASSEMBLY |
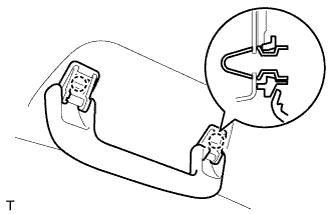 |
Engage the 2 springs and install the assist grip.
| 22. INSTALL SEAT BELT ANCHOR COVER CAP (for Rear Center Seat Belt 3 Point Type) |
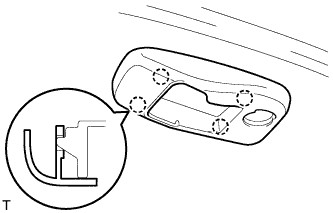 |
Engage the 4 claws and install the seat belt anchor cover.
| 23. INSTALL REAR ROOF SIDE RAIL GARNISH RH |
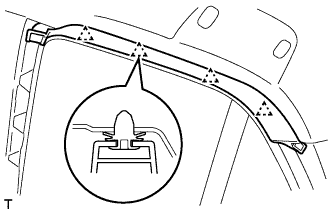 |
Engage the 4 clips and install the rear roof side rail garnish.
| 24. INSTALL REAR ROOF SIDE RAIL GARNISH LH |
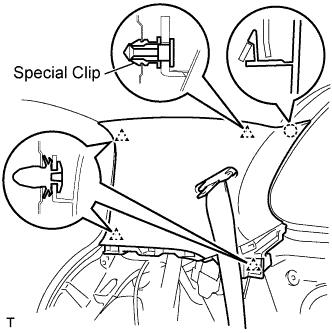 |
w/ Curtain Shield Airbag:
Install a new special clip onto the roof side inner garnish.
Pass the rear seat outer belt through the slit in the roof side inner garnish.
Engage the 4 clips and the claw and install the roof side inner garnish.
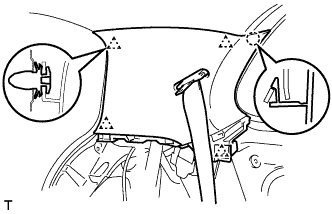 |
w/o Curtain Shield Airbag:
Pass the rear seat outer belt through the slit in the roof side inner garnish.
Engage the 4 clips and the claw and install the roof side inner garnish.
| 25. INSTALL ROOF SIDE INNER GARNISH RH |
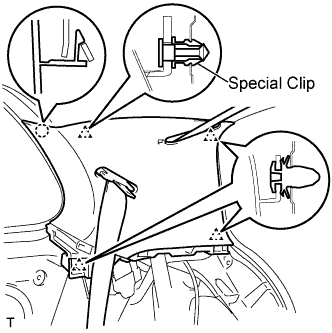 |
w/ Curtain Shield Airbag:
for 3 Point Type Rear Center Seat Belt:
for 2 Point Type Rear Center Seat Belt:
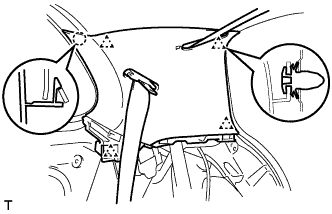 |
w/o Curtain Shield Airbag:
for 3 Point Type Rear Center Seat Belt:
for 2 Point Type Rear Center Seat Belt:
| 26. INSTALL ROOF SIDE INNER GARNISH LH |
|
w/ Curtain Shield Airbag:
Install a new special clip onto the roof side inner garnish.
Pass the rear seat outer belt through the slit in the roof side inner garnish.
Engage the 4 clips and the claw and install the roof side inner garnish.
|
w/o Curtain Shield Airbag:
Pass the rear seat outer belt through the slit in the roof side inner garnish.
Engage the 4 clips and the claw and install the roof side inner garnish.
| 27. INSTALL REAR CENTER SEAT OUTER BELT ASSEMBLY (for 3 Point Type Rear Center Seat Belt) |
| 28. INSTALL CENTER PILLAR UPPER GARNISH RH |
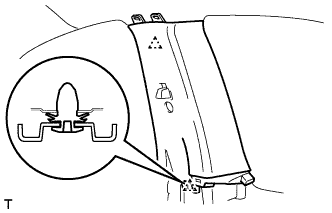 |
Engage the 2 clips and install the center pillar upper garnish.
| 29. INSTALL CENTER PILLAR UPPER GARNISH LH |
| 30. INSTALL FRONT SEAT OUTER BELT ASSEMBLY RH |
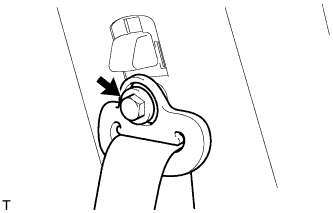 |
Install the through anchor with the bolt.
| 31. INSTALL FRONT SEAT OUTER BELT ASSEMBLY LH |
| 32. INSTALL SEAT BELT ANCHOR COVER CAP RH |
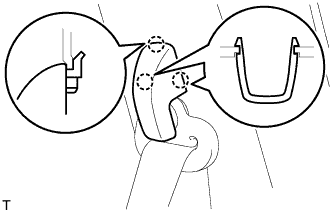 |
Engage the 3 claws and install the seat belt anchor cover cap.
| 33. INSTALL SEAT BELT ANCHOR COVER CAP (for 3 Point Type Rear Center Seat Belt) |
|
Engage the 4 claws and install the seat belt anchor cover.
| 34. INSTALL DECK SIDE TRIM PANEL ASSEMBLY RH |
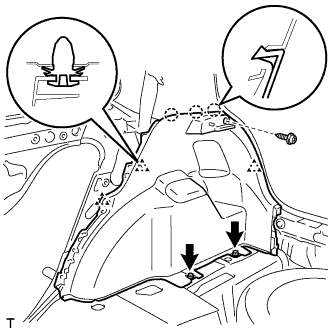 |
Engage the 3 clips and the 3 claws and install the deck side trim panel.
Tighten the 3 screws.
| 35. INSTALL DECK SIDE TRIM PANEL ASSEMBLY LH |
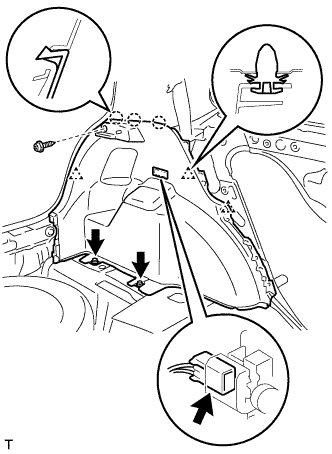 |
Connect the deck side room light connector.
Engage the 3 clips and the 3 claws and install the deck side trim panel.
Tighten the 3 screws.
| 36. INSTALL REAR SEAT OUTER BELT ASSEMBLY RH |
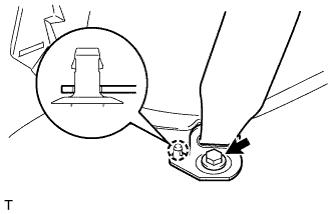 |
Engage the clip and install the anchor plate.
Tighten the bolt.
| 37. INSTALL REAR SEAT OUTER BELT ASSEMBLY LH |
| 38. INSTALL REAR DECK TRIM COVER |
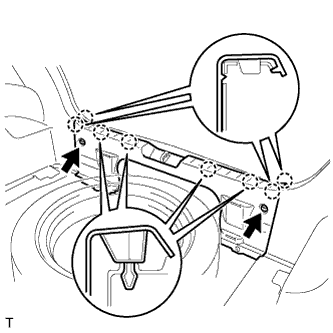 |
for Grand Tire:
Engage the 8 claws and install the rear deck trim cover.
Install the 2 clips.
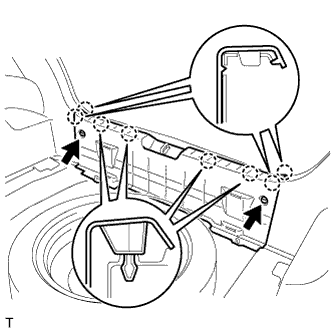 |
for Temper Spare Tire:
Engage the 8 claws and install the rear deck trim cover.
Install the 2 clips.
| 39. INSTALL FRONT QUARTER TRIM PANEL ASSEMBLY RH |
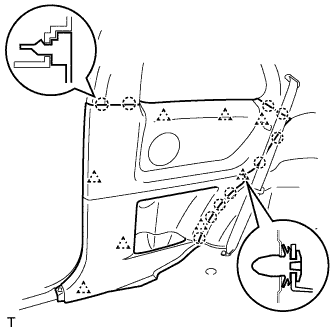 |
Engage the 8 clips, the retainer and the 10 claws and install the front quarter trim panel.
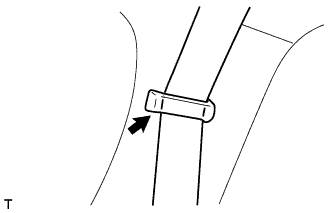 |
Install the belt of the rear seat outer belt onto the rear seat shoulder belt hanger.
| 40. INSTALL FRONT QUARTER TRIM PANEL ASSEMBLY LH |
| 41. INSTALL FRONT SEAT OUTER BELT BAR SUB-ASSEMBLY RH (w/ Seat Belt Bar) |
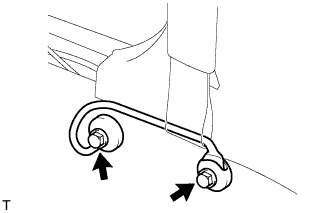 |
Install the front seat outer belt bar with the 2 bolts.
| 42. INSTALL FRONT SEAT OUTER BELT BAR SUB-ASSEMBLY LH (w/ Seat Belt Bar) |
| 43. INSTALL FRONT DOOR OPENING TRIM WEATHERSTRIP RH |
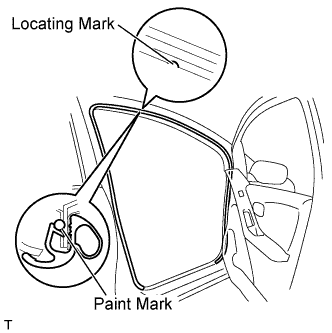 |
Align the location mark with the paint mark first, and install the front door opening trim weatherstrip, as shown in the illustration.
| Area | Color |
| RH side | Yellow |
| LH side | White |
| 44. INSTALL FRONT DOOR OPENING TRIM WEATHERSTRIP LH |
| 45. INSTALL COWL SIDE TRIM BOARD RH |
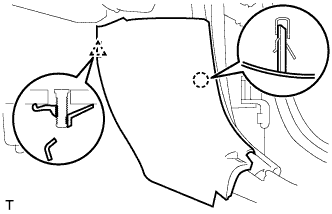 |
Engage the claw and stud bolt and install the cowl side trim board.
| 46. INSTALL COWL SIDE TRIM BOARD LH |
| 47. INSTALL INSTRUMENT PANEL UNDER COVER SUB-ASSEMBLY RH |
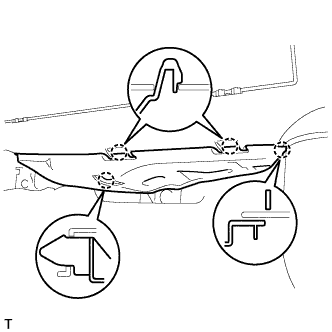 |
Engage the 4 claws and install the instrument panel under cover.
| 48. INSTALL INSTRUMENT PANEL UNDER COVER SUB-ASSEMBLY LH |
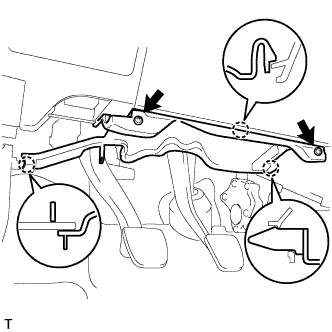 |
Engage the 3 claws and install the instrument panel under cover.
Tighten the 2 screws.
| 49. INSTALL FRONT DOOR SCUFF PLATE RH |
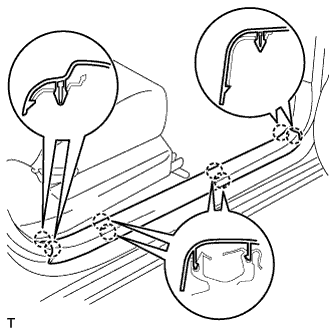 |
Engage the 8 claws and install the front door scuff plate.
| 50. INSTALL FRONT DOOR SCUFF PLATE LH |
| 51. INSTALL REAR SEAT ASSEMBLY LH |
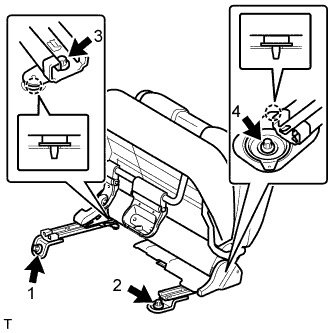 |
Insert the 2 location pins through the 2 body holes and install the rear seat.
Using "TORX" socket wrench E10, install the 4 bolts in the sequence shown in the illustration.
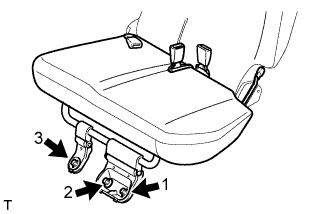 |
Install the rear seat cushion.
Using "TORX" socket wrench E10, install the 3 bolts in the sequence shown in the illustration.
| 52. INSTALL REAR SEAT ASSEMBLY RH |
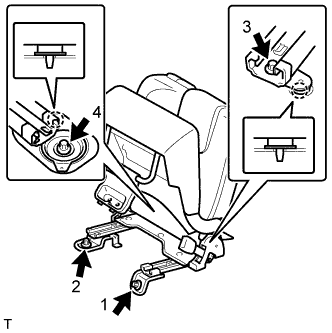 |
Insert the 2 location pins through the 2 body holes and install the rear seat.
Using "TORX" socket wrench E10, install the 4 bolts in the sequence shown in the illustration.
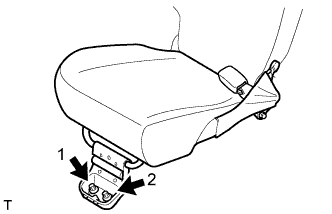 |
Install the rear seat cushion.
Using "TORX" socket wrench E10, install the 2 bolts in the sequence shown in the illustration.
| 53. INSTALL NO.2 SEAT LEG COVER |
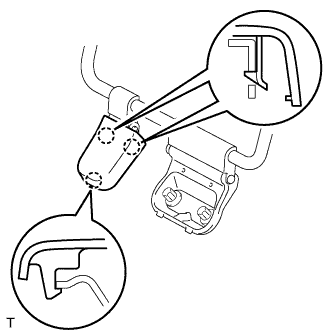 |
Engage the 3 claws and install the No. 2 rear seat leg cover.
| 54. INSTALL NO.1 REAR SEAT LEG COVER |
for RH Side:
Install the No. 1 rear seat leg cover .
for LH Side:
Install the No. 1 rear seat leg cover .
| 55. INSTALL DECK FLOOR BOX RH (w/ Deck Board) |
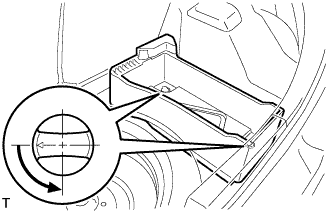 |
Set the deck floor box and lock the 2 knobs.
| 56. INSTALL DECK FLOOR BOX LH (w/ Deck Board) |
| 57. INSTALL SPARE WHEEL COVER ASSEMBLY (w/ Deck Board) |
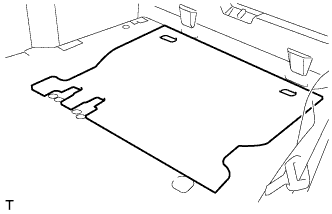 |
Install the spare wheel cover.
| 58. INSTALL DECK BOARD SUB-ASSEMBLY (w/ Deck Board) |
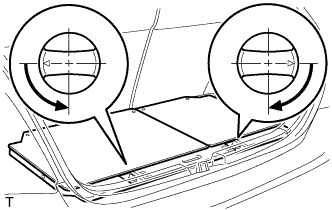 |
Set the deck board and lock the 2 knobs.
| 59. INSTALL REAR FLOOR CARPET ASSEMBLY (w/o Deck Board) |
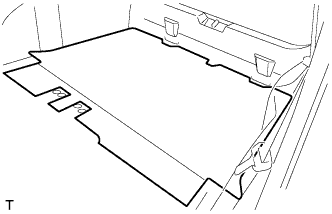 |
Install the rear floor carpet.
| 60. INSTALL PACKAGE TRAY TRIM PANEL ASSEMBLY (w/ Package Tray Trim) |
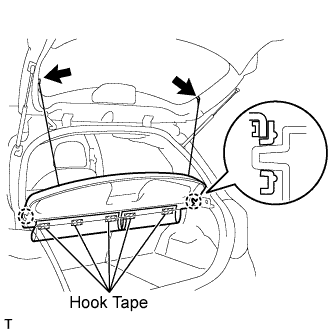 |
Engage the 2 claws and install the package tray trim panel.
Install the 5 pieces of hook tape.
Install the 2 package tray trim suspenders.
| 61. CONNECT CABLE TO NEGATIVE BATTERY TERMINAL |
| 62. INSPECT SRS WARNING LIGHT |