 |
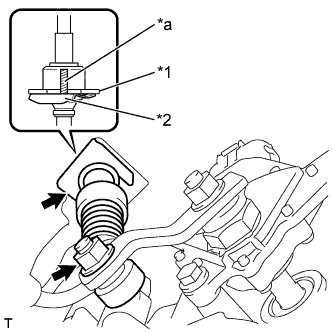
Connect the transmission control cable assembly to the control shaft lever with the nut.
- Torque:
- 12 N*m{ 122 kgf*cm , 9 ft.*lbf }
| *1 | No. 1 Transmission Control Cable Bracket |
| *2 | Clip |
| *a | Marking |
TRANSMISSION CONTROL CABLE > INSTALLATION |
| 1. INSTALL TRANSMISSION CONTROL CABLE ASSEMBLY |
|
Connect the transmission control cable assembly to the control shaft lever with the nut.
| *1 | No. 1 Transmission Control Cable Bracket |
| *2 | Clip |
| *a | Marking |
Install the transmission control cable assembly to the No. 1 transmission control cable bracket with a new clip.
Install the transmission control cable assembly to the control cable support.
Install the transmission control cable assembly with the 3 nuts.
| 2. INSTALL FRONT NO. 1 FLOOR HEAT INSULATOR |
Install the front No. 1 floor heat insulator with the 2 bolts and nut.
| 3. INSTALL FRONT EXHAUST PIPE ASSEMBLY |
| 4. INSTALL AIR CLEANER BRACKET |
Install the air cleaner bracket with the 2 bolts.
Connect the wire harness clamp to the air cleaner bracket.
| 5. INSTALL AIR CLEANER ASSEMBLY |
Install the air cleaner case onto the air cleaner bracket with the 2 bolts.
Engage the clamp and connect the wire harness to the air cleaner case.
Install the air cleaner element onto the air cleaner case.
Install the air cleaner cap sub-assembly with No. 1 air cleaner hose onto the throttle body assembly.
Engage the 2 clamps and connect the air cleaner cap sub-assembly to the air cleaner case subassembly.
Tighten the hose clamp.
Connect the vacuum switching valve assembly connector.
Connect the mass air flow meter connector.
Engage the 2 clamps and connect the wire harness to the air cleaner cap sub-assembly and vacuum switching valve assembly.
Connect the No. 2 fuel vapor feed hose to the intake manifold.
Connect the fuel vapor feed hose assembly to the No. 1 air cleaner hose and vacuum switching valve assembly with the 2 hose clamps.
Engage the clamp and connect the fuel vapor feed hose assembly to the No. 1 air cleaner hose.
| 6. INSTALL BATTERY CARRIER (for LHD) |
Install the battery carrier with the 5 bolts.
Engage the 6 wire harness clamps and install the wire harness.
| 7. INSTALL BATTERY CARRIER (for RHD) |
Install the battery carrier with the 5 bolts.
Engage the 7 wire harness clamps and install the wire harness.
| 8. INSTALL BATTERY TRAY |
| 9. INSTALL BATTERY |
Install the battery onto the vehicle with the battery clamp.
Connect the cable to the battery terminal.
| 10. ADJUST SHIFT LEVER POSITION |
Move the shift lever to N.
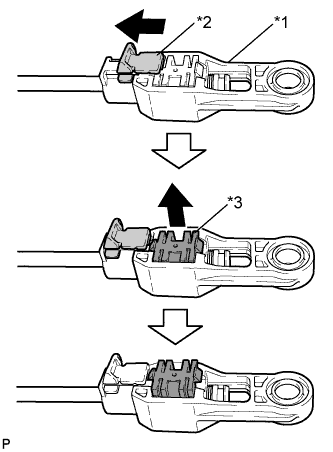 |
Slide the adjuster case cover in the direction shown by the arrow.
| *1 | Adjuster Case |
| *2 | Cover |
| *3 | Lock Piece |
Using a precision screwdriver, pull up the lock piece.
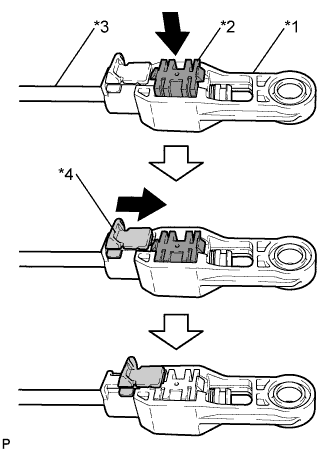 |
Press the lock piece into the adjuster case.
| *1 | Adjuster Case |
| *2 | Lock Piece |
| *3 | Cable Rod |
| *4 | Cover |
Slide the adjuster case cover in the direction shown by the arrow.
| 11. INSPECT SHIFT LEVER POSITION |
Turn the ignition switch to ON and step on the brake pedal.
Confirm that the shift lever moves smoothly through all of the shift positions and the position indicator shows the correct shift lever position.
Start the engine and confirm that the vehicle moves forward when the shift lever is moved from N to D.
| 12. INSTALL REAR CONSOLE BOX ASSEMBLY |