 |
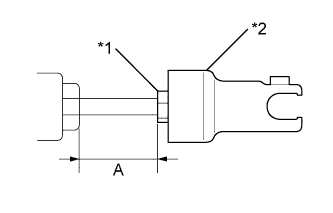
Install the lock nut to the push rod.
| *1 | Lock Nut |
| *2 | Clutch Master Cylinder Push Rod Clevis |
CLUTCH MASTER CYLINDER (for RHD) > INSTALLATION |
| 1. INSTALL CLUTCH MASTER CYLINDER PUSH ROD CLEVIS |
|
Install the lock nut to the push rod.
| *1 | Lock Nut |
| *2 | Clutch Master Cylinder Push Rod Clevis |
Install the clutch master cylinder push rod clevis to the push rod.
Tighten the lock nut and check the dimension A is same as the dimension A that has been measured.
| 2. INSTALL CLUTCH MASTER CYLINDER ASSEMBLY |
Install the clutch master cylinder assembly with the 2 nuts.
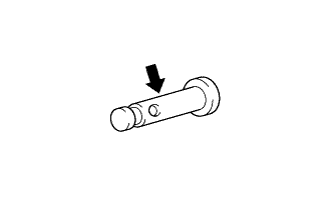 |
Apply MP grease to the clevis pin.
 | MP grease |
Install the clutch master cylinder push rod clevis to the clutch pedal sub-assembly with the clevis pin and a new clip.
| 3. CONNECT CLUTCH MASTER CYLINDER TO FLEXIBLE HOSE TUBE |
Using a union nut wrench (10 mm), connect the clutch master cylinder to flexible hose tube to the clutch master cylinder assembly.
| 4. CONNECT CLUTCH RESERVOIR TUBE |
Connect the clutch reservoir tube to the clutch master cylinder assembly with the clip.
| 5. FILL RESERVOIR WITH BRAKE FLUID |
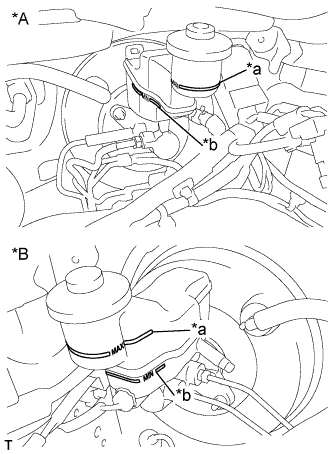 |
Fill the reservoir with brake fluid.
| *A | for LHD |
| *B | for RHD |
| *a | MAX Line |
| *b | MIN Line |
| 6. BLEED CLUTCH LINE |
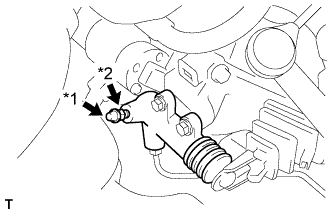 |
Remove the release cylinder bleeder plug cap.
| *1 | Release Cylinder Bleeder Plug Cap |
| *2 | Release Cylinder Bleeder Plug |
Connect a vinyl tube to the release cylinder bleeder plug.
Depress the clutch pedal 5 times, and then loosen the release cylinder bleeder plug while the pedal is depressed.
When fluid no longer comes out, tighten the release cylinder bleeder plug, and then release the clutch pedal.
Repeat both of the previous 2 steps 6 times.
Tighten the release cylinder bleeder plug.
Depress the clutch pedal 10 times or more and confirm its operation.
Install the release cylinder bleeder plug cap.
Check that all the air has been bled from the clutch line.
| 7. INSPECT FOR BRAKE FLUID LEAK |
| 8. INSPECT BRAKE FLUID LEVEL |
|
Check the fluid level.
| *A | for LHD |
| *B | for RHD |
| *a | MAX Line |
| *b | MIN Line |
| 9. INSPECT AND ADJUST CLUTCH PEDAL |
| 10. INSTALL OUTER COWL TOP PANEL |
Install the outer cowl top panel with the 8 bolts.
Engage the 2 clamps and install the wire harness.
| 11. INSTALL INNER COWL TOP TO COWL BRACE |
Install the cowl top to cowl brace with the 2 bolts.
| 12. INSTALL FRONT NO. 1 VENTILATOR SEAL |
Engage the clip and install the front No. 1 ventilator seal.
| 13. INSTALL FRONT AIR SHUTTER SEAL RH |
| 14. INSTALL WINDSHIELD WIPER MOTOR AND LINK ASSEMBLY |
| 15. INSTALL LOWER INSTRUMENT PANEL FINISH PANEL (w/o Knee Airbag) |
for LHD:
Engage the 5 claws and 2 clips and install the instrument panel finish panel.
for RHD:
Engage the 6 claws and 2 clips and install the instrument panel finish panel.
| 16. INSTALL LOWER NO. 1 INSTRUMENT PANEL AIRBAG ASSEMBLY (w/ Knee Airbag) |
| 17. INSTALL NO. 1 INSTRUMENT PANEL UNDER COVER SUB-ASSEMBLY (w/o Knee Airbag) |