| NG |  |
| Go to step 5 |
ENGINE IMMOBILISER SYSTEM > Key Cannot be Registered |
| 1.CHECK REGISTRATION MODE |
Check that the system enters registration mode.
|
| ||||
| OK | |
 |
| 2.CHECK THEFT WARNING INDICATOR LIGHT OPERATION |
In the registration mode, when the key inserted in ignition key cylinder, check that the theft warning indicator light assembly.
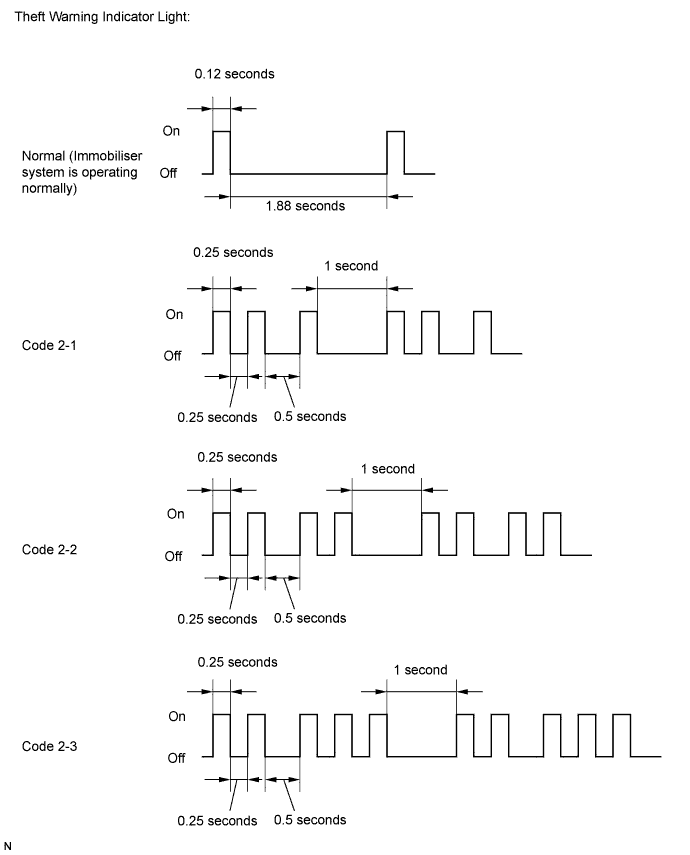
| Result | Proceed to |
| Code 2-1 | A |
| Code 2-2 | B |
| Code 2-3 | C |
|
| ||||
|
| ||||
| A | |
|
| 3.READ VALUE USING INTELLIGENT TESTER |
Connect the intelligent tester to the DLC3.
Turn the ignition switch to ON.
Turn the intelligent tester on.
Enter the following menus: Body / Immobiliser / Data List.
According to the display on the intelligent tester, read the Data List.
| Tester Display | Measurement Item/Range | Normal Condition | Diagnostic Note |
| Transponder S-code | Number of registered sub-keys / min.: 0, max.: 15 | Number of registered sub-keys | - |
| Transponder M-code | Number of registered master keys / min.: 0, max.: 15 | Number of registered master keys | - |
| Result | Proceed to |
| None of the below | A |
| Registered master keys: 5, registered sub-keys: 0 | B |
| Registered master keys: 0, registered sub-keys: 3 | C |
| Registered master keys: 5, registered sub-keys: 3 | D |
|
| ||||
|
| ||||
|
| ||||
| A | |
|
| 4.KEY REGISTRATION |
Refer to the table below to determine if additional keys can be registered.
| Number of Keys Registered (Master and Sub) | Proceed to |
| 0 | New key ID registration (refer to the Service Bulletin) |
| 1 to 7 | Additional key ID registration (refer to the Service Bulletin) |
Check whether key registration.
|
| ||||
| OK | ||
 | ||
| ||
| 5.INSPECT UNLOCK WARNING SWITCH ASSEMBLY |
Inspect the unlock warning switch assembly (Click here).
|
| ||||
| OK | |
|
| 6.CHECK HARNESS AND CONNECTOR (TRANSPONDER KEY ECU ASSEMBLY - UNLOCK WARNING SWITCH) |
Disconnect the F15 unlock warning switch assembly connector.
Disconnect the F54 transponder key ECU assembly connector.
Measure the resistance according to the value(s) in the table below.
| Tester Connection | Condition | Specified Condition |
| F15-1 - F54-3 (KSW) | Always | Below 1 Ω |
| F15-2 - Body ground | Always | Below 1 Ω |
| F15-1 - Body ground | Always | 10 kΩ or higher |
| Result | Proceed to |
| OK (not using intelligent tester) | A |
| OK (using intelligent tester) | B |
| NG | C |
|
| ||||
|
| ||||
| A | |
|
| 7.INSPECT FRONT DOOR COURTESY LIGHT SWITCH ASSEMBLY LH |
Inspect the front door courtesy light switch assembly LH (Click here).
|
| ||||
| OK | |
|
| 8.CHECK HARNESS AND CONNECTOR (TRANSPONDER KEY ECU ASSEMBLY - FRONT DOOR COURTESY LIGHT SWITCH ASSEMBLY LH) |
Disconnect the F54 transponder key ECU assembly connector.
Disconnect the K1 front door courtesy light switch assembly LH connector.
Measure the resistance according to the value(s) in the table below.
| Tester Connection | Condition | Specified Condition |
| F54-7 (CTY) - K1-1 | Always | Below 1 Ω |
| F54-7 (CTY) - Body ground | Always | 10 kΩ or higher |
|
| ||||
| OK | ||
| ||
| ||
