REMOVAL
CYLINDER HEAD - LEFT
1. Disconnect the negative cable from the battery.
2. Raise the vehicle on a hoist.
3. Disconnect the exhaust pipe at the left side exhaust manifold.
4. Drain the engine coolant (Refer to 7 - COOLING - STANDARD PROCEDURE).
5. Lower the vehicle.
6. Remove the intake manifold (Refer to 9 - ENGINE/MANIFOLDS/INTAKE MANIFOLD - REMOVAL).
7. Remove the master cylinder and booster assembly (Refer to 5 - BRAKES/HYDRAULIC/MECHANICAL/POWER BRAKE BOOSTER - REMOVAL).
8. Remove the cylinder head cover (Refer to 9 - ENGINE/CYLINDER HEAD/CYLINDER HEAD COVER(S) - REMOVAL).
9. Remove the fan shroud and fan blade assembly (Refer to 7 - COOLING/ENGINE/RADIATOR FAN - REMOVAL).
10. Remove accessory drive belt (Refer to 7 - COOLING/ACCESSORY DRIVE/DRIVE BELTS - REMOVAL) .
11. Remove the power steering pump and set aside.
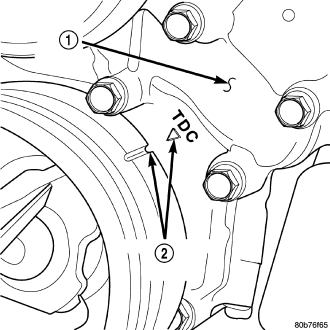
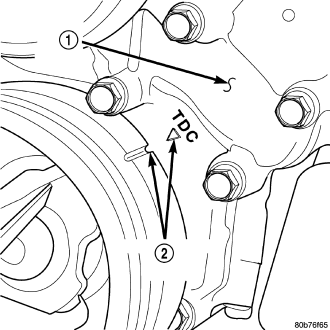
12. Rotate the crankshaft until the damper timing mark is aligned with TDC indicator mark (2).
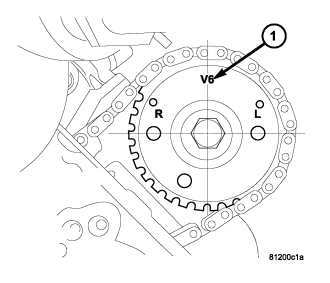
13. Verify the V6 mark (1) on the camshaft sprocket is at the 12 o'clock position, with the No. 1 cylinder at TDC on the exhaust stroke.. Rotate the crankshaft one turn if necessary.
14. Remove the crankshaft damper (Refer to 9 - ENGINE/ENGINE BLOCK/VIBRATION DAMPER - REMOVAL).
15. Remove the timing chain cover (Refer to 9 - ENGINE/VALVE TIMING/TIMING BELT / CHAIN COVER(S) - REMOVAL)
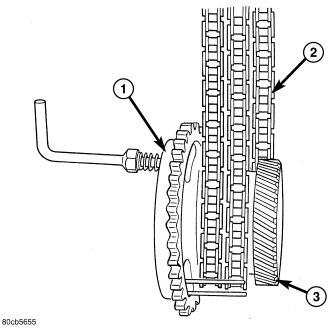
16. Lock the secondary timing chains (2) to the idler sprocket using Special Tool 8429 Timing Chain Holding Fixture (1).
NOTE: Mark the secondary timing chain prior to removal to aid in installation.
17. Mark the secondary timing chain (2), one link on each side of the V6 mark on the camshaft drive gear.
18. Remove the left side secondary chain tensioner (Refer to 9 - ENGINE/VALVE TIMING/TIMING BELT/CHAIN AND SPROCKETS - REMOVAL).
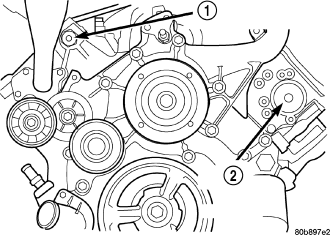
19. Remove the cylinder head access plug (1) and (2).
20. Remove the left side secondary chain guide (Refer to 9 - ENGINE/VALVE TIMING/TIMING BELT/CHAIN AND SPROCKETS - REMOVAL).
21. Remove the retaining bolt and the camshaft drive gear.
CAUTION: Do not allow the engine to rotate. Severe damage to the valve train can occur.
CAUTION: Do not overlook the four smaller bolts at the front of the cylinder head. Do not attempt to remove the cylinder head without removing these four bolts.
NOTE: The cylinder head is attached to the cylinder block with twelve bolts.
22. Remove the cylinder head retaining bolts.
23. Remove the cylinder head and gasket. Discard the gasket.
CAUTION: Do not lay the cylinder head on its gasket sealing surface, due to the design of the cylinder head gasket any distortion to the cylinder head sealing surface may prevent the gasket from properly sealing resulting in leaks.
REMOVAL RIGHT CYLINDER HEAD
1. Disconnect battery negative cable.
2. Raise the vehicle on a hoist.
3. Disconnect the exhaust pipe at the right side exhaust manifold.
4. Drain the engine coolant (Refer to 7 - COOLING - STANDARD PROCEDURE).
5. Lower the vehicle.
6. Remove the intake manifold (Refer to 9 - ENGINE/MANIFOLDS/INTAKE MANIFOLD - REMOVAL).
7. Remove the cylinder head cover (Refer to 9 - ENGINE/CYLINDER HEAD - REMOVAL).
8. Remove the fan shroud (Refer to 7 - COOLING/ENGINE/RADIATOR FAN - REMOVAL).
9. Remove oil fill housing from cylinder head.
10. Remove accessory drive belt (Refer to 7 - COOLING/ACCESSORY DRIVE/DRIVE BELTS - REMOVAL).
11. Rotate the crankshaft until the damper timing mark is aligned with TDC indicator mark (2).
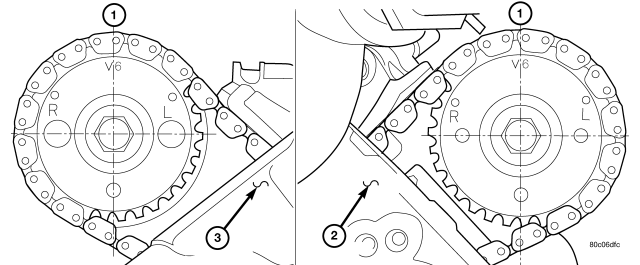
12. Verify the V6 mark on the camshaft sprocket is at the 12 o'clock position. Rotate the crankshaft one turn if necessary.
13. Remove the crankshaft damper (Refer to 9 - ENGINE/ENGINE BLOCK/VIBRATION DAMPER - REMOVAL).
14. Remove the timing chain cover (Refer to 9 - ENGINE/VALVE TIMING/TIMING BELT / CHAIN COVER(S) - REMOVAL).
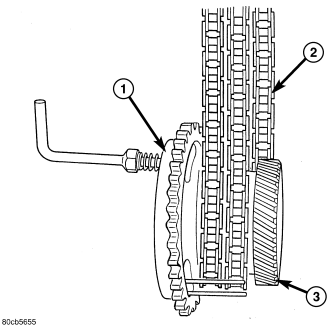
15. Lock the secondary timing chains to the idler sprocket using Special Tool 8429 Timing Chain Holding Fixture (1).
NOTE: Mark the secondary timing chain prior to removal to aid in installation.
16. Mark the secondary timing chain, one link on each side of the V6 mark on the camshaft drive gear.
17. Remove the right side secondary chain tensioner (Refer to 9 - ENGINE/VALVE TIMING/TIMING BELT/CHAIN AND SPROCKETS - REMOVAL).
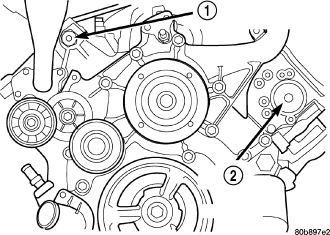
18. Remove the cylinder head access plug (1,2).
19. Remove the right side secondary chain guide (Refer to 9 - ENGINE/VALVE TIMING/TIMING BELT/CHAIN AND SPROCKETS - REMOVAL).
CAUTION: The nut on the right side camshaft sprocket should not be removed for any reason, as the sprocket and camshaft sensor target wheel is serviced as an assembly. If the nut was removed, torque nut to 5 N·m (44 in. lbs.).
20. Remove the retaining bolt and the camshaft drive gear.
CAUTION: Do not allow the engine to rotate. severe damage to the valve train can occur.
CAUTION: Do not overlook the four smaller bolts at the front of the cylinder head. Do not attempt to remove the cylinder head without removing these four bolts.
CAUTION: Do not hold or pry on the camshaft target wheel for any reason. A damaged target wheel can result in a vehicle no start condition.
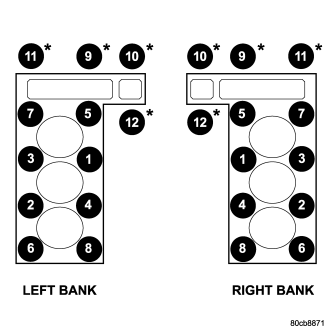
NOTE: The cylinder head is attached to the cylinder block with twelve bolts.
21. Remove the cylinder head retaining bolts.
22. Remove the cylinder head and gasket. Discard the gasket.
CAUTION: Do not lay the cylinder head on its gasket sealing surface, do to the design of the cylinder head gasket any distortion to the cylinder head sealing surface may prevent the gasket from properly sealing resulting in leaks.