INSTALLATION
LAMP
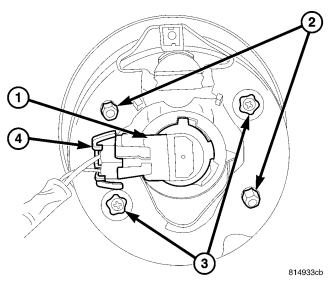
1. Position the front fog lamp into the seat in the face of the front fascia. Be certain that the two alignment pins (2) on the back of the lamp housing are engaged in the alignment holes in the seat.
2. Install and tighten the two screws (3) that secure the lamp to the back of the fascia. Tighten the screws to 2 N·m (14 in. lbs.).
3. Reconnect the wire harness connector (4) to the fog lamp bulb socket (1).
4. Reinstall the front wheelhouse splash shield to the front fender flare using new plastic rivets. (Refer to 23 - BODY/EXTERIOR/WHEELHOUSE SPLASH SHIELD - INSTALLATION).
5. Lower the vehicle.
6. Reconnect the battery negative cable.
7. Confirm proper front fog lamp alignment. (Refer to 8 - ELECTRICAL/LAMPS/LIGHTING - EXTERIOR - STANDARD PROCEDURE - FRONT LAMP AIMING).
BULB
CAUTION: Always use the correct bulb size and type for replacement. An incorrect bulb size or type may overheat and cause damage to the lamp, the socket or the lamp wiring.
CAUTION: Do not contaminate the bulb glass by touching it with your fingers or by allowing it to contact other oily surfaces. Shortened bulb life will result.
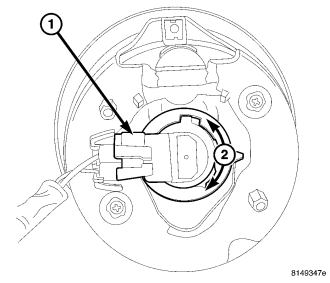
1. Align the base of the bulb with the front fog lamp socket (1).
2. Push the bulb straight into the socket until the base is firmly seated.
3. Align the socket and bulb with the keyed opening on the back of the front fog lamp housing.
4. Insert the socket and bulb into the housing until the socket is firmly seated.
5. Rotate the socket (2) clockwise about 30 degrees to lock it into place. The socket connector receptacle should be pointed straight downward.
6. Reconnect the wire harness connector to the socket.
7. Lower and snap the cover back over the access hole at the front of the wheel house splash shield.
8. Lower the vehicle.
9. Reconnect the battery negative cable.