LINES-UNDERBODY
DESCRIPTION
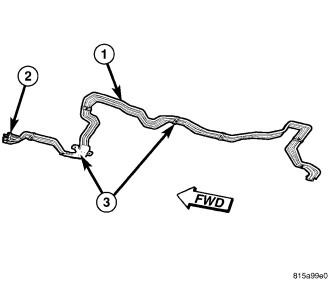
Models equipped with the rear heating-A/C system use a metal underbody line assembly (1) to carry refrigerant and engine coolant to/and from the rear A/C evaporator and heater core. The underbody refrigerant lines are connected to the front suction and liquid lines by use of metal fittings (2) and to the rear A/C expansion valve by use of a tapping plate. The metal underbody heater lines have rubber hose ends that are connected to the rear HVAC housing by use of spring-clamp type heater hose clamps. The underbody lines are retained by plastic mounting brackets (3) and screws and can be repaired (depending on the amount of damage) by using Miller Special Tool Kit 8456-A or equivalent (refer to 24 - HEATING & AIR CONDITIONING/PLUMBING - REAR/LINES-UNDERBODY - STANDARD PROCEDURE).
NOTE: Replacement of the refrigerant line O-ring seals and gaskets is required anytime a refrigerant line is opened. Failure to replace the rubber O-ring seals and metal gaskets could result in a refrigerant system leak.
The underbody lines have no serviceable parts except for the refrigerant line rubber O-ring seals and the mounting brackets. The O-ring seals used on the refrigerant line connections are made from a special type of rubber not affected by R-134a refrigerant. The O-ring seals must be replaced whenever the underbody refrigerant lines are disconnected or removed.
REMOVAL
WARNING: Refer to the applicable warnings and cautions for this system before performing the following operation (refer to 24 - HEATING & AIR CONDITIONING/PLUMBING - FRONT - WARNING) and (refer to 24 - HEATING & AIR CONDITIONING/PLUMBING - FRONT - CAUTION). Failure to follow the warnings and cautions could result in possible personal injury or death.
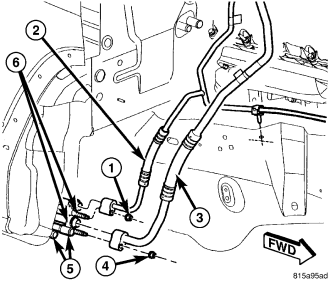
NOTE: Illustration shown with left front fender liner removed for clarity.
1. Disconnect and isolate the negative battery cable.
2. Recover the refrigerant from the refrigerant system (refer to 24 - HEATING & AIR CONDITIONING/PLUMBING - FRONT - STANDARD PROCEDURE - REFRIGERANT SYSTEM RECOVERY).
3. Partially drain the engine cooling system (refer to 7 - COOLING - STANDARD PROCEDURE - COOLING SYSTEM DRAIN).
4. Raise and support the vehicle.
5. Remove the two nuts (1 and 4) that secure the liquid line extension tube (2) and the suction line extension tube (3) to the underbody refrigerant lines (6).
6. Disconnect the liquid and suction line extension tubes from the underbody refrigerant lines and remove and discard the O-ring seals.
7. Install plugs in, or tape over the opened refrigerant line fittings.
8. Disconnect the heater hoses from the underbody heater lines (5).
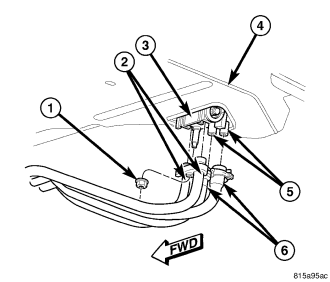
NOTE: Illustration shown with rear body cradle removed for clarity.
9. Remove the nut (1) that secures the underbody refrigerant lines (2) to the rear A/C expansion valve (3) which extends through the rear floor panel (4) behind the right rear wheel housing.
10. Disconnect the rear underbody refrigerant lines from the rear A/C expansion valve and remove and discard the O-ring seals.
11. Install plugs in, or tape over the opened underbody refrigerant line fittings and rear expansion valve ports.
12. Disconnect the rear heater hoses (6) from the rear heater core tubes (5) which extends through the rear floor panel.
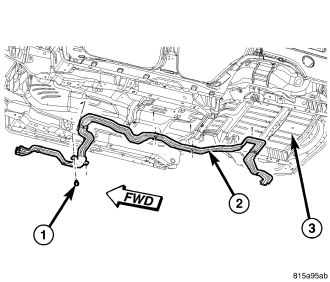
NOTE: Illustration shown with rear axle removed for clarity.
13. Remove the rear body cradle (refer to 13 - FRAME & BUMPERS/FRAME/CRADLE-REAR BODY - REMOVAL).
14. Remove the muffler and tail pipe as an assembly (refer to 11 - EXHAUST SYSTEM/MUFFLER - REMOVAL).
15. Remove the heat shields as required from the vehicle underbody.
16. Remove the two screws (1) that secure the underbody line assembly (2) to the front of the vehicle underbody (3).
17. Disengage the five mounting brackets that secure the underbody line assembly to the vehicle underbody.
18. Route the underbody line assembly over the rear axle and remove the line assembly from the vehicle.
INSTALLATION
CAUTION: Be certain to adjust the refrigerant oil level when servicing the A/C refrigerant system (refer to 24 - HEATING & AIR CONDITIONING/PLUMBING - FRONT/REFRIGERANT OIL - STANDARD PROCEDURE - REFRIGERANT OIL LEVEL). Failure to properly adjust the refrigerant oil level will prevent the A/C system from operating as designed and can cause serious A/C compressor damage.
NOTE: When replacing multiple A/C system components, refer to the Refrigerant Oil Capacities chart to determine how much oil should be added to the refrigerant system (refer to 24 - HEATING & AIR CONDITIONING/PLUMBING - FRONT/REFRIGERANT OIL - STANDARD PROCEDURE - REFRIGERANT OIL LEVEL).
NOTE: Replacement of the refrigerant line O-ring seals and gaskets is required anytime a refrigerant line is opened. Failure to replace the rubber O-ring seals and metal gaskets could result in a refrigerant system leak.
NOTE: Illustration shown with rear axle removed for clarity.
1. Route the underbody line assembly (2) over the rear axle and position the line assembly to the vehicle underbody (3).
2. Engage the five mounting brackets that secure the underbody line assembly to the vehicle underbody.
3. Install the two screws (1) that secure the underbody line assembly to the front of the underbody. Tighten the screws securely.
4. Install the heat shields as required to the vehicle underbody.
5. Install the muffler and tail pipe as an assembly (refer to 11 - EXHAUST SYSTEM/MUFFLER - INSTALLATION).
6. Install the rear body cradle (refer to 13 - FRAME & BUMPERS/FRAME/CRADLE-REAR BODY - INSTALLATION).
NOTE: Illustration shown with rear body cradle removed for clarity.
7. Remove the tape or plugs from rear underbody refrigerant line fittings and rear expansion valve ports.
8. Lubricate new rubber O-ring seals with clean refrigerant oil and install them onto the rear underbody refrigerant line fittings. Use only the specified O-rings as they are made of a special material for the R-134a refrigerant system. Use only refrigerant oil of the type recommended for the A/C compressor in the vehicle.
9. Connect the underbody refrigerant lines to the rear A/C expansion valve (3) which extend through the rear floor panel (4) behind the right rear wheel housing.
10. Install the nut (1) that secures the underbody refrigerant lines to the to the rear A/C expansion valve. Tighten the nut to 23 N·m (17 ft. lbs.).
11. Connect the rear heater hoses (6) to the rear heater core tubes (5) and install the heater hose clamps securely.
NOTE: Illustration shown with left front fender liner removed for clarity.
12. Remove the tape or plugs from the opened refrigerant line fittings.
13. Lubricate a new rubber O-ring seal with clean refrigerant oil and install them onto the underbody refrigerant line fittings. Use only the specified O-rings as they are made of a special material for the R-134a system. Use only refrigerant oil of the type recommended for the A/C compressor in the vehicle.
14. Connect the liquid line extension tube (2) and the suction line extension tube (3) to the underbody refrigerant lines (6) and install the two nuts (1 and 4). Tighten the nuts to 20 N·m (15 ft. lbs.).
15. Connect the heater hoses to the front of the underbody heater lines (5) and install the heater hose clamps securely.
16. Lower the vehicle.
17. Reconnect the negative battery cable.
18. Fill the engine cooling system (refer to 7 - COOLING - STANDARD PROCEDURE - COOLING SYSTEM FILL).
19. Evacuate the refrigerant system (refer to 24 - HEATING & AIR CONDITIONING/PLUMBING - FRONT - STANDARD PROCEDURE - REFRIGERANT SYSTEM EVACUATE).
20. Adjust the refrigerant oil level (refer to 24 - HEATING & AIR CONDITIONING/PLUMBING - FRONT/REFRIGERANT OIL - STANDARD PROCEDURE - REFRIGERANT OIL LEVEL).
21. Charge the refrigerant system (refer to 24 - HEATING & AIR CONDITIONING/PLUMBING - FRONT - STANDARD PROCEDURE - REFRIGERANT SYSTEM CHARGE).