LINK ROD
DESCRIPTION
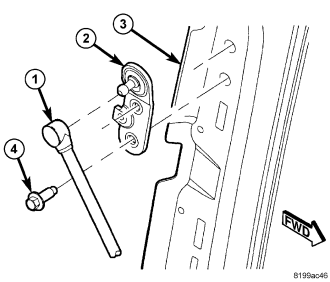
WARNING: Never attempt to operate the power liftgate system when the link rod is removed or disconnected. Damage to the power liftgate system will result.
Vehicles equipped with a power liftgate utilize a link rod (1) assembly. This link rod is located in the left rear of the vehicle and is visible without removing the D-pillar trim. The link rod attaches to the liftgate pivot bracket (2) at one end and the power liftgate drive unit assembly at the other. The link rod consists of a steel shaft, equipped with two spherical rod end receptacles at each end. The weight of the liftgate is not supported by the link rod, the liftgate prop rods are designed to support the liftgate.
The link rod cannot be adjusted or repaired and if inoperative, must be replaced. (Refer to 8 - ELECTRICAL/POWER DOORS/CONTROL ROD - REMOVAL).
OPERATION
One end of the link rod assembly is attached to the liftgate pivot bracket, the other end is attached to the power liftgate drive unit. When the drive unit is driven by the liftgate motor assembly the liftgate is moved to the open or closed position.
REMOVAL
1. Open the liftgate.
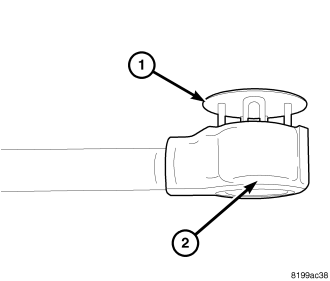
2. Using an appropriate flat-bladed tool, pry the plastic retainer (1) up to release the locking mechanism from the mounting sphere (2). Do not try to remove the retainer, it is not designed to be removed.
3. Remove the link rod (1) from the liftgate pivot bracket (2) by gently pulling the link rod away from the liftgate.
4. Remove the D-pillar trim from the vehicle. (Refer to 23 - BODY/INTERIOR/D-PILLAR TRIM - REMOVAL) for the procedure.
5. Remove the link rod from the drive unit mounting sphere by gently pulling the link rod away from the drive unit.
INSTALLATION
1. Install the drive unit end of the link rod (1) onto the mounting sphere by gently pushing straight on.
2. Install the liftgate end of the link rod (1) onto the liftgate (3) pivot bracket (2) by gently pushing straight on.
3. Push the plastic retainer (1) down to lock the link rod mounting sphere (2) into position for both ends of the link rod.
4. Install the D-pillar trim on the vehicle. (Refer to 23 - BODY/INTERIOR/D-PILLAR TRIM - INSTALLATION) for the procedure.
5. Perform the power liftgate learn cycle, (Refer to 8 - ELECTRICAL/POWER DOORS - STANDARD PROCEDURE - POWER LIFTGATE LEARN CYCLE).