WASHER RESERVOIR
DESCRIPTION
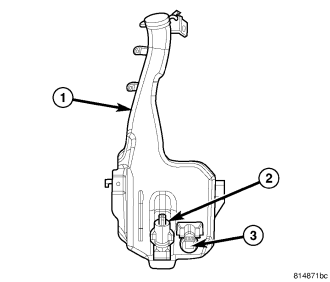
A single washer fluid reservoir (1) is used for both the front and rear washer systems. The molded plastic washer fluid reservoir is mounted on the outboard side of the left front frame rail in front of the left front wheel, where it is concealed by the left front wheel house splash shield. The only visible component of the washer reservoir is the filler neck and cap unit, which extends upward into the engine compartment forward of the radiator crossmember. A bright yellow plastic filler cap with a rubber seal and an International Control and Display Symbol icon for Windshield Washer and the text Washer Fluid Only molded into it snaps over the open end of the filler neck. The cap hinges on and is secured to a molded-in hook formation on the rear of the reservoir filler neck.
There are separate, dedicated holes on the outboard side of the reservoir provided for the washer pump/motor unit (2) and the washer fluid level switch (3). The inboard side of the washer reservoir has two integral mounting flanges that are secured to the outside of the left front frame rail by two screws. A blind rivet secures an integral mounting on the reservoir filler neck to the left side of the upper radiator crossmember near the front of the engine compartment. The left front fender wheel house splash shield must be removed to access the washer reservoir for service.
The washer reservoir cannot be repaired and, if ineffective or damaged, it must be replaced. The washer reservoir, rubber grommet seals for the washer pump/motor unit and the washer fluid level switch, and the filler cap are each available for individual service replacement.
OPERATION
The washer fluid reservoir provides a secure, on-vehicle storage location for a large reserve of washer fluid for operation of the front and rear washer systems. The washer reservoir filler neck provides a clearly marked and readily accessible point from which to add washer fluid to the reservoir. The washer pump/motor unit is located in a sump area near the outboard side of the reservoir to be certain that washer fluid will be available to the pump as the fluid level in the reservoir becomes depleted. The washer pump/motor unit is mounted in the lowest position in the sump. The washer fluid level switch is mounted just above the sump area of the reservoir so that there will be adequate warning to the vehicle operator that the washer fluid level is low, before the washer system will no longer operate.
REMOVAL
1. Disconnect and isolate the negative battery cable.
2. Turn the steering wheel to move the front wheels to the full left position.
3. Open the reservoir filler cap and unsnap it from the hook on the back of the filler neck.
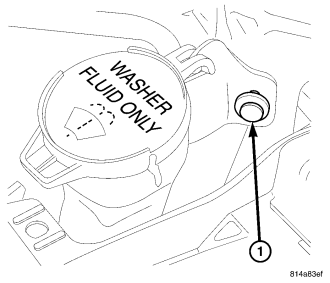
4. Remove the blind rivet (1) that secures the washer reservoir filler neck to the upper radiator support.
5. Raise and support the vehicle.
6. Remove the plastic push-in fasteners that secure the forward end of the left front wheelhouse splash shield to the inner fender panel and the front fascia. (Refer to 23 - BODY/EXTERIOR/LINER-FENDER AND QUARTER PANEL - REMOVAL).
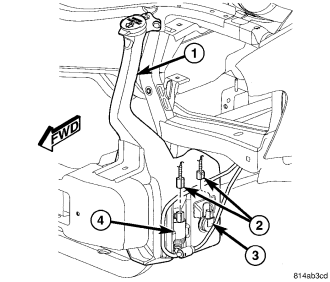
7. Pull the forward end of the front wheelhouse splash shield away from the inner fender panel and front fascia far enough to access the washer reservoir (1) for service.
8. Disconnect the headlamp and dash wire harness connectors (2) from the washer fluid level switch (3) and the washer pump/motor (4).
NOTE: To aid in reinstallation, note the installed position of the washer hoses prior to disconnecting them from the washer pump.
9. Disconnect the front and rear washer hoses from the barbed outlet nipples of the washer pump and allow the washer fluid to drain into a clean container for reuse.
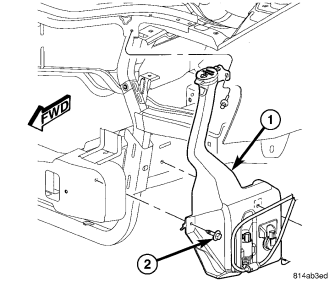
10. Remove the two screws (2) that secure the washer reservoir (1) to the left front frame rail.
11. Disengage the hook tab at the front of the washer reservoir from the slot in the left front frame rail.
12. Lower the washer reservoir from the vehicle, rotating it as necessary for clearance.
INSTALLATION
1. Position the washer reservoir (1) into the left front fender wheel house from underneath the vehicle.
2. Raise the washer reservoir into position, rotating it as necessary for clearance.
3. Engage the hook tab at the front of the reservoir into the slot in the left front frame rail.
4. Install and tighten the two screws (2) that secure the washer reservoir to the left front frame rail. Tighten the screws to 7 N·m (60 in. lbs.).
NOTE: Be certain to reconnect the front and rear washer hoses to the proper outlet nipples of the washer pump. Failure to properly connect the hoses will cause the front and rear washer systems to operate incorrectly.
5. Reconnect the front and rear washer hoses to the barbed outlet nipples of the washer pump.
6. Reconnect the headlamp and dash wire harness connectors (2) for the washer pump/motor unit (4) and the washer fluid level switch (3).
7. Reinstall the plastic push-in fasteners that secure the left front wheelhouse splash shield to the inner fender panel and the front fascia. (Refer to 23 - BODY/EXTERIOR/LINER-FENDER AND QUARTER PANEL - INSTALLATION).
8. Lower the vehicle.
9. Install a new blind rivet (1) to secure the washer reservoir filler neck mounting bracket to the upper radiator crossmember.
10. Reinstall the washer reservoir filler cap hinge onto the hook on the filler neck.
11. Refill the washer reservoir with the washer fluid drained during removal.
12. Reconnect the battery negative cable.