INSTALLATION
- BULB - WITH FLASHLIGHT FEATURE
- BULB - WITHOUT FLASHLIGHT FEATURE
- LAMP - WITH FLASHLIGHT FEATURE
- LAMP - WITHOUT FLASHLIGHT FEATURE
BULB - WITH FLASHLIGHT FEATURE
CAUTION: Always use the correct bulb size and type for replacement. An incorrect bulb size or type may overheat and cause damage to the lamp, the socket or the lamp wiring.
NOTE: There are two types of cargo lamps available in this vehicle; one with and one without a removable flashlight feature.
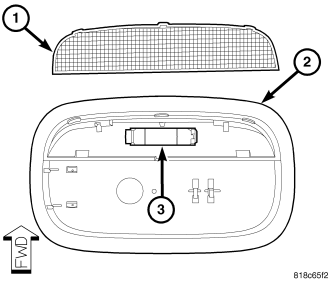
1. Align the ends of the bulb (3) with the two bulb holders within the cargo lamp housing (2).
2. Carefully press the bulb firmly and evenly into the bulb holders until it snaps into place.
3. Position the curved edge of the lens (1) into position against the housing, then press upward on the straight edge of the lens firmly and evenly until it snaps into the housing.
4. Reinstall the flashlight into the cargo lamp housing.
5. Reconnect the battery negative cable.
BULB - WITHOUT FLASHLIGHT FEATURE
CAUTION: Always use the correct bulb size and type for replacement. An incorrect bulb size or type may overheat and cause damage to the lamp, the socket or the lamp wiring.
NOTE: There are two types of cargo lamps available in this vehicle; one with and one without a removable flashlight feature.
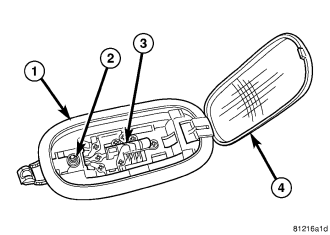
1. Align the ends of the bulb (3) with the two bulb holders within the cargo lamp housing (1).
2. Carefully press the bulb firmly and evenly into the bulb holders until it snaps into place.
3. Swing the notched end of the lens (4) up into position against the housing, then press upward on the lens firmly and evenly until it snaps into the housing.
4. Reconnect the battery negative cable.
LAMP - WITH FLASHLIGHT FEATURE
NOTE: There are two types of cargo lamps available in this vehicle; one with and one without a removable flashlight feature.
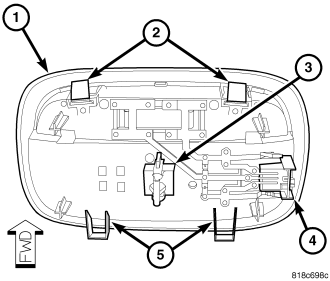
1. Position the cargo lamp (1) with the flashlight removed close enough to the headliner to reconnect the headliner wire harness connector to the connector receptacle (4) on the back of the lamp.
2. Engage the two fixed retainers (5) into the rear edge of the headliner mounting hole.
3. Slide the lamp housing rearward far enough to obtain clearance between the front edge of the lamp housing and the front of the headliner mounting hole for the lamp.
4. Depress the two spring tabs (2) far enough to push the forward edge of the lamp housing up into the mounting hole in the headliner, then release the spring tabs to engage the back of the headliner substrate.
5. Align the snap clip retainer (3) with the hole in the upper liftgate opening header.
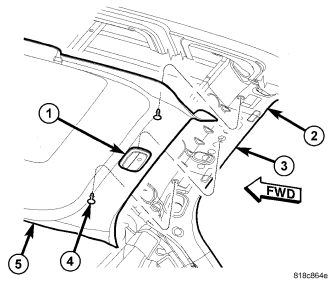
6. Press firmly and evenly upward on the center of the flashlight receptacle in the cargo lamp housing (1) until the snap clip retainer on the back of the lamp snaps into place in the hole in the upper liftgate opening header (3).
7. Reinstall the push pin fastener (4) adjacent to each side of the cargo lamp that secures the headliner (5) to the upper D-pillar reinforcement (2).
8. Reinstall the trim onto the inside of both upper D-pillars. (Refer to 23 - BODY/INTERIOR/UPPER D-PILLAR TRIM - INSTALLATION).
9. Reinstall the flashlight into the cargo lamp housing.
10. Reconnect the battery negative cable.
LAMP - WITHOUT FLASHLIGHT FEATURE
NOTE: There are two types of cargo lamps available in this vehicle; one with and one without a removable flashlight feature.
1. Position the cargo lamp unit (1) to the mounting hole in the headliner.
2. Reconnect the wire harness connector to the connector receptacle on the back of the lamp housing.
3. Insert the fixed retainer (4) on the notched end (5) of the lamp housing up into one side of the mounting hole in the headliner.
4. Slide the notched end of the housing into the mounting hole far enough to engage the lens hinge/retainer (3) into the opposite side of the hole in the headliner.
5. Gently and evenly press the lens hinge/retainer end of the lamp into the mounting hole until the bezel of the lamp housing is flush with the headliner.
6. Swing the notched end of the lamp lens (2) into position against the lamp housing, then press on the lens firmly and evenly until it snaps into the housing.
7. Reconnect the battery negative cable.