STANDARD PROCEDURE
FRONT FRAME RAIL TIP REPLACEMENT
CAUTION:
This procedure is designed to replace the front frame rail tips that have been damaged in the crush initiator zones. Prior to any cutting, the vehicle must be mounted on
the appropriate frame repair equipment (“frame rack”), checked with three dimensional measuring equipment, and the necessary pull corrections made without the use of heat.
(Refer to 13 - FRAME & BUMPERS/FRAME - SPECIFICATIONS - FRAME DIMENSION)
CAUTION:
Inspect the tire winch assembly for damage. If any one or more of the following are evident, replace the winch assembly.
1. Before proceeding with this repair procedure review the required service warnings and precautions. (Refer to 13 - FRAME & BUMPERS/FRAME - WARNING)
2. Disconnect and isolate the battery negative cable.
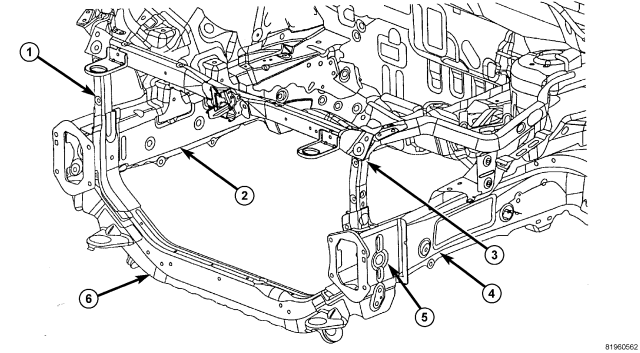
| FRONT STRUCTURE |
| 1 - FESM STRUCTURE |
| 2 - RIGHT SIDE FRAME RAIL |
| 3 - FESM STRUCTURE |
| 4 - LEFT SIDE FRAME RAIL |
| 5 - FRONT RAIL CAP PANEL (TYPICAL BOTH SIDES) |
| 6 - LOWER RADIATOR CROSSMEMBER |
3. With vehicle mounted to appropriate pulling and 3-dimensional measuring equipment, complete the following procedure paying particular attention to body dimensions while fitting and welding panels.
4. Remove bumper components, cooling module, headlamp, and all other components for clear access to repair area.
5. Remove front rail cap panel (5) on damaged rail.
6. Remove welds holding lower radiator crossmember (6) to damaged rail (if crossmember is damaged, remove completely).
7. Remove welds holding FESM structure (1 and 3) to rail (if damaged, remove complete assembly).
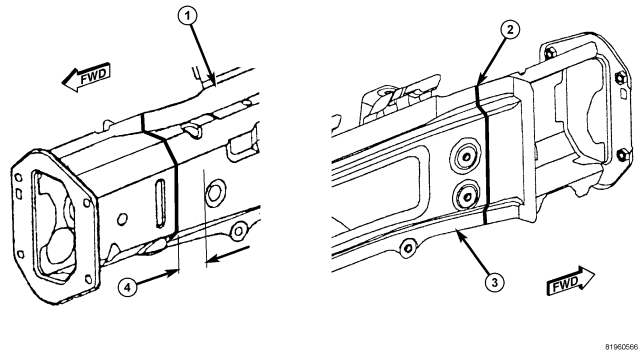
| RIGHT SIDE ONLY |
| 1 - INNER RAIL |
| 2 - CONTINUE MARK FROM INNER RAIL |
| 3 - OUTER RAIL |
| 4 - MARK LOCATION 50 mm (2 in) |
8. Mark existing rail as follows:
Right side
1. On inner rail (1), mark at 50 mm (2 in) (4) forward of the leading edge of flanged hole in rail.
2. On outer rail (3), continue mark (2) from inner rail.
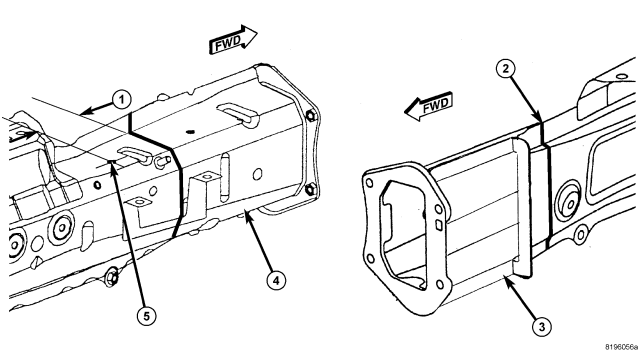
| CUT LINE MARKS |
| 1 - MARK LOCATION 80 mm (3.2 in) |
| 2 - CONTINUE MARK FROM INNER RAIL |
| 3 - OUTER RAIL |
| 4 - INNER RAIL |
| 5 - REAR BATTERY TRAY WELD NUT |
Left side
1. On inner rail (4), mark at 80 mm (3.2 in) (1) forward of centerline of rear battery tray weld-nut (located on top of rail).
2. On outer rail (3), continue mark (2) from inner rail (4).
9. Mark replacement part in same location.
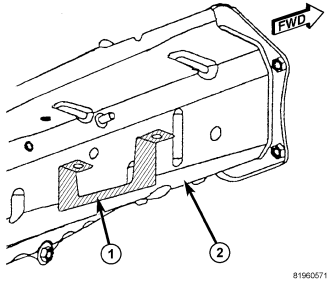
| BATTERY TRAY BRACKET |
10. On left rail (2), remove bracket (1) located on inner rail.
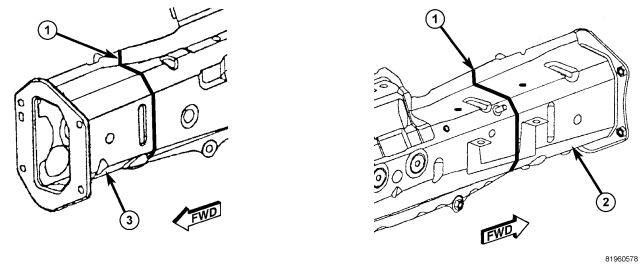
| CUT LOCATIONS |
| 1 - CUT EXISTING PARTS ON FORWARD SIDE OF SCRIBED LINE |
| 2 - LEFT SIDE |
| 3 - RIGHT SIDE |
11. Using a cut-off wheel, reciprocating saw, or equivalent:
a. Cut all existing parts on the forward side of the scribe line (1) using care not to damage the material that will not be removed. - Right rail section location: When installation of new tip is complete, there is a 6 mm (0.25 in) hole on the inner rail at the forward edge of the section joint which may need to be recreated or restored. - Left rail section location: When installation of new tip is complete, there is a 10 mm (0.40 in) hole in bottom horizontal surface of rail which may need to be restored.
b. Cut all replacement parts on the rearward side of the scribe line again using care not to make any additional damage but do not discard any material yet.
12. Clean all sharp edges and create a slight taper for weld purposes.
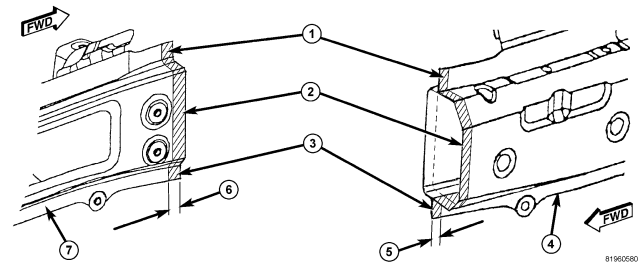
| CUT STRIPS |
| 1 - CUT OFF FLANGES |
| 2 - CUT, REMOVE AND SAVE THESE PIECES (WELD BACKERS) |
| 3 - CUT OFF FLANGES |
| 4 - INNER RAIL |
| 5 - CUT STRIP 19 mm (0.75 in) |
| 6 - CUT STRIP 19 mm (0.75 in) |
| 7 - OUTER RAIL |
13. From the remaining replacement part, cut a 19 mm (0.75 in) strip (2) from both the inner and outer rail. Clip off the weld flanges (1 and 3), top and bottom, and dress edges. These pieces will be the weld-backer.
14. Prepare welding equipment per the weld chart at the end of procedure, (Refer to 13 - FRAME & BUMPERS/FRAME - SPECIFICATIONS).
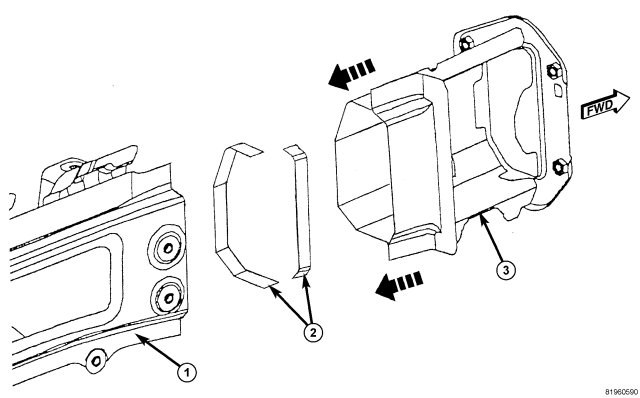
| FRAME TIP ASSEMBLY |
| 1 - FRAME RAIL |
| 2 - WELD BACKERS |
| 3 - REPLACEMENT FRAME RAIL TIP |
15. Install the weld-backers (2) into the frame rail (1), centering them on cut edge. Clamp and tack the weld-backers in position when proper fit is confirmed.
16. Dry fit the new rail tip (3) to verify alignment, fit and make any adjustments as necessary.
NOTE: Any burned surface coatings will need to be removed prior to application of corrosion preventative coatings.
CAUTION: Shield the surrounding area and components from exposure to the welding spatter and heat.
17. Using the appropriate measuring equipment, verify the front frame rail tip's location in all three (X, Y and Z) planes of space, and adjust if required. (Refer to 13 - FRAME & BUMPERS/FRAME - SPECIFICATIONS - FRAME DIMENSION)
18. Weld using a skip-stitch method until the full length of the joint is completed on both the inner and outer rail. To avoid excessive heat buildup, move between inner and outer rail during welding.
19. Dress welds without removing any base material paying particular attention to the mounting surface of the outer rail.
20. Install the bracket removed from the left rail.
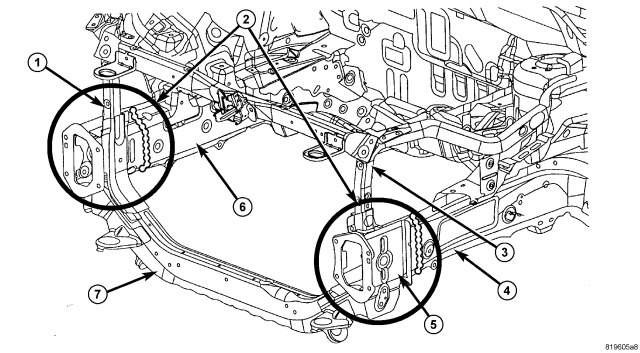
| REPAIR COMPLETE |
| 1 - FESM STRUCTURE |
| 2 - CLEAN AND REFINISH REPAIRED AREAS |
| 3 - FESM STRUCTURE |
| 4 - LEFT SIDE FRAME RAIL |
| 5 - FRONT RAIL CAP PANEL |
| 6 - RIGHT SIDE FRAME RAIL |
| 7 - LOWER RADIATOR CROSSMEMBER |
21. Either install new or reposition the lower radiator crossmember (7) and FESM structure (1 and 3) and clamp in place and weld.
22. Install new front rail cap panel (5).
23. Clean all repaired areas and apply appropriate refinish and corrosion protection materials.