CV BOOT-OUTER
REMOVAL
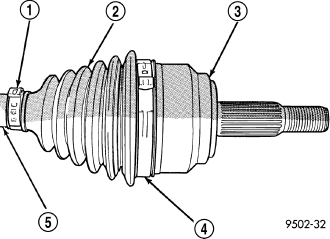
1. Remove halfshaft assembly requiring boot replacement from vehicle. (Refer to 3 - DIFFERENTIAL & DRIVELINE/HALF SHAFT - REMOVAL)
2. Remove large boot clamp (4) retaining CV joint sealing boot to CV joint housing (3) and discard. Remove small clamp (1) that retains outer CV joint sealing boot to interconnecting shaft (5) and discard. Remove sealing boot (2) from outer CV joint housing and slide it down interconnecting shaft.
3. Wipe away grease to expose outer CV joint and interconnecting shaft.
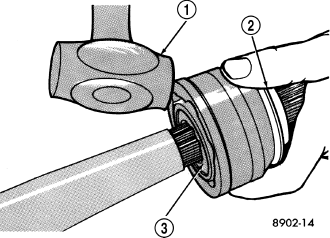
4. Remove outer CV joint from interconnecting shaft using the following procedure: Support interconnecting shaft in a vise equipped with protective caps on jaws of vise to prevent damage to interconnecting shaft. Then, using a soft–faced hammer (1), sharply hit the end of the CV joint housing to dislodge housing from internal circlip (3) on interconnecting shaft. Then slide outer CV joint off end of interconnecting shaft, joint may have to be tapped off shaft using a soft–faced hammer.
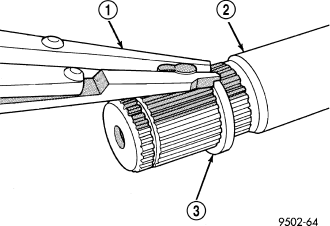
5. Remove large circlip (3) from the interconnecting shaft (2) before attempting to remove outer CV joint sealing boot.
6. Slide sealing boot off interconnecting shaft.
7. Thoroughly clean and inspect outer CV joint assembly and interconnecting joint for any signs of excessive wear. If any parts show signs of excessive wear, the halfshaft assembly will require replacement. Component parts of these halfshaft assemblies are not serviceable.
INSTALLATION
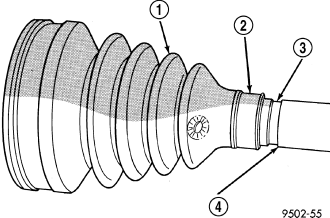
1. Slide new sealing boot clamp (2) onto interconnecting shaft (4). Slide the outer CV joint assembly sealing boot (1) onto the interconnecting shaft (4). Seal boot MUST be positioned on interconnecting shaft so the raised bead on the inside of the seal boot is in groove on interconnecting shaft.
2. Align splines on interconnecting shaft with splines on cross of outer CV joint assembly and start outer CV joint onto interconnecting shaft.
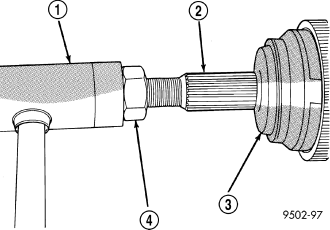
3. Install outer CV joint assembly onto interconnecting shaft by using a soft–faced hammer (1) and tapping end of stub axle (2) (with hub nut (4) installed) until outer CV joint (3) is fully seated on interconnecting shaft.
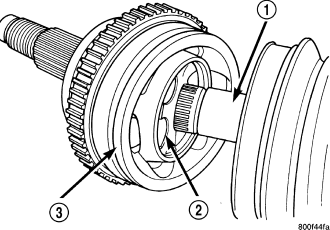
4. Outer CV joint assembly must be installed on interconnecting shaft until cross (2) of outer CV joint assembly (3) is seated against circlip on interconnecting shaft (1).
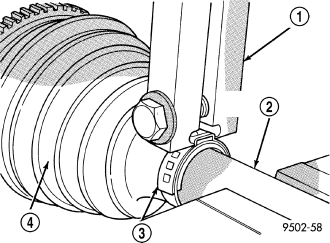
5. Distribute 1/2 the amount of grease provided in seal boot service package (DO NOT USE ANY OTHER TYPE OF GREASE) into outer CV joint assembly housing. Put the remaining amount into the sealing boot (4).
6. Install outer CV joint sealing boot to interconnecting shaft clamp evenly on sealing boot.
7. Clamp sealing boot onto interconnecting shaft (2) using crimper, Clamp C-4975-A and the following procedure. Place Crimping Tool C-4975-A (1) over bridge of clamp (3).
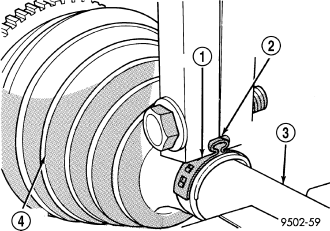
8. Tighten nut on Clamp C-4975-A until jaws on tool are closed completely together (2), face to face.
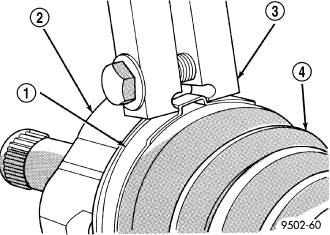
CAUTION: Seal must not be dimpled, stretched, or out–of–shape in any way. If seal is NOT shaped correctly, equalize pressure in seal and shape it by hand.
9. Position outer CV joint sealing boot (4) into its retaining groove on outer CV joint housing. Install sealing boot to outer CV joint retaining clamp (1) evenly on sealing boot.
10. Clamp sealing boot onto outer CV joint housing using Clamp C-4975-A (3) and the following procedure. Place Clamp C-4975-A over bridge of clamp (1).
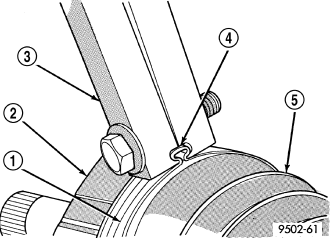
11. Tighten nut on Clamp C-4975-A until jaws on tool are closed completely together (4), face to face.
12. Install the halfshaft requiring boot replacement back on the vehicle. (Refer to 3 - DIFFERENTIAL & DRIVELINE/HALF SHAFT - INSTALLATION)