INSTALLATION
BRACKET
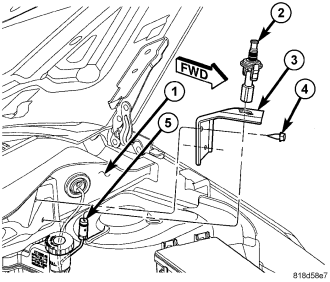
1. Position the hood ajar switch bracket (3) onto the left side of the cowl plenum panel (1).
2. Install and tighten the two screws (4) that secure the hood ajar switch bracket to the cowl plenum panel. Tighten the screws to 4 N·m (35 in. lbs.).
3. Reinstall the hood ajar switch (2) into the mounting bracket. (Refer to 8 - ELECTRICAL/VEHICLE THEFT SECURITY/HOOD AJAR SWITCH - INSTALLATION).
STRIKER CAP
NOTE: The hood ajar switch striker cap is not intended for reuse. If the striker cap is removed from the hood inner reinforcement for any reason, it must be replaced.
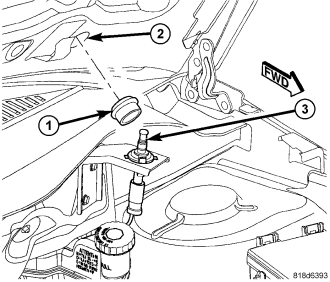
1. Position the new hood ajar switch striker cap (1) to the mounting hole (2) in the inner hood panel reinforcement over the hood ajar switch (3).
2. Using hand pressure, press the hood ajar switch striker cap upward into the mounting hole in the inner hood panel reinforcement until it is fully engaged in the mounting hole.
3. Close and latch the hood.
SWITCH
1. Position the hood ajar switch (2) near the hole in the mounting bracket (3) on the left side of the cowl plenum panel (1).
2. Route the wire harness connector (5) through the switch mounting bracket and reconnect it to the switch connector receptacle.
3. From the top of the mounting bracket, press the switch downward into the mounting hole until the integral switch latch tabs lock it into place.
4. Reconnect the battery negative cable.
5. Close and latch the hood.