DISASSEMBLY
HOUSING-HVAC
NOTE: The HVAC housing must be removed from the vehicle and disassembled for service of the A/C evaporator.
NOTE: LHD model with A/C shown in illustrations. RHD and heater-only models similar.
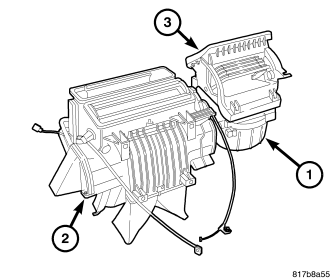
1. Remove the HVAC housing assembly and place it on a workbench (refer to 24 - HEATING & AIR CONDITIONING/DISTRIBUTION /HOUSING-HVAC - HOUSING-HVAC ASSEMBLY - REMOVAL).
2. Remove the air distribution housing (2) from the HVAC housing (1) (refer to 24 - HEATING & AIR CONDITIONING/DISTRIBUTION/HOUSING-HVAC - HOUSING-AIR DISTRIBUTION - REMOVAL).
3. Remove the air inlet housing (3) from the HVAC housing (refer to 24 - HEATING & AIR CONDITIONING/DISTRIBUTION/HOUSING-HVAC - HOUSING-AIR INLET - REMOVAL).
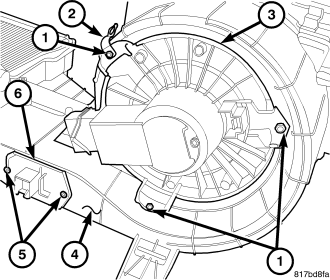
4. Remove the three screws (1) that secure the wire lead bracket (2) and the blower motor (3) to the bottom of the HVAC housing (4) and remove the blower motor and wire lead bracket.
5. Remove the two screws (5) that secure the blower motor resistor (6) to the bottom of the HVAC housing and remove the resistor.
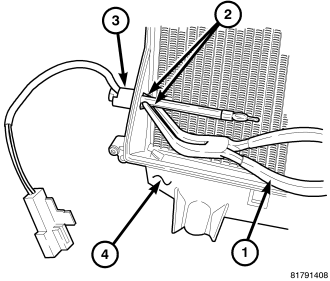
6. Using needle nose pliers (1), disengage the two retaining tabs (2) that secure the evaporator temperature sensor (3) to the driver side of the HVAC housing (4) and remove the sensor.
NOTE: If the foam seal for the flange is deformed or damaged, it must be replaced.
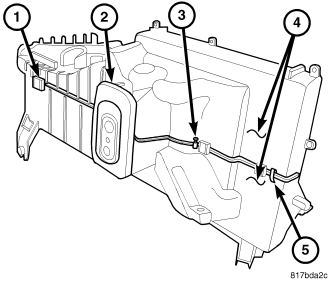
7. Carefully remove the foam seal (2) from the front of the two halves of the HVAC housing (4). If the seal is deformed or damaged, it must be replaced.
8. Remove the nine screws (3) and three metal clips (5) that secure the two halves of the HVAC housing together.
9. Disengage the nine plastic retaining tabs (1) that secure the two halves of the HVAC housing together and separate the housing.
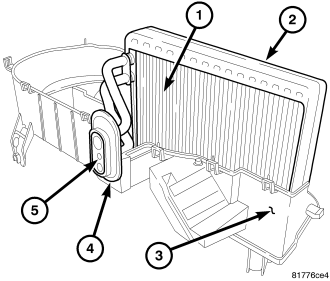
NOTE: If the foam insulator around the A/C evaporator is deformed or damaged, the insulator must be replaced.
10. Carefully lift the A/C evaporator (1) and the foam insulator (2) out of the lower half of the HVAC housing (3).
NOTE: If the seal around the evaporator tube tapping block is deformed or damaged, the seal must be replaced.
11. If required, remove the seal (4) from around the evaporator tube tapping block (5).
HOUSING-AIR DISTRIBUTION
NOTE: The air distribution housing must be removed from the HVAC housing and disassembled for service of the blend-air and mode-air doors.
NOTE: LHD model with A/C shown in illustrations. RHD and heater-only models similar.
1. Remove the HVAC housing assembly and place it on a workbench (refer to 24 - HEATING & AIR CONDITIONING/DISTRIBUTION /HOUSING-HVAC - HOUSING-HVAC ASSEMBLY - REMOVAL).
2. Remove the air distribution housing (2) from the HVAC housing (1) (refer to 24 - HEATING & AIR CONDITIONING/DISTRIBUTION/HOUSING-HVAC - HOUSING-AIR DISTRIBUTION - REMOVAL).
3. If equipped with the 2.0L diesel engine, remove the electric positive temperature coefficient (PTC) heater unit from the air distribution housing (refer to 24 - HEATING & AIR CONDITIONING/CABIN HEATER/HEATER UNIT - REMOVAL).
4. Remove the heater core from the air distribution housing (Refer to 24 - HEATING & AIR CONDITIONING/PLUMBING/CORE HEATER - REMOVAL).
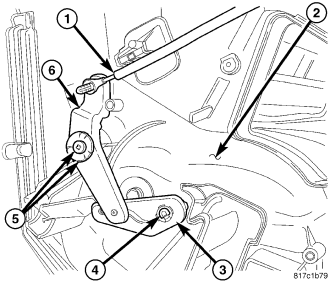
5. Remove the temperature control cable (1) from the left side of the air distribution housing (2) (refer to 24 - HEATING & AIR CONDITIONING/CONTROLS/CABLE-TEMPERATURE CONTROL - REMOVAL).
6. Remove the screw and washer (5) that secures the blend door cable lever (6) to the air distribution housing and remove the cable lever.
NOTE: To remove the blend door pivot lever, disengage the retaining tab and pull the lever straight out of the air distribution housing.
7. Remove the blend door pivot lever (3) from the end of the blend door pivot shaft (4) and remove the pivot lever.
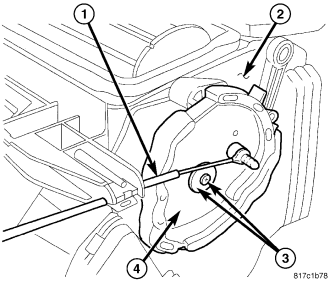
8. Remove the mode door cable (1) from the right side of the air distribution housing (2) (refer to 24 - HEATING & AIR CONDITIONING/CONTROLS/CABLE-MODE DOOR - REMOVAL).
9. Remove the screw and washer (3) that secure the mode door cam (4) to the air distribution housing and remove the cam.
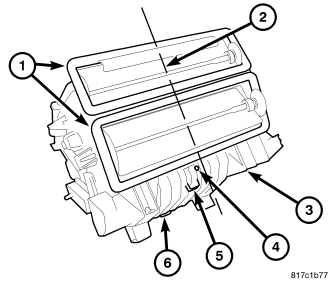
NOTE: If any foam seal on the air distribution housing outlets is deformed or damaged, the seal must be replaced.
10. Carefully cut the two foam seals (1) along the parting line (2) of the two halves of the air distribution housing (3). If either seal is deformed or damaged, it must be replaced.
11. Remove the five screws (4) and one metal clip (5) that secure the two halves of the air distribution housing together.
12. Disengage the three plastic retaining tabs (6) that secure the two halves of the air distribution housing together and carefully separate the housing.
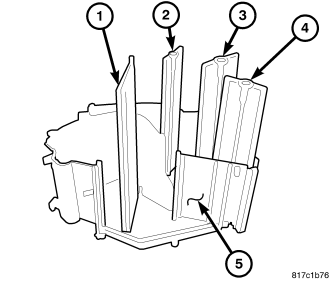
NOTE: If a seal on an air door is deformed or damaged, the air door must be replaced.
13. Disengage the air door(s) (1, 2, 3 and 4) from the mode door levers and remove the air doors from the air distribution housing (5).
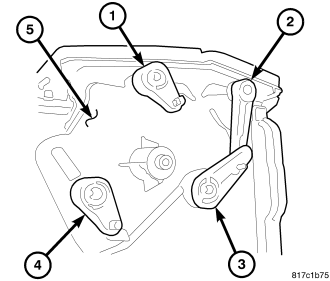
NOTE: To remove the mode door levers, disengage the retaining tabs on the inside of the air distribution housing and pull the levers straight out of the housing.
14. Remove the four mode door levers (1, 2, 3 and 4) from the right side of the air distribution housing (5).
HOUSING-AIR INLET
NOTE: The air inlet housing must be removed from HVAC housing and disassembled for service of the recirculation-air door.
NOTE: LHD model with A/C shown in illustrations. RHD and heater-only models similar.
1. Remove the HVAC housing assembly and place it on a workbench (refer to 24 - HEATING & AIR CONDITIONING/DISTRIBUTION /HOUSING-HVAC - HOUSING-HVAC ASSEMBLY - REMOVAL).
2. Remove the air inlet housing (3) from the HVAC housing (1) (refer to 24 - HEATING & AIR CONDITIONING/DISTRIBUTION/HOUSING-HVAC - HOUSING-AIR INLET - REMOVAL).
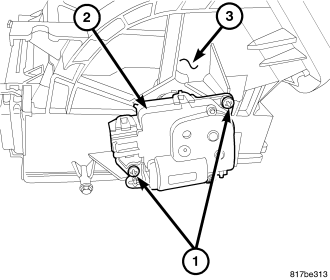
3. Remove the two screws (1) that secure the recirculation door actuator (2) to the right side of the air inlet housing (3) and remove the actuator.
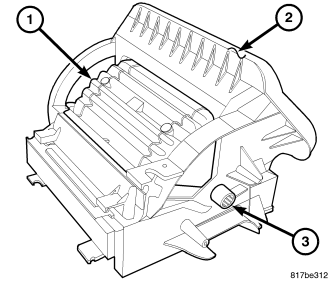
4. To remove the recirculation door pivot shaft adapter from the right end of the recirculation-air door, first carefully push down on the tab of the door lever pivot shaft adapter located inside of the air inlet housing, then pull the pivot shaft adapter straight out of the end of the recirculation-air door pivot shaft.
NOTE: If the foam seal on the air inlet housing is deformed or damaged, the seal must be replaced.
NOTE: If a rubber seal on the recirculation air-door is deformed or damaged, the air-door must be replaced.
5. Carefully pinch the two ends of the recirculation air-door together and remove the air-door from the air inlet housing. If the seal on the recirculation air-door is deformed or damaged, the air-door must be replaced.