INSTALLATION
BULB - DOMESTIC
CAUTION: Always use the correct bulb size and type for replacement. An incorrect bulb size or type may overheat and cause damage to the lamp, the socket or the lamp wiring.
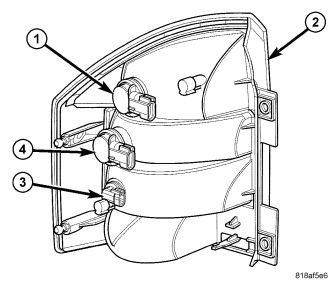
NOTE: The rear lamp unit (2) contains three bulbs. They are: backup (3), park/stop/rear side marker (1), and turn signal (4). The service procedures for each bulb are the same, only the bulb sizes and types may differ.
1. Align the base of the bulb with the appropriate lamp socket (1, 3 or 4).
2. Push the bulb straight into the socket until the base is firmly seated.
3. Align the socket and bulb with the keyed opening on the back of the rear lamp unit (2) housing.
4. Insert the socket and bulb into the housing until the socket is firmly seated.
5. Rotate the socket clockwise about 30 degrees to lock it into place.
6. Reinstall the rear lamp unit onto the end of the quarter panel. (Refer to 8 - ELECTRICAL/LAMPS/LIGHTING - EXTERIOR/REAR LAMP UNIT - INSTALLATION).
7. Reconnect the battery negative cable.
BULB - EXPORT
CAUTION: Always use the correct bulb size and type for replacement. An incorrect bulb size or type may overheat and cause damage to the lamp, the socket or the lamp wiring.
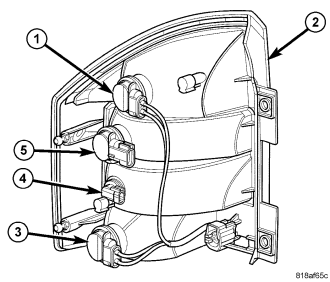
NOTE: The rear lamp unit (2) contains four bulbs. They are: backup (4), park/stop/rear side marker (1), rear fog (3) and turn signal (5). The service procedures for each bulb are the same, only the bulb sizes and types may differ.
1. Align the base of the bulb with the appropriate lamp socket (1, 3, 4 or 5).
2. Push the bulb straight into the socket until the base is firmly seated.
3. Align the socket and bulb with the keyed opening on the back of the rear lamp unit (2) housing.
4. Insert the socket and bulb into the housing until the socket is firmly seated.
5. Rotate the socket clockwise about 30 degrees to lock it into place.
6. Reinstall the rear lamp unit onto the end of the quarter panel. (Refer to 8 - ELECTRICAL/LAMPS/LIGHTING - EXTERIOR/REAR LAMP UNIT - INSTALLATION).
7. Reconnect the battery negative cable.
LAMP - DOMESTIC
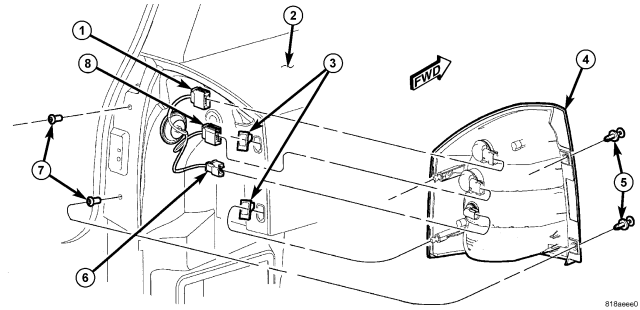
1. Check to be certain that the two plastic seal grommets (7) are in good condition and properly installed in the side trough of the liftgate opening.
2. Check to be certain that the two plastic ball stud grommets (3) are in good condition and properly installed in the quarter outer panel (2).
3. Position the rear lamp unit (4) to the lamp opening of the quarter outer panel.
4. Reconnect the three unibody wire harness connectors (1, 6 and 8) to the bulb socket connector receptacles on the back of the lamp housing.
5. Align the two ball studs on the outboard side of the lamp housing with the two grommets in the quarter outer panel.
CAUTION: Apply firm and even pressure to the rear lamp ONLY at the top and bottom of the unit. Applying pressure at the side or center of the lamp may result in damage to the lamp lens or reflector.
6. Using hand pressure, push firmly and evenly on the outboard top and bottom of the lamp until both ball studs snap into the grommets.
7. Install the two push pin fasteners (6) that secure the rear lamp unit to the side trough of the liftgate opening.
8. Reconnect the battery negative cable.
LAMP - EXPORT
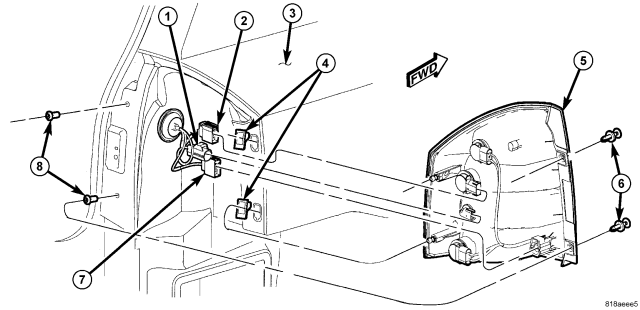
1. Check to be certain that the two plastic seal grommets (8) are in good condition and properly installed in the side trough of the liftgate opening.
2. Check to be certain that the two plastic ball stud grommets (4) are in good condition and properly installed in the quarter outer panel (3).
3. Position the rear lamp unit (5) to the lamp opening of the quarter outer panel.
4. Reconnect the three unibody wire harness connectors (1, 2 and 7) to the two bulb socket connector receptacles and the pigtail wire connector on the back of the lamp housing.
5. Align the two ball studs on the outboard side of the lamp housing with the two grommets in the quarter outer panel.
CAUTION: Apply firm and even pressure to the rear lamp ONLY at the top and bottom of the unit. Applying pressure at the side or center of the lamp may result in damage to the lamp lens or reflector.
6. Using hand pressure, push firmly and evenly on the outboard top and bottom of the lamp until both ball studs snap into the grommets.
7. Install the two push pin fasteners (6) that secure the rear lamp unit to the side trough of the liftgate opening.
8. Reconnect the battery negative cable.