GLASS - LIFTGATE
REMOVAL
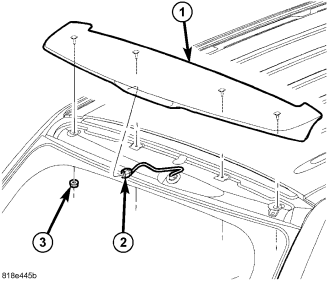
1. Before proceeding with the following repair procedure, review all warnings and cautions. (Refer to 23 - BODY/STATIONARY GLASS - WARNING)
2. Remove the spoiler (1), (Refer to 23 - BODY/EXTERIOR/SPOILER - LIFTGATE - REMOVAL).
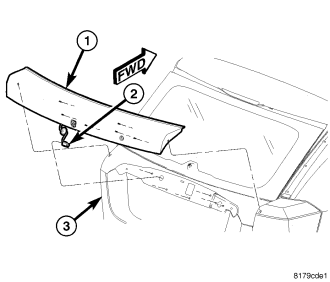
3. Remove the liftgate handle (1), (Refer to 23 - BODY/LIFTGATE/HANDLE - REMOVAL).
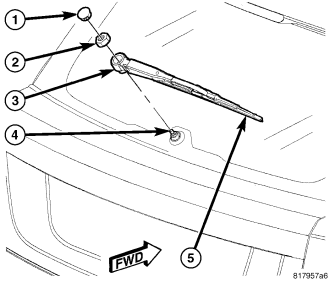
4. Remove the rear wiper arm (3), (Refer to 8 - ELECTRICAL/WIPERS/WASHERS/WIPER ARMS - REMOVAL).
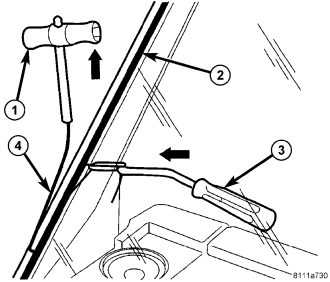
| 1 - T-HANDLE |
| 2 - WINDSHIELD ADHESIVE |
| 3 - COUNTER SUPPORT |
| 4 - CUTTING WIRE |
NOTE: Windshield removal shown, liftgate glass similar.
5. Disconnect the heated liftgate glass electrical connectors, if equipped.
6. Using a windshield cut-out wire (4) or other suitable tool, separate the adhesive (2).
7. Carefully remove liftgate glass.
INSTALLATION
WARNING: Allow the urethane at least 24 hours to cure before returning the vehicle to use.
CAUTION: Roll down the left and right front door glass and open the rear glass slider (if available) before installing liftgate glass to avoid pressurizing the passenger compartment if a door is slammed before urethane is cured. Water leaks can result.
NOTE: The liftgate glass fence should be cleaned of most of its old urethane bonding material. A small amount of old urethane, approximately 1-2 mm in height, should remain on the fence. Do not grind off or completely remove all old urethane from the fence, the paint finish and bonding strength will be adversely affected. Support spacers should be replaced with new parts. Replace any missing or damaged spacers around the perimeter of the liftgate opening.
Glass Preparation - Installing A Previously Installed liftgate glass
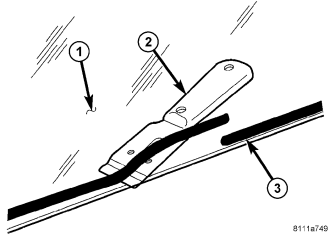
1. Before proceeding with the following repair procedure, review all warnings and cautions. (Refer to 23 - BODY/STATIONARY GLASS - WARNING)
2. Level old bead of liftgate glass adhesive (3) to a thickness of approximately 1 mm (0.04 in.) and remove loose adhesive.
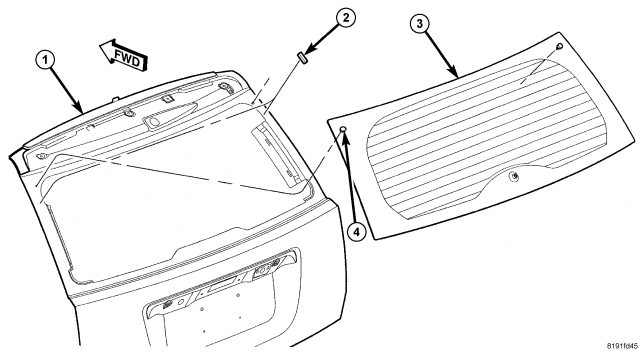
3. Apply two new spacers (2) to the liftgate frame.
4. Install the lower spacers to the liftgate horizontal flange.
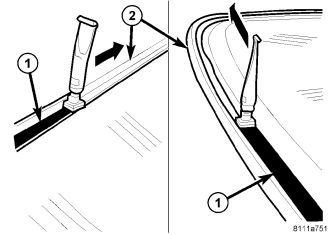
NOTE: Typical primer installation shown.
5. Clean and dry area of glass (2) to be re-glued with a suitable glass preparation solvent and rag.
6. Using a flash light, verify that glass primer is without damage.
7. Re-prime any damaged area. If old adhesive has been exposed for more than 12 hours, entire adhesive area needs to be re-primed.
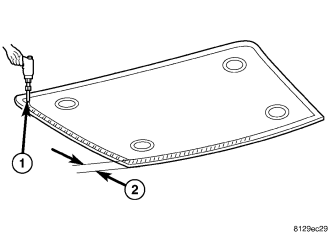
8. Apply primer (1) around the perimeter of the glass to a width of 15 mm (0.5 in.) (2).
9. Allow primer to air dry for at least 10 minutes.
10. Using a flash light, verify that glass primer is without damage.
Glass Preparation - Installing A New liftgate glass
1. Apply two new spacers (2) to the liftgate frame.
2. Install the lower spacers to the liftgate horizontal flange.
NOTE: Typical primer installation shown.
3. Clean and dry area of glass (2) to be re-glued with a suitable glass preparation solvent and rag.
4. Apply primer to gluing surface at liftgate glass seal.
5. Apply primer (1) around the perimeter of the glass to a width of 15 mm (0.5 in.) (2).
6. Allow primer to air dry for at least 10 minutes.
7. Using a flash light, verify that glass primer is without damage.
Liftgate Opening Preparation
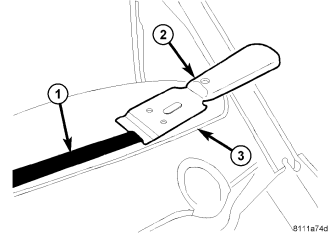
NOTE: Windshield opening shown, liftgate opening similar.
1. Clean and vacuum liftgate opening.
2. Level old bead of liftgate opening adhesive (1) to a thickness of approximately 1 mm (0.04 in.) and remove loose adhesive.
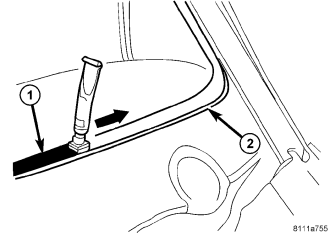
NOTE: Windshield opening shown, liftgate opening similar.
3. Clean and dry area of liftgate opening to be re-glued with a suitable glass preparation solvent and rag.
4. Re-prime any damaged area. If old adhesive has been exposed for more than 12 hours, entire adhesive area needs to be re-primed.
5. Allow primer to air dry for at least 10 minutes.
liftgate glass Installation
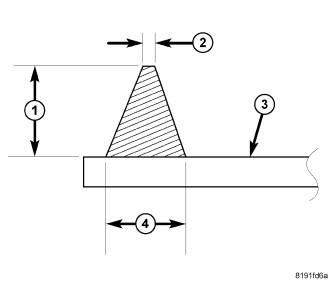
| 1 - ADHESIVE HEIGHT 12.7 mm (0.50 in) |
| 2 - ADHESIVE TIP WIDTH 3 mm (0.120 in) |
| 3 - INNER WINDSHIELD SURFACE |
| 4 - ADHESIVE WIDTH 9.5 mm (0.375 in) |
1. Bead dimensions should be approximately 9.5 mm (0.375 in) wide (4) by 12.7 mm (0.50 in) in height (1).
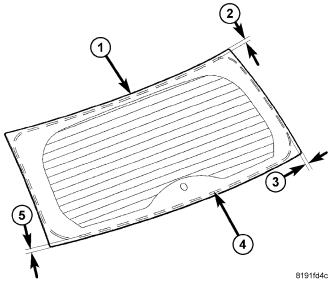
| 1 - LIFTGATE GLASS |
| 2 - TOP LOCATION 18.0 mm (0.70 in.) |
| 3 - SIDE LOCATION 11.5 mm (0.45 in.) |
| 4 - ADHESIVE BEAD |
| 5 - BOTTOM LOCATION 11.5 mm (0.45 in.) |
NOTE: Adhesive locations are measured from the center of the bead to the edge of the glass.
2. Apply bead (4) of adhesive with a triangular nozzle directly to the liftgate glass (1) starting at bottom in center of the liftgate glass.
3. Locate the bead (4) of adhesive onto the primed glass surface (2) as indicated.
CAUTION: Always apply bead of adhesive to the liftgate glass. Always install the liftgate glass within 5 minutes after applying adhesive.
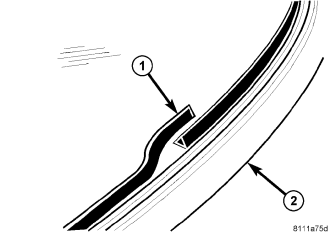
4. Allow end of adhesive bead (1) to run out parallel to the start of the bead and smooth ends flush.
5. Lift liftgate glass into place in the center of the liftgate opening and line up the guide pins (4) to the holes in the liftgate glass frame.
6. Carefully lay down the liftgate glass and press on.
CAUTION: It is no longer possible to move the liftgate glass after installation. The liftgate glass should never be pressed into place by more than one person, because the liftgate glass can break if pressed simultaneously on both sides.
CAUTION: Roll down the left and right front door glass and open the rear glass slider (if available) before installing liftgate glass to avoid pressurizing the passenger compartment if a door is slammed before urethane is cured. Water leaks can result.
1. Install the rear wiper arm, if equipped, (Refer to 8 - ELECTRICAL/WIPERS/WASHERS/WIPER ARMS - INSTALLATION).
2. Install the liftgate spoiler (1), (Refer to 23 - BODY/EXTERIOR/SPOILER - LIFTGATE - INSTALLATION).
3. Install the liftgate handle (1), (Refer to 23 - BODY/LIFTGATE/HANDLE - INSTALLATION).