DUCTS-FLOOR DISTRIBUTION
REMOVAL
WARNING: Disable the airbag system before attempting any steering wheel, steering column, or instrument panel component diagnosis or service. Disconnect and isolate the battery negative (ground) cable, then wait two minutes for the airbag system capacitor to discharge before performing further diagnosis or service. This is the only sure way to disable the airbag system. Failure to take the proper precautions could result in accidental airbag deployment and possible personal injury or death.
NOTE: Take the proper precautions to protect the face of the instrument panel from cosmetic damage while performing this procedure.
FRONT FLOOR DUCTS
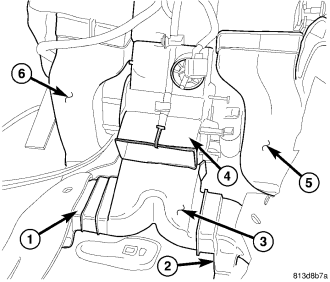
NOTE: Illustration shown with instrument panel, gear selector and console duct removed for clarity.
1. Remove the instrument panel from the passenger compartment (refer to 23 - BODY/INSTRUMENT PANEL/INSTRUMENT PANEL ASSEMBLY - REMOVAL).
2. Disconnect the right front floor duct (5) and the left front floor duct (6) from the rear of the air distribution housing (4) and remove the front floor ducts from the vehicle.
REAR FLOOR DUCTS
NOTE: LHD model shown in illustrations. RHD model similar.
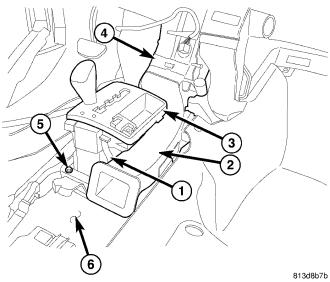
1. Remove the floor console from the passenger compartment (refer to 23 - BODY/INTERIOR/FLOOR CONSOLE - REMOVAL).
2. Remove the front seats (refer to 23 - BODY/SEATS/SEAT - REMOVAL).
3. Disengage the retainer (1) that secures the front console duct (2) to the gear selector (3).
4. Disconnect the front console duct from the air distribution housing (4) and remove the console duct.
5. Remove the screws (5) that secure the gear selector to the floor panel (6) and position the gear selector out of the way.
6. Roll back the front floor carpet from under the instrument panel toward the rear of the vehicle (refer to 23 - BODY/INTERIOR/CARPETS AND FLOOR MATS - REMOVAL).
7. Disconnect the left rear floor duct (1) and the right rear floor duct (2) from the rear floor distribution duct (3).
8. Disengage the retainer that secures the rear floor ducts to the floor support and remove the floor ducts.
9. Disconnect the rear floor distribution duct from the air distribution housing (4) and remove the distribution duct.
INSTALLATION
FRONT FLOOR DUCTS
NOTE: Illustration shown with instrument panel, gear selector and console duct removed for clarity.
1. Position the right front floor duct (5) and left front floor duct (6) into the vehicle
2. Connect the front floor ducts to the rear of the air distribution housing (4).
3. Install the instrument panel (refer to 23 - BODY/INSTRUMENT PANEL/INSTRUMENT PANEL ASSEMBLY - INSTALLATION).
REAR FLOOR DUCTS
NOTE: LHD model shown in illustrations. RHD model similar.
1. Position the rear floor distribution duct (3) into the vehicle and connect it to the rear of the HVAC air distribution housing (4).
2. Position the left rear floor duct (1) and right rear floor duct (2) into the vehicle and engage the retainers that secure the floor ducts to the floor support.
3. Connect the rear floor ducts to the rear floor distribution duct.
4. Install the carpet onto the front floor panel and under the instrument panel (refer to 23 - BODY/INTERIOR/CARPETS AND FLOOR MATS - INSTALLATION).
5. Position the gear selector (3) to its installed location on the floor panel (6) and securely install the retaining screws (5).
6. Connect the front console duct (2) to the air distribution housing (4) and engage the retainer (1) to the gear selector.
7. Install the front seats (refer to 23 - BODY/SEATS/SEAT - INSTALLATION).
8. Install the floor console duct (refer to 24 - HEATING & AIR CONDITIONING/DISTRIBUTION/DUCT-FLOOR CONSOLE - INSTALLATION)
9. Install the floor console (refer to 23 - BODY/INTERIOR/FLOOR CONSOLE - INSTALLATION).