STANDARD PROCEDURE
COMPASS CALIBRATION
CAUTION: Do not place any external magnets, such as magnetic roof mount antennas, in the vicinity of the compass. Do not use magnetic tools when servicing the overhead console.
The electronic compass unit features a self-calibrating design, which simplifies the calibration procedure. This feature automatically updates the compass calibration while the vehicle is being driven. This allows the compass unit to compensate for small changes in the residual magnetism that the vehicle may acquire during normal use. If the compass readings appear to be erratic or the Electronic Vehicle Information Center (EVIC) displays “CAL”, perform the following calibration procedure. Also, any time EVIC service replacement components are installed, they must be calibrated using this procedure. Do not attempt to calibrate the compass near large metal objects such as other vehicles, large buildings, or bridges; or, near overhead or underground power lines.
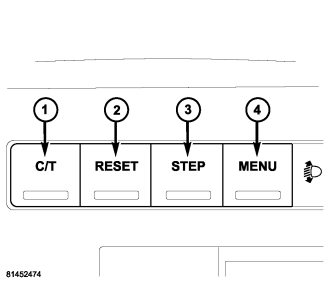
Calibrate the compass manually as follows:
1. Turn the ignition switch to the On position.
2. Press and release the C/T button (1) so that the EVIC display is in the Compass/Temperature mode.
3. Depress and hold the C/T push button (1) for approximately ten seconds. The message “CAL” will appear in the EVIC display.
4. Drive the vehicle on a level surface, away from large metal objects and power lines, through one or two complete circles in not less than 16 seconds. The “CAL” message will disappear from the display to indicate that the compass is now calibrated.
NOTE: A blank compass display indicates that vehicle degaussing (demagnetizing) is necessary.
NOTE: If the “CAL” message remains in the display, either there is excessive magnetism near the compass, or the unit is inoperative. Repeat the calibration procedure at least one more time.
NOTE: If the wrong direction is still indicated in the compass display, the area selected for calibration may be too close to a strong magnetic field. Repeat the calibration procedure in another location.
COMPASS DEMAGNETIZING
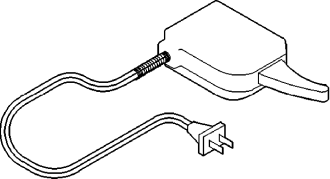
A degaussing tool (Special Tool 6029) is used to demagnetize, or degauss, the roof panel above the overhead console. Equivalent units must be rated as continuous duty for 110/115 volts and 60 Hz. They must also have a field strength of over 350 gauss at 7 millimeters (0.25 inch) beyond the tip of the probe.
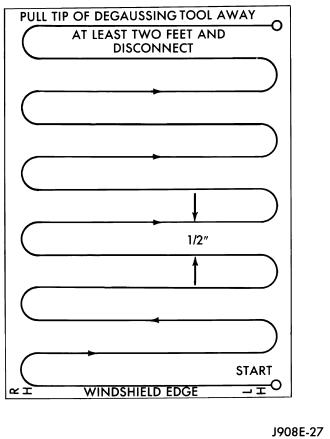
To demagnetize the roof panel proceed as follows:
1. Be certain that the ignition switch is in the Off position, before you begin the demagnetizing procedure.
2. Place a piece of paper approximately 22 by 28 centimeters (8.5 by 11 inches), oriented on the vehicle lengthwise from front to rear, on the center line of the roof at the windshield header. The purpose of the paper is to protect the roof panel from scratches, and to define the area to be demagnetized.
3. Connect the degaussing tool to an electrical outlet, while keeping the tool at least 61 centimeters (2 feet) away from the compass unit.
4. Slowly approach the center line of the roof panel at the windshield header, with the degaussing tool connected.
5. Contact the roof panel with the plastic coated tip of the degaussing tool. Be sure that the template is in place to avoid scratching the roof panel. Using a slow, back-and-forth sweeping motion, and allowing 13 millimeters (0.50 inch) between passes, move the tool at least 11 centimeters (4 inches) to each side of the roof center line, and 28 centimeters (11 inches) back from the windshield header.
6. With the degaussing tool still energized, slowly back it away from the roof panel. When the tip of the tool is at least 61 centimeters (2 feet) from the roof panel, disconnect the tool.
7. Calibrate the compass, (Refer to 8 - ELECTRICAL/OVERHEAD CONSOLE/ELECTRONIC VEHICLE INFO CENTER - STANDARD PROCEDURE - COMPASS CALIBRATION) and adjust the compass variance, (Refer to 8 - ELECTRICAL/OVERHEAD CONSOLE/ELECTRONIC VEHICLE INFO CENTER - STANDARD PROCEDURE - COMPASS VARIATION ADJUSTMENT).
COMPASS VARIATION ADJUSTMENT
Compass variance, also known as magnetic declination, is the difference in angle between magnetic north and true geographic north. In some geographic locations, the difference between magnetic and geographic north is great enough to cause the compass to give false readings. If this problem occurs, the compass variance setting may need to be changed.
To set the compass variance:
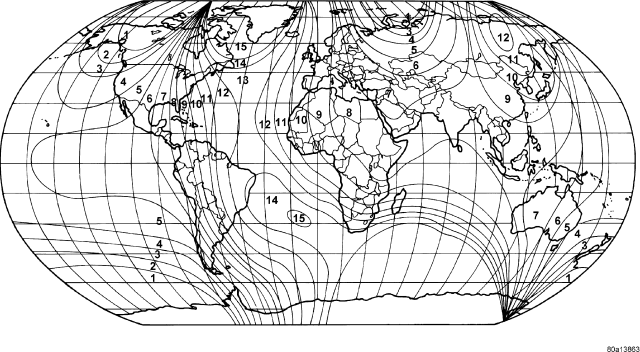
1. Using the Variance Settings map, find your geographic location and note the zone number.
2. Turn the ignition switch to the On position.
3. Press and release the C/T button (1) so that the EVIC display is in the Compass/Temperature mode.
4. Depress and hold the C/T push button (1) for approximately five to ten seconds. The last variance zone number will appear in the EVIC display.
5. Press and release the STEP button (3) until the zone number for your geographic location appears in the display.
6. Depress and release the RESET push button (2) to exit.
7. Confirm that the correct directions are now indicated by the compass.