LOWER CONTROL ARM
DESCRIPTION
The front lower suspension arms are cast iron.OPERATION
The bushings provide isolation from the road. The arms mount to the cradle bracket and the knuckle. The arm and bushings provide location and react to loads from the road.REMOVAL
1. Raise and support the vehicle.
2. Remove the tire and wheel assembly.
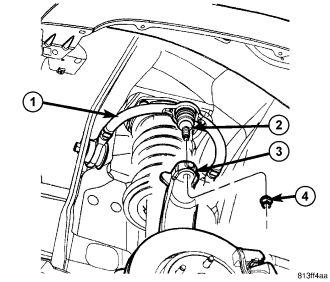
3. Remove the steering knuckle (3). (Refer to 2 - SUSPENSION/FRONT/KNUCKLE - REMOVAL).
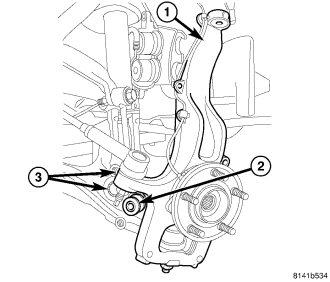
4. Remove the shock clevis bracket (3) from the lower control arm.
5. Remove the stabilizer link (2) at the lower control arm.
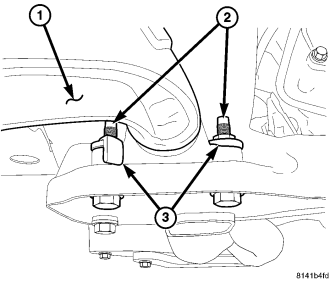
6. Remove the nut and bolt from the front of the lower control arm.
7. Remove the rear bolts (2) and flag nuts (3) from the lower control arm (1).
8. Remove the lower control arm from the vehicle.
INSTALLATION
1. Position the lower suspension arm into the cradle.
2. Install the rear bolts (2) and flag nuts (3) to secure the lower control arm (1) to the frame, Tighten the bolts (3) to 88 N·m (65 ft lbs).
3. Install the nut and bolt for the front of the lower control arm Tighten to 169 N·m (125 ft lbs).
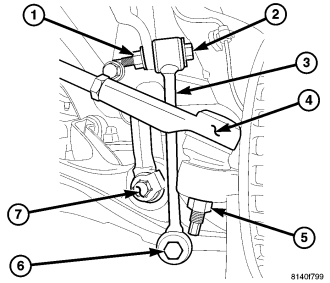
NOTE: Orientation of the flag bolt is critical Flag and head of the bolt (7) must be installed on the forward side of the lower control arm.
4. Install the lower clevis bolt at the lower control arm and tighten to 169 N·m (125 ft lbs).
5. Install the stabilizer link (6) at the lower control arm and tighten to 115 N·m (85 ft lbs).
6. Install the steering knuckle (3) to the upper ball joint (2) and tighten the nut (4) to 95 N·m (70 ft. lbs.) (Refer to 2 - SUSPENSION/FRONT/KNUCKLE - INSTALLATION).
7. Install the tire and wheel assembly.
8. Lower the vehicle.
9. Perform wheel alignment (Refer to 2 - SUSPENSION/WHEEL ALIGNMENT - STANDARD PROCEDURE).