REMOVAL
DENSO A/C COMPRESSOR
NOTE: The compressor clutch assembly can be serviced with the refrigerant system fully-charged and with the A/C compressor installed on the engine.
NOTE: Typical A/C compressor and clutch assembly shown in illustrations.
1. Disconnect and isolate the negative battery cable.
2. Remove the accessory drive belt (refer to 7 - COOLING/ACCESSORY DRIVE/DRIVE BELTS - REMOVAL).
3. Raise and support the vehicle.
4. Remove the front skid plate (refer to 13 - FRAME & BUMPERS/FRAME/FRONT SKID PLATE - REMOVAL).
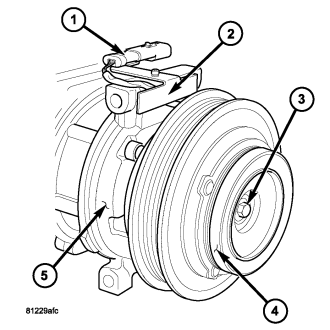
5. Disconnect the engine wire harness from the compressor clutch field coil connector (1) located on the top of the A/C compressor (5).
6. Carefully remove the compressor clutch field coil connector and wire lead from the connector bracket (2).
7. Remove the compressor shaft bolt (3). A band-type oil filter wrench or a strap wrench may be used to hold the clutch plate (4) from rotating during bolt removal.
CAUTION: Do not pry between the clutch plate and the pulley and bearing assembly to remove the clutch plate from the compressor shaft as this may damage the clutch plate.
NOTE: Use care not to lose any clutch shim(s) during removal of the clutch plate, as they may be reused during the clutch plate installation process.
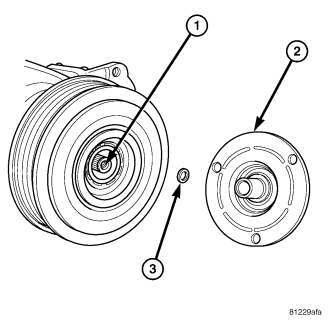
8. Tap the clutch plate (2) lightly with a plastic mallet to release it from the splines on the compressor shaft (1) and remove the clutch plate and shim(s) (3).
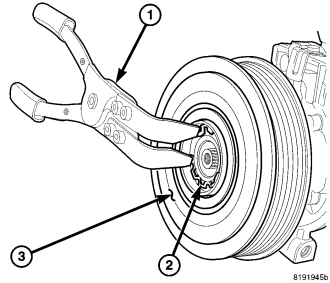
9. Using Snap Ring Pliers 9764 or equivalent (1), remove the snap ring (2) that secures the pulley and bearing assembly (3) to the front of the A/C compressor and remove the pulley and bearing assembly.
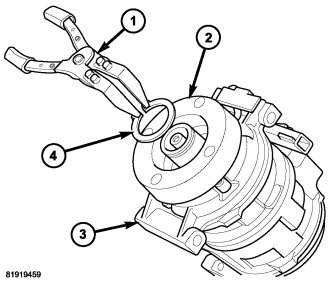
10. Using Snap Ring Pliers 9764 or equivalent (1), remove the snap ring (4) that secures the compressor clutch field coil (2) to the front of the A/C compressor (3) and remove the field coil.
VISTEON A/C COMPRESSOR
NOTE: The compressor clutch assembly can be serviced with the refrigerant system fully-charged.
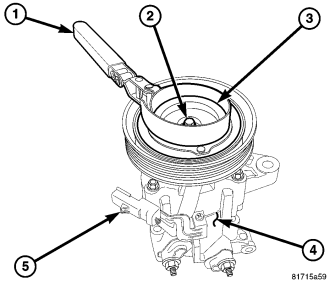
1. Disconnect and isolate negative battery cable.
2. Remove the accessory drive belt (refer to 7 - COOLING/ACCESSORY DRIVE/BELTS-DRIVE - REMOVAL).
3. Disconnect the engine wire harness from the clutch field coil connector (4).
4. Remove the bolts that secure the A/C compressor (4) to the mounting bracket (refer to 24 - HEATING & AIR CONDITIONING/PLUMBING/COMPRESSOR-A/C - 3.7L ENGINE - REMOVAL).
5. Remove the A/C compressor from the mounting bracket and support the compressor while servicing the clutch.
6. Using a strap wrench (1), remove the bolt (2) that secures the clutch plate (3) to the compressor shaft.
NOTE: The clutch plate can be removed from the compressor shaft by hand or, if required, pressed off with an 8 x 1.25 mm bolt.
NOTE: Clutch plate shim(s) may remain inside the hub of the clutch plate. Be sure to remove all of the shims from inside the hub or from the end of the compressor shaft.
7. Remove the clutch plate and shim(s) from the A/C compressor. If required, install a 8 x 1.25 mm bolt into the center of the clutch plate and turn the bolt clockwise until the clutch plate is completely removed from the A/C compressor.
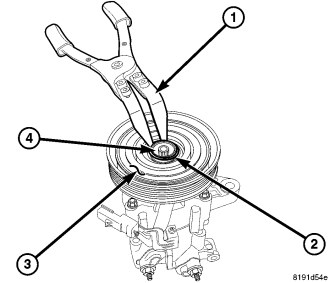
8. Using snap ring pliers (Special Tool 9764 or equivalent) (1), remove the snap ring (2) that secures the pulley and bearing assembly (3) to the front of the A/C compressor (4).
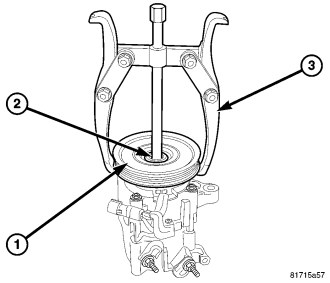
NOTE: The pulley and bearing assembly can be removed from the compressor by hand or, if required, with a two jaw puller.
9. Remove the pulley and bearing assembly (1) from the front of the A/C compressor (2). If required, install a two jaw puller (3) and turn the puller center-bolt clockwise until the pulley and bearing assembly is completely removed.
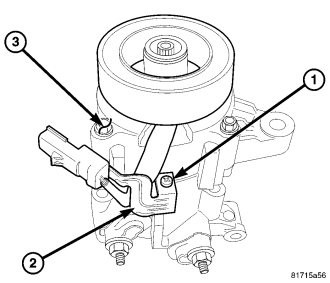
10. Remove the screw (1) that secures the clutch field coil wire lead bracket (2) to the A/C compressor (3).
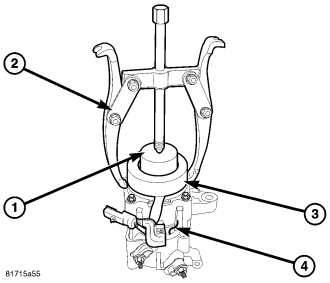
11. Using compressor field coil remover (Special Tool 9354 in Kit 9349) (1) and a two jaw puller (2), remove the clutch field coil (3) from the front of the A/C compressor (4).