CRANKSHAFT
- DESCRIPTION
- OPERATION
- STANDARD PROCEDURE - CHECKING CRANKSHAFT END PLAY
- REMOVAL - CRANKSHAFT
- INSTALLATION
DESCRIPTION
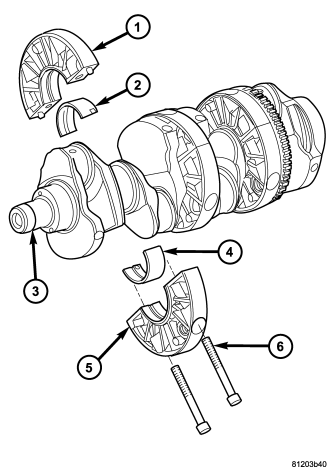
The crankshaft for the 2.8L is a forged steel type design with five main bearing journals. The crankshaft is located at the bottom of the engine block and is held in place with three main bearing supports.
OPERATION
The crankshaft transfers force generated by combustion within the cylinder bores to the flexplate.
STANDARD PROCEDURE - CHECKING CRANKSHAFT END PLAY
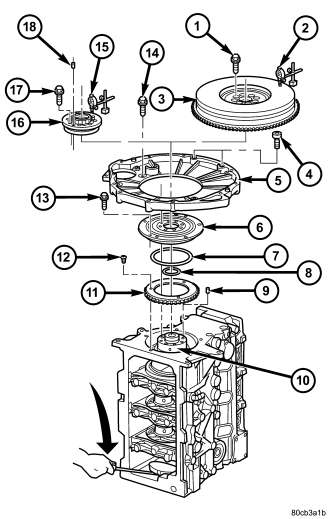
1. Mount a dial indicator (2) to a stationary point at rear of engine. Locate the probe perpendicular against the flywheel (3).
2. Move the crankshaft (10) all the way to the front of its travel.
3. Zero the dial indicator (2).
4. Move the crankshaft (10) all the way to the rear and read dial indicator (2). For crankshaft end play clearances (Refer to 9 - ENGINE - SPECIFICATIONS).
REMOVAL - CRANKSHAFT
NOTE: The crankshaft is removed from the rear of the engine. Make sure to use an appropriate engine stand.
1. Remove engine from vehicle (Refer to 9 - ENGINE - REMOVAL).
2. Mount engine on an engine stand.
3. Drain engine oil and remove oil filter.
4. Remove timing belt outer cover (Refer to 9 - ENGINE/VALVE TIMING/TIMING BELT / CHAIN COVER(S) - REMOVAL).
5. Remove timing belt (Refer to 9 - ENGINE/VALVE TIMING/TIMING BELT/CHAIN AND SPROCKETS - REMOVAL).
6. Remove timing belt inner cover (Refer to 9 - ENGINE/VALVE TIMING/TIMING BELT / CHAIN COVER(S) - REMOVAL).
7. Remove cylinder head cover/intake manifold (Refer to 9 - ENGINE/CYLINDER HEAD/CYLINDER HEAD COVER(S) - REMOVAL).
8. Remove cylinder head (Refer to 9 - ENGINE/CYLINDER HEAD - REMOVAL).
9. Remove flex plate.
NOTE: Paint marking or scribing will assist in properly assembling and aligning oil passage ports in the crankshaft supports and engine block.
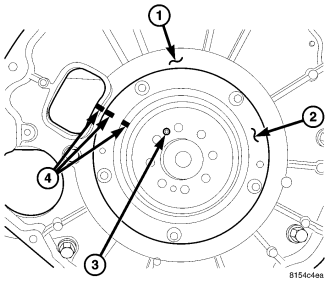
10. Paint mark or scribe (4) the relation of the rear main bearing support (2) and adaptor plate (1).
NOTE: One of the crankshaft position sensor heat shield fasteners will have to be removed to free the adaptor plate (1) for removal.
11. Remove rear main bearing support (2) and adapter plate (1) retaining bolts and remove adapter plate (1).
12. Paint mark or scribe (4) the rear main bearing support (2) to engine block relation once the adaptor plate (1) is removed.
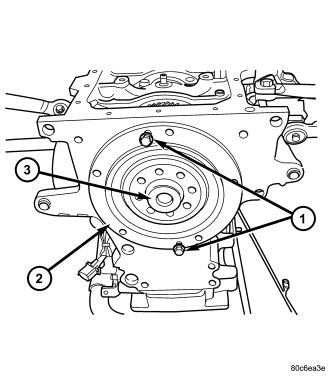
NOTE: Keep the rear main bearing support (2) and rear crankshaft seal together as an assembly (Refer to 9 - ENGINE/ENGINE BLOCK/CRANKSHAFT OIL SEAL - REAR - DESCRIPTION).
13. Remove rear main bearing support (2) by threading two retaining bolts (1) in holes provided. Tighten bolts (1) equally to push main bearing support (2) out of block.
14. Remove front engine cover (Refer to 9 - ENGINE/ENGINE BLOCK/ENGINE COVER - REMOVAL).
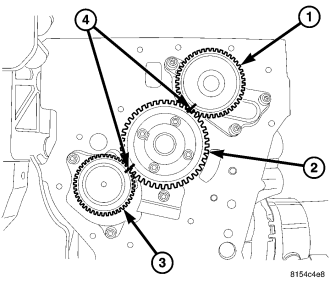
15. Paint mark or scribe (4) the crankshaft gear (2) to vacuum pump (3) and oil pump drive gears (1).
16. Remove crankshaft gear (2).
17. Remove oil pan (Refer to 9 - ENGINE/LUBRICATION/OIL PAN - REMOVAL).
18. Remove oil pump pickup tube (Refer to 9 - ENGINE/LUBRICATION/OIL PUMP - REMOVAL) .
19. Remove balance shaft assembly (Refer to 9 - ENGINE/VALVE TIMING/BALANCE SHAFT - REMOVAL).
20. Remove oil jets (Refer to 9 - ENGINE/LUBRICATION/OIL JET - REMOVAL).
21. Remove piston and connecting rod assemblies (Refer to 9 - ENGINE/ENGINE BLOCK/PISTON & CONNECTING ROD - REMOVAL).
22. Slide special tool VM.1069 on the front of the crankshaft.
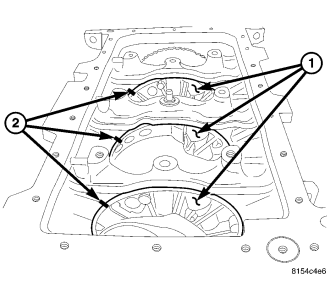
CAUTION: Failure to properly identify and align each crankshaft support (1) will result in improperly aligned engine oil passages which will lead to engine failure.
23. Paint mark or scribe (2) each crankshaft support (1) to engine block relation.
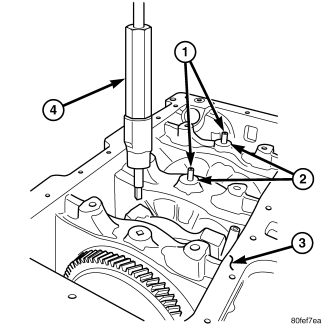
24. Using special tool VM.1054 (4), remove crankshaft support retainers (1) and o-rings (2), discard o-rings (2).
25. Paint mark or scribe the relation between the crankshaft sensor tone ring and the crankshaft and remove the tone ring.
26. While holding crankshaft guide VM 1069, carefully guide crankshaft out of the rear of engine block (3).
INSTALLATION
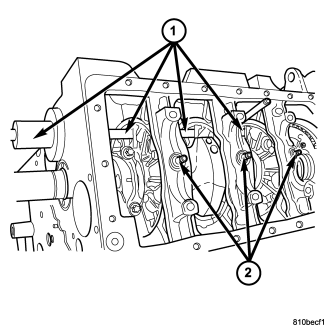
CAUTION: IT IS CRITICAL THAT BOTH HALVES OF THE CRANKSHAFT SUPPORT ARE ALIGNED PROPERLY WITH THE ENGINE TO SUPPORT ENGINE OIL MANAGEMENT.
1. Install crankshaft in engine block .
NOTE: There are two identical holes in the crankshaft support. Care must be taken to insert the special tool into the correct one.
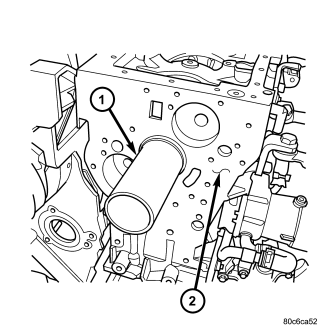
2. Insert crankshaft support alignment pin (1) into the vacuum pump access hole, through the proper crankshaft support holes then slide the tool guide flush against the front of the engine block and retain with a vacuum pump retaining bolt.
3. Install crankshaft support retainers.
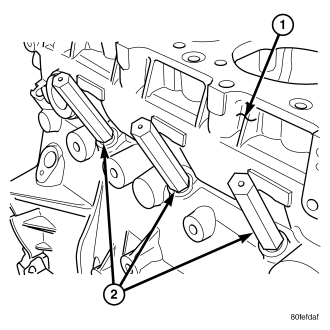
4. Remove special tool VM.1079 (2) from crankshaft.
5. Remove special tool VM. 9095 from engine block.
6. Install crankshaft sprocket.
7. Install front engine cover (Refer to 9 - ENGINE/ENGINE BLOCK/ENGINE COVER - INSTALLATION).
8. Install rear main bearing support in engine block (1). Be sure to align oil hole in rear main bearing support with the lubrication port in the block.
9. Install adapter plate and retaining bolts. Torque bolts to 27.5N·m.
10. Install flex plate.
11. Install piston and connecting rod assemblies (Refer to 9 - ENGINE/ENGINE BLOCK/PISTON & CONNECTING ROD - INSTALLATION).
12. Install oil jets (Refer to 9 - ENGINE/LUBRICATION/OIL JET - INSTALLATION).
13. Install balance shaft assembly (Refer to 9 - ENGINE/VALVE TIMING/BALANCE SHAFT - INSTALLATION).
14. Install oil pump pickup tube (Refer to 9 - ENGINE/LUBRICATION/OIL PUMP - INSTALLATION).
15. Install oil pan (Refer to 9 - ENGINE/LUBRICATION/OIL PAN - INSTALLATION).
16. Install cylinder head (Refer to 9 - ENGINE/CYLINDER HEAD - INSTALLATION) .
17. Install cylinder head cover/intake manifold (Refer to 9 - ENGINE/CYLINDER HEAD/CYLINDER HEAD COVER(S) - INSTALLATION).
18. Install timing belt inner cover (Refer to 9 - ENGINE/VALVE TIMING/TIMING BELT / CHAIN COVER(S) - INSTALLATION).
19. Install timing belt (Refer to 9 - ENGINE/VALVE TIMING/TIMING BELT/CHAIN AND SPROCKETS - INSTALLATION).
20. Install timing belt outer cover (Refer to 9 - ENGINE/VALVE TIMING/TIMING BELT / CHAIN COVER(S) - INSTALLATION).
21. Install engine in vehicle.
22. Fill engine oil with proper oil to correct level.