MOLDING - SILL
REMOVAL
Front Sill Molding
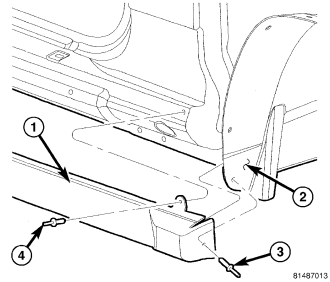
1. Remove the front wheel flare molding as necessary to gain access to the rivets. (Refer to 23 - BODY/EXTERIOR/WHEEL OPENING FLARE MOLDING - REMOVAL)
2. Remove the front rivets (3 and 4).
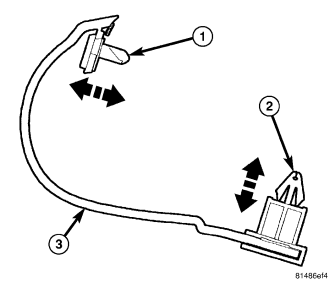
3. Separate the lower clips (2) using a trim tool C-4829-A or equivalent.
4. Using a trim stick C-4755 or equivalent, separate the adhesive tape and upper clips (1) and remove the front sill molding (3).
Rear Sill Molding
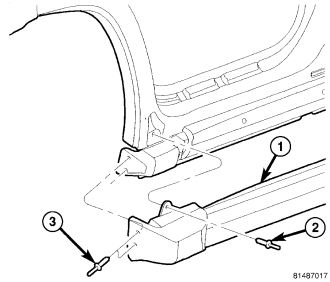
1. Open the rear door and remove the rivets (2 and 3).
2. Separate the lower clips (2) using a trim tool C-4829-A or equivalent.
3. Using a trim stick C-4755 or equivalent, separate the adhesive tape and upper clips (1) and remove the rear sill molding (3).
INSTALLATION
1. Thoroughly clean all residue from the body side sill molding attachment area.
2. Wipe area clean with a 50% solution of water and alcohol and wipe dry.
Rear Sill Molding
1. Replace the lower push pin fasteners (2) if damaged previously.
2. Remove the protective backing from the adhesive tape on the upper rear side of the molding.
3. Position the rear sill molding behind the lower rear door and slide forward until fully seated to rear sill with all pins aligned to holes.
NOTE: Avoid contact with the adhesive strip on rear of sill.
4. Seat the upper push pin fasteners then the lower fasteners fully.
Front Sill Molding
1. Replace the lower push pin fasteners (2) if damaged previously.
2. Remove the protective backing from the adhesive tape on the upper rear side of the molding.
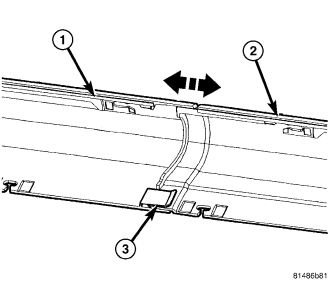
3. Position the front sill molding (1) over the matting flange on the previously installed rear sill molding. Make sure the tab (3) on the front molding (2) is fully engaged onto the rear molding (1) flange and slide rearward.
4. Seat the upper and then the lower push pin fasteners fully.
3. Apply hand pressure along the upper edge (1) of the molding starting at the front of the front molding sliding back to the rear of the rear molding.
NOTE: This will ensure that the adhesive tape on the back side of the moldings has contacted the sill.
4. Replace the plastic rivets securing the front and rear moldings at the wheel openings.
5. Install the front wheel opening flare molding as necessary. (Refer to 23 - BODY/EXTERIOR/WHEEL OPENING FLARE MOLDING - INSTALLATION)