INSTALLATION
BULB - FASCIA MOUNTED
CAUTION: Always use the correct bulb size and type for replacement. An incorrect bulb size or type may overheat and cause damage to the lamp, the socket or the lamp wiring.
CAUTION: Do not contaminate the bulb glass by touching it with your fingers or by allowing it to contact other oily surfaces. Shortened bulb life will result.
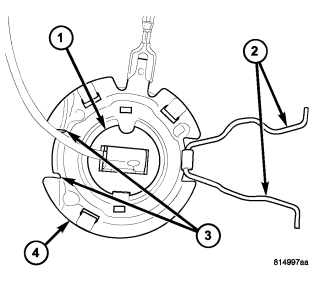
1. Align the fog lamp bulb flange (1) with the mounting flange (4) on the back of the lens reflector.
2. Insert the bulb straight into the opening in the mounting flange until the bulb flange is firmly seated.
3. Pivot the bulb retainer clip (2) up and over the bulb flange.
4. Pinch together the two hooked ends of the retainer clip and engage them into the slots (3) in the mounting flange to lock the bulb into place.
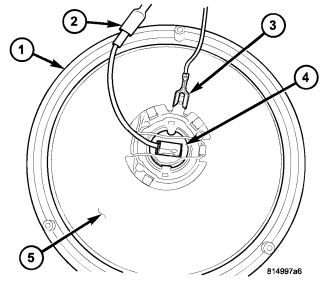
5. Reconnect the bulb pigtail wire to the fog lamp wiring connector (2).
6. Align and install the lens and bezel (1) into the front fog lamp housing. Be certain not to pinch the lamp wiring between the housing and the bezel.
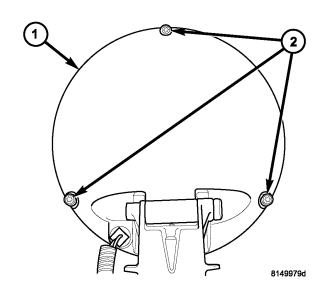
7. Install and tighten the three screws (2) that secure the bezel and lens to the back of the lamp housing (1). Tighten the screws to 2 N·m (17 in. lbs.).
8. Reconnect the battery negative cable.
BULB - GRILLE MOUNTED
CAUTION: Always use the correct bulb size and type for replacement. An incorrect bulb size or type may overheat and cause damage to the lamp, the socket or the lamp wiring.
CAUTION: Do not contaminate the bulb glass by touching it with your fingers or by allowing it to contact other oily surfaces. Shortened bulb life will result.
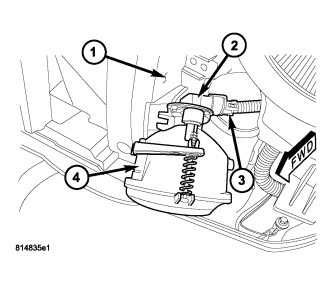
1. Align the base of the bulb with the front fog lamp socket (2).
2. Push the bulb straight into the socket until the base is firmly seated.
3. Align the socket and bulb with the keyed opening on the back of the front fog lamp housing (4).
4. Insert the socket and bulb into the housing until the socket is firmly seated.
5. Rotate the socket clockwise about 30 degrees to lock it into place. The socket connector receptacle (3) should be pointed horizontally.
6. Reinstall the fog lamp into the grille opening reinforcement (1). (Refer to 8 - ELECTRICAL/LAMPS/LIGHTING - EXTERIOR/FRONT FOG LAMP - INSTALLATION).
7. Reconnect the battery negative cable.
LAMP - FASCIA MOUNTED
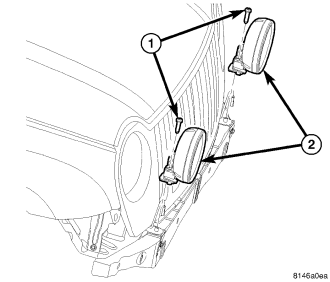
1. Position the front fog lamp (2) to the bracket on the top of the front bumper fascia.
2. Install and tighten the screw (1) into the mounting bracket that secures the lamp to the fascia. Tighten the screw to 20 N·m (15 ft. lbs.).
3. Reconnect the lamp pigtail wire to the connector on the grille opening reinforcement.
4. Reinstall the grille panel onto the front of the grille opening reinforcement. (Refer to 23 - BODY/EXTERIOR/GRILLE - INSTALLATION).
5. Reconnect the battery negative cable.
6. Confirm proper front fog lamp alignment. (Refer to 8 - ELECTRICAL/LAMPS/LIGHTING - EXTERIOR/FOG LAMP - ADJUSTMENTS).
LAMP - GRILLE MOUNTED
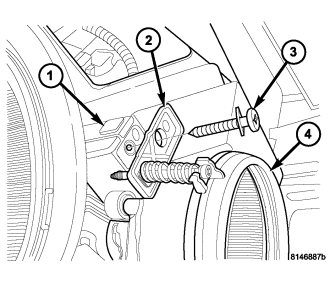
1. Position the front fog lamp (4) to the seat in the grille opening reinforcement (1).
2. Reconnect the wire harness connector to the bulb socket on the back of the lamp housing.
3. Engage the pivot pin on either side of the lamp into its receptacle in the stanchion within the lamp seat of the grille opening reinforcement.
4. Insert a trim stick or another suitable wide flat-bladed tool, between the opposite side of the lamp and the side of the lamp seat.
5. Carefully pry between the side of the lamp and the seat far enough for the loose pivot pin to be snapped into place within its stanchion.
6. Install and tighten the screw (3) that secures the fog lamp adjuster bracket (2) to the grille opening reinforcement. Tighten the screw to 3 N·m (30 in. lbs.).
7. Reinstall the grille panel onto the front of the grille opening reinforcement. (Refer to 23 - BODY/EXTERIOR/GRILLE - INSTALLATION).
8. Reconnect the battery negative cable.
9. Confirm proper front fog lamp alignment. (Refer to 8 - ELECTRICAL/LAMPS/LIGHTING - EXTERIOR/FOG LAMP - ADJUSTMENTS).