LOWER CONTROL ARM
REMOVAL
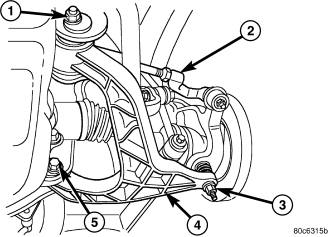
1. Raise and support the vehicle.
2. Remove the tire and wheel assembly.
3. Remove the lower clevis bracket bolt at the lower control arm (4).
4. Remove the stabilizer link bolt at the lower control arm (4).
5. Remove the lower ball joint nut (3).
6. Separate the lower ball joint from the lower control arm using tool C-4150A.
NOTE: Marking the lower control arm pivot bolts front (1) and rear (5) will aid in the assembly procedure.
7. Mark the lower control arm pivot bolts front (1) and rear (5).
8. Remove the front cam/pivot bolt (1).
9. Remove the rear cam/pivot bolt (5).
10. Remove the lower control arm (4) from the vehicle.
INSTALLATION
1. Install the lower control arm (4) to the vehicle.
2. Install the rear cam/pivot bolt (5).
3. Install the front cam/pivot bolt (1).
4. Install the lower ball joint nut (3). Tighten the nut to 81 N·m (60 ft.lbs.)
5. Align the marks front and rear at the cam/pivot bolts and tighten the nuts. Tighten the nuts to 170 N·m (125 ft.lbs.)
6. Install the stabilizer link bolt at the lower control arm. Tighten the nut to 136 N·m (100 ft.lbs.)
7. Install the lower clevis bracket bolt at the lower control arm. Tighten the nut to 150 N·m (110 ft.lbs.)
8. Install the tire and wheel assembly. (Refer to 22 - TIRES/WHEELS/WHEELS - STANDARD PROCEDURE).
9. Perform a wheel alignment (Refer to 2 - SUSPENSION/WHEEL ALIGNMENT - STANDARD PROCEDURE).