RAIL-FUEL
DESCRIPTION
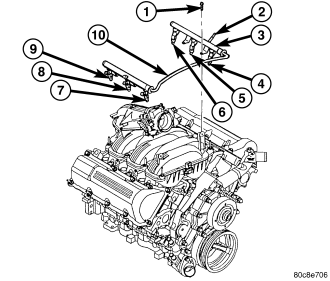
The fuel injector rail (3) is mounted to the intake manifold . It is used to mount the fuel injectors to the engine. The rail is equipped with a test port to check/test fuel system pressure.
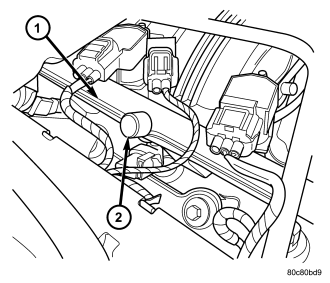
The rail is equipped with a test port (2) to check/test fuel system pressure.
A fuel rail mounted, fuel damper is not used with this engine.
OPERATION
High pressure fuel from the fuel pump is routed to the fuel rail. The fuel rail then supplies the necessary fuel to each individual fuel injector.
A quick-connect fitting with a safety latch is used to attach the fuel line to the fuel rail.
The fuel rail is not repairable.
REMOVAL - 3.7L
WARNING: The fuel system is under constant pressure even with engine off. Before servicing fuel rail, fuel system pressure must be released.
CAUTION: The left and right fuel rails are replaced as an assembly. Do not attempt to separate rail halves at connector tube (10). Due to design of tube, it does not use any clamps. Never attempt to install a clamping device of any kind to tube. When removing fuel rail assembly for any reason, be careful not to bend or kink tube.
1. Remove fuel tank filler tube cap.
2. Perform Fuel System Pressure Release Procedure. (Refer to 14 - FUEL SYSTEM/FUEL DELIVERY - STANDARD PROCEDURE)
3. Remove negative battery cable at battery.
4. Remove air duct at throttle body air box.
5. Remove air box at throttle body.
6. Disconnect fuel line latch clip and fuel line at fuel rail. A special tool will be necessary for fuel line disconnection. (Refer to 14 - FUEL SYSTEM/FUEL DELIVERY/QUICK CONNECT FITTING - STANDARD PROCEDURE)
7. Remove necessary vacuum/vapor lines at throttle body.
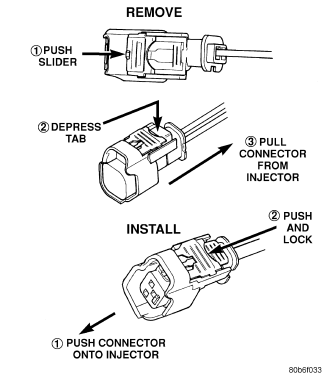
8. Disconnect electrical connectors at all 6 fuel injectors. Push red colored slider away from injector (1). While pushing slider, depress tab (2) and remove connector (3) from injector. The factory fuel injection wiring harness is numerically tagged (INJ 1, INJ 2, etc.) for injector position identification. If harness is not tagged, note wiring location before removal.
9. Disconnect electrical connectors at throttle body sensors.
10. Remove 6 ignition coils. (Refer to 8 - ELECTRICAL/IGNITION CONTROL/IGNITION COIL - REMOVAL)
11. Remove four fuel rail mounting bolts (1) .
12. Gently rock and pull left side of fuel rail until fuel injectors just start to clear machined holes in cylinder head. Gently rock and pull right side of rail until injectors just start to clear cylinder head holes. Repeat this procedure (left/right) until all injectors have cleared cylinder head holes.
13. Remove fuel rail (with injectors attached) from engine.
14. If fuel injectors are to be removed, (Refer to 14 - FUEL SYSTEM/FUEL INJECTION/FUEL INJECTOR - REMOVAL) .
INSTALLATION - 3.7L
1. If fuel injectors are to be installed, refer to 14 - FUEL SYSTEM/FUEL INJECTION/FUEL INJECTOR - INSTALLATION.
2. Clean out fuel injector machined bores in intake manifold.
3. Apply a small amount of engine oil to each fuel injector O-ring. This will help in fuel rail installation.
4. Position fuel rail/fuel injector assembly to machined injector openings in cylinder head.
5. Guide each injector into cylinder head. Be careful not to tear injector O-rings.
6. Push right side of fuel rail down until fuel injectors have bottomed on cylinder head shoulder. Push left fuel rail down until injectors have bottomed on cylinder head shoulder.
7. Install four fuel rail mounting bolts and tighten. Refer to Torque Specifications.
8. Install six ignition coils. Refer to 8 - ELECTRICAL/IGNITION CONTROL/IGNITION COIL - INSTALLATION.
9. Connect electrical connectors to throttle body.
10. Connect electrical connectors at all fuel injectors. Push connector onto injector (1) and then push and lock red colored slider (2). Verify connector is locked to injector by lightly tugging on connector.
11. Connect necessary vacuum/vapor lines to throttle body.
12. Connect fuel line latch clip and fuel line to fuel rail.
13. Install air box to throttle body.
14. Install air duct to air box.
15. Connect battery cable to battery.
16. Start engine and check for leaks.