INSTALLATION
BULB - EXPORT
CAUTION: Always use the correct bulb size and type for replacement. An incorrect bulb size or type may overheat and cause damage to the lamp, the socket or the lamp wiring.
CAUTION: Do not contaminate the bulb glass by touching it with your fingers or by allowing it to contact other oily surfaces. Shortened bulb life will result.
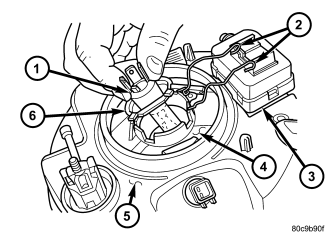
1. Position the bulb (1) into the keyed opening in the headlamp reflector (4).
2. Pivot the headlamp bulb retainer clip (2) back over the bulb flange (6).
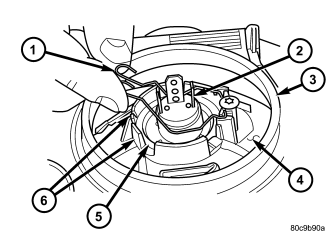
3. Pinch the two hooked ends of the wire headlamp bulb retainer clip (1) together and engage them into the slots (6) in the flange of the reflector (4).
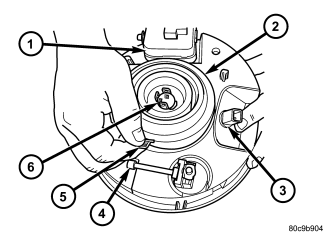
4. Position the center opening of the boot seal (2) over the base of the headlamp bulb (6) and pull it downward until the seal is fully engaged over the bulb base.
5. Position the outer circumference of the boot seal over the flange on the back of the headlamp unit housing and pull it downward until the seal is fully engaged over the flange.
6. Reinstall the headlamp unit onto the grille opening reinforcement. (Refer to 8 - ELECTRICAL/LAMPS/LIGHTING - EXTERIOR/HEADLAMP UNIT - INSTALLATION).
7. Reconnect the battery negative cable.
8. Confirm proper headlamp unit alignment. (Refer to 8 - ELECTRICAL/LAMPS/LIGHTING - EXTERIOR/HEADLAMP UNIT - ADJUSTMENTS).
BULB - NORTH AMERICA
CAUTION: Always use the correct bulb size and type for replacement. An incorrect bulb size or type may overheat and cause damage to the lamp, the socket or the lamp wiring.
CAUTION: Do not contaminate the bulb glass by touching it with your fingers or by allowing it to contact other oily surfaces. Shortened bulb life will result.
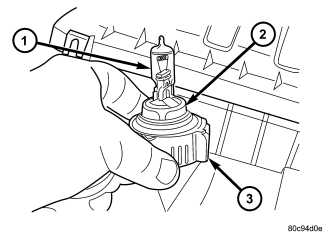
1. Position the headlamp bulb (1) and socket (2) into the lock ring (3).
2. Reconnect the grille opening reinforcement wire harness connector to the headlamp bulb socket connector receptacle.
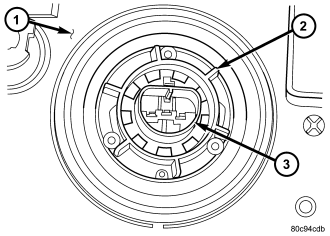
3. Position the lock ring (2), socket, and bulb (3) down behind the upper radiator crossmember and align them with the keyed opening on the back of the headlamp unit housing (1).
4. Push the socket and bulb unit straight into the headlamp housing until they are firmly seated.
5. Position the lock ring over the socket and engage it with the flange on the back of the headlamp housing.
6. Rotate the lock ring on the back of the headlamp housing clockwise about 30 degrees to lock it into place.
7. Reconnect the battery negative cable.
LAMP
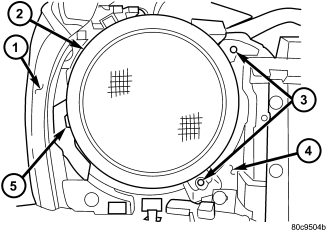
1. Position the headlamp unit (2) to the grille opening reinforcement (4).
2. Reconnect the wire harness connectors to the headlamp bulb socket (North America), the headlamp bulb base (Export), the front position lamp socket (if equipped), and the headlamp leveling motor (if equipped).
3. Engage the locator tab (5) on the outboard side of the headlamp unit into the engagement slot in the outboard edge of the grille opening reinforcement.
4. Align the two mounting tabs (3) on the inboard side of the headlamp unit housing to the mounting holes in the grille opening reinforcement.
5. Install and tighten the two screws that secure the mounting tabs on the inboard side of the headlamp housing to the grille opening reinforcement. Tighten the screws to 3 N·m (30 in. lbs.).
6. Reinstall the grille panel onto the grille opening reinforcement. (Refer to 23 - BODY/EXTERIOR/GRILLE - INSTALLATION).
7. Reconnect the battery negative cable.
8. Confirm proper headlamp unit alignment. (Refer to 8 - ELECTRICAL/LAMPS/LIGHTING - EXTERIOR/HEADLAMP UNIT - ADJUSTMENTS).