INSTALLATION
BULB
CAUTION: Always use the correct bulb size and type for replacement. An incorrect bulb size or type may overheat and cause damage to the lamp, the socket or the lamp wiring.
CAUTION: Do not contaminate the bulb glass by touching it with your fingers or by allowing it to contact other oily surfaces. Shortened bulb life will result.
NOTE: The optional light bar includes either two or four lamps, depending upon the requirements in the market for which the vehicle is manufactured. Each lamp contains a single bulb. The service procedures for each of these bulbs is the same.
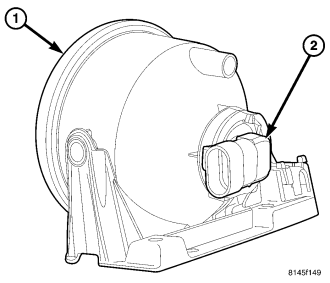
1. Align the base of the bulb with the light bar lamp socket (2).
2. Push the bulb straight into the socket until the base is firmly seated.
3. Align the socket and bulb with the keyed opening on the back of the light bar lamp housing (1).
4. Insert the socket and bulb into the housing until the socket is firmly seated.
5. Rotate the socket clockwise about 30 degrees to lock it into place.
6. Reconnect the wire harness connector to the socket.
7. Reinstall the cover over the light bar lamps and reinforcement. (Refer to 8 - ELECTRICAL/LAMPS/LIGHTING - EXTERIOR/LIGHT BAR LAMP COVER - INSTALLATION).
8. Reconnect the battery negative cable.
COVER
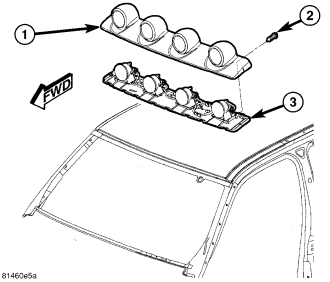
1. Position the front edge of the light bar cover (1) on the roof panel just ahead of the front edge of the light bar reinforcement (3).
2. Slide the cover rearward to engage the front edge of the cover under the forward edge of the reinforcement, then lower the rear edge of the cover into position.
3. Install and tighten the four screws (2) that secure the rear edge of the cover to the reinforcement. Tighten the screws to 2 N·m (17 in. lbs.).
LAMP
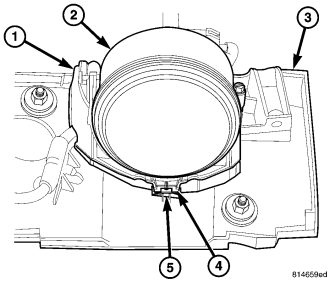
1. Position the lamp (2) and bracket (1) unit onto the light bar reinforcement (3).
NOTE: There is a hook on the forward edge of the lamp bracket that must be secured under a tab that is integral to the reinforcement. The rear of the lamp must be lifted upward by the lamp socket/connector in order to engage the hook under the tab.
2. Lift the lamp socket/connector on the rear of the lamp upward far enough to engage the hook (4) on the front edge of the lamp bracket under the integral tab (5) of the reinforcement.
3. Slide the lamp and bracket forward and seat.
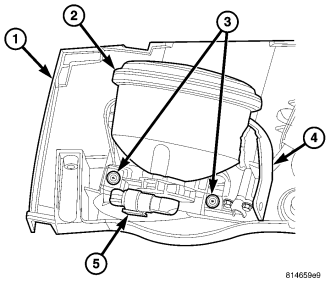
4. Install and tighten the two screws (3) that secure the rear of the lamp bracket (4) to the reinforcement (1). Tighten the screws to 2 N·m (17 in. lbs.).
5. Reconnect the light bar wire harness connector (5) to the socket on the back of the lamp (2).
6. Reconnect the battery negative cable.
7. Confirm proper lamp alignment. (Refer to 8 - ELECTRICAL/LAMPS/LIGHTING - EXTERIOR/LIGHT BAR LAMP - ADJUSTMENTS).
8. Reinstall the cover over the light bar lamps and reinforcement. (Refer to 8 - ELECTRICAL/LAMPS/LIGHTING - EXTERIOR/LIGHT BAR LAMP COVER - INSTALLATION).
REINFORCEMENT
CAUTION: Four strips of double-faced adhesive tape serve to protect the roof panel and supplement the hard fasteners that secure the light bar reinforcement. Any residual tape and adhesive must be removed carefully to prevent damage to roof panel. Following removal, the roof panel and the bottom of the reinforcement must be thoroughly cleaned with isopropyl alcohol or another suitable solvent. The mounting surfaces must be clean and dry before installation.
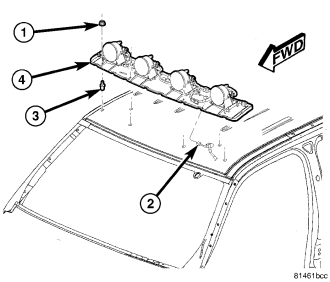
1. Install four new strips of double-faced adhesive tape to the base of an existing reinforcement (4) being reinstalled.
2. Remove the release paper from the adhesive strips on the base of the new (4) or existing reinforcement.
3. With the aid of an assistant, carefully feed the jumper wire and connector (2) through the clearance hole in the reinforcement while positioning the unit over the rivet studs (3) on the roof panel.
4. Using hand pressure, press the reinforcement down firmly and evenly over each of the tape strips to be certain they are firmly secured to the roof panel.
5. Install and tighten the four nuts (1) that secure the reinforcement to the rivet studs on the roof panel. Tighten the nuts to 6 N·m (50 in. lbs.).
6. Reconnect the jumper harness connector to the light bar reinforcement harness connector.
7. Reconnect the battery negative cable.
8. Confirm proper lamp alignment. (Refer to 8 - ELECTRICAL/LAMPS/LIGHTING - EXTERIOR/LIGHT BAR LAMP - ADJUSTMENTS).
9. Reinstall the cover over the light bar lamps and reinforcement. (Refer to 8 - ELECTRICAL/LAMPS/LIGHTING - EXTERIOR/LIGHT BAR LAMP COVER - INSTALLATION).