REMOVAL
BULB
CAUTION: Do not contaminate the bulb glass by touching it with your fingers or by allowing it to contact other oily surfaces. Shortened bulb life will result.
NOTE: The optional light bar includes either two or four lamps, depending upon the requirements in the market for which the vehicle is manufactured. Each lamp contains a single bulb. The service procedures for each of these bulbs is the same.
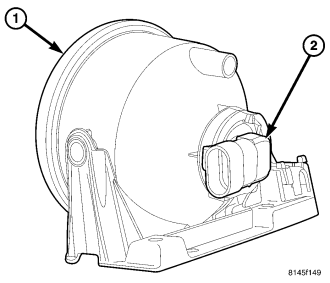
1. Disconnect and isolate the battery negative cable.
2. Remove the cover from the light bar lamps and reinforcement. (Refer to 8 - ELECTRICAL/LAMPS/LIGHTING - EXTERIOR/LIGHT BAR LAMP COVER - REMOVAL).
3. Disconnect the wire harness connector from the light bar lamp socket (2).
4. Firmly grasp the socket on the back of the lamp housing (1) and rotate it counterclockwise about 30 degrees to unlock it.
5. Pull the socket and bulb straight out from the keyed opening in the housing.
6. Pull the base of the bulb straight out of the socket.
COVER
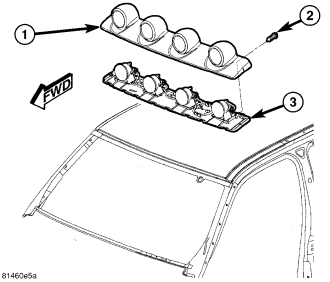
1. Remove the four screws (2) that secure the cover (1) to the rear edge of the light bar reinforcement (3) on the roof panel.
2. Lift the rear edge of the cover upward and then slide it forward far enough to disengage the front edge of the cover from under the front edge of the light bar reinforcement.
3. Remove the light bar cover from the roof panel.
LAMP
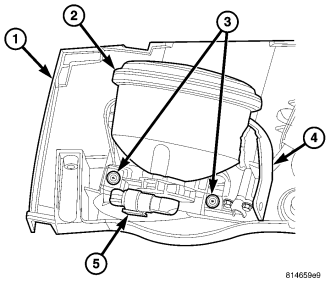
1. Disconnect and isolate the battery negative cable.
2. Remove the cover from the light bar lamps. (Refer to 8 - ELECTRICAL/LAMPS/LIGHTING - EXTERIOR/LIGHT BAR LAMP COVER - REMOVAL).
3. Disconnect the light bar wire harness connector (5) from the socket on the back of the lamp (2).
4. Remove the two screws (3) that secure the rear of the lamp bracket (4) to the reinforcement (1).
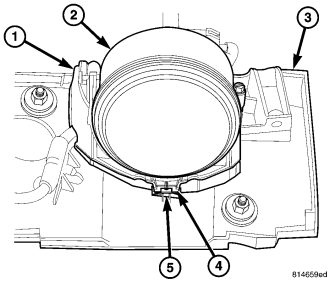
NOTE: There is a hook on the forward edge of the lamp bracket secured under a tab that is integral to the reinforcement. The rear of the lamp must be lifted upward by the lamp socket/connector in order to disengage the hook from under the tab.
5. Lift the lamp socket/connector on the rear of the lamp (2) upward far enough to disengage the hook (4) on the front edge of the lamp bracket (1) from under the integral tab (5) of the reinforcement (3).
6. Slide the lamp and bracket unit rearward and remove it from the reinforcement.
REINFORCEMENT
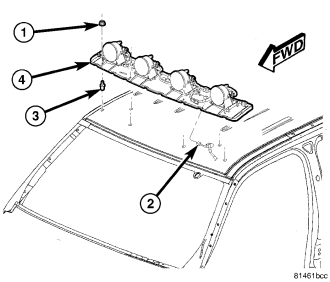
1. Disconnect and isolate the battery negative cable.
2. Remove the cover from the light bar lamps. (Refer to 8 - ELECTRICAL/LAMPS/LIGHTING - EXTERIOR/LIGHT BAR LAMP COVER - REMOVAL).
3. Disconnect the jumper harness connector (2) from the light bar reinforcement harness connector.
4. Remove the four nuts (1) that secure the reinforcement (4) to the rivet studs (3) on the roof panel.
CAUTION: Four strips of double-faced adhesive tape serve to protect the roof panel and supplement the hard fasteners that secure the light bar reinforcement. Any residual tape and adhesive must be removed carefully to prevent damage to roof panel. Following removal, the roof panel and the bottom of the reinforcement must be thoroughly cleaned with isopropyl alcohol or another suitable solvent.
5. While lifting the light bar reinforcement upward from the roof panel, carefully feed the jumper wire and connector through the clearance hole in the reinforcement.
6. Remove the reinforcement from the vehicle.