REMOVAL
FRONT
WARNING: To avoid personal injury or death, on vehicles equipped with airbags, disable the supplemental restraint system before attempting any steering wheel, steering column, airbag, occupant classification system, seat belt tensioner, impact sensor, or instrument panel component diagnosis or service. Disconnect and isolate the battery negative (ground) cable, then wait two minutes for the system capacitor to discharge before performing further diagnosis or service. This is the only sure way to disable the supplemental restraint system. Failure to take the proper precautions could result in accidental airbag deployment.
WARNING: To avoid personal injury or death, during and following any seat belt or child restraint anchor service, carefully inspect all seat belts, buckles, mounting hardware, retractors, tether straps, and anchors for proper installation, operation, or damage. Replace any belt that is cut, frayed, or torn. Straighten any belt that is twisted. Tighten any loose fasteners. Replace any belt that has a damaged or ineffective buckle or retractor. Replace any belt that has a bent or damaged latch plate or anchor plate. Replace any child restraint anchor or the unit to which the anchor is integral that has been bent or damaged. Never attempt to repair a seat belt or child restraint component. Always replace damaged or ineffective seat belt and child restraint components with the correct, new and unused replacement parts listed in the DaimlerChrysler Mopar® Parts Catalog.
NOTE: On vehicles equipped with the Occupant Classification System (OCS), the passenger side front seat belt and retractor unit includes a belt tension sensor that is integral to the lower seat belt anchor, which is secured to the outboard side of the passenger side front seat cushion frame. Any time any OCS component is removed or replaced for any reason, the OCM must be re-calibrated using a diagnostic scan tool, the Occupant Classification Seat Weight special tool, and the Occupant Classification System Verification Test. Refer to the appropriate diagnostic procedures.
NOTE: The following procedure is for replacement of an ineffective or damaged seat belt and retractor unit. The front retractor also includes a seat belt tensioner. If the front seat belt or retractor is ineffective or damaged, but the seat belt tensioner is not deployed, review the recommended procedures for handling non-deployed supplemental restraints. (Refer to 8 - ELECTRICAL/RESTRAINTS - STANDARD PROCEDURE - HANDLING NON-DEPLOYED SUPPLEMENTAL RESTRAINTS). If the seat belt tensioner has been deployed, review the recommended procedures for service after a supplemental restraint deployment before removing the unit from the vehicle. (Refer to 8 - ELECTRICAL/RESTRAINTS - STANDARD PROCEDURE - SERVICE AFTER A SUPPLEMENTAL RESTRAINT DEPLOYMENT).
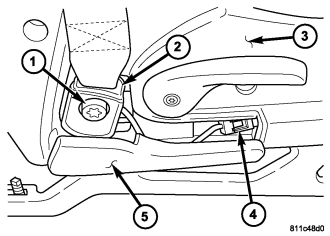
1. Adjust the front seat to its most forward position for easiest access to the front seat belt lower anchor (2) and the B-pillar trim.
2. Disconnect and isolate the battery negative cable. Wait two minutes for the system capacitor to discharge before further service.
3. Using a trim stick or another suitable wide flat-bladed tool, gently pry the seat belt anchor cover to remove it from the rear of the outboard seat side shield (3).
4. On the passenger side only if the vehicle is equipped with the Occupant Classification System, disconnect the belt tension sensor pigtail wire connector (4) from the seat wire harness connector.
5. Remove the screw (1) that secures the lower anchor/belt tension sensor to the bracket on the outboard side of the front seat cushion frame.
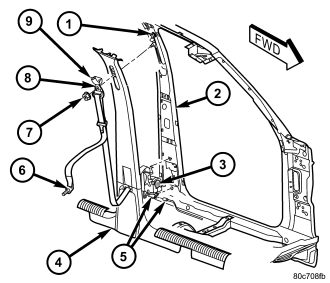
6. Unsnap and lift the trim cover (9) to access the nut (7) that secures the front seat belt turning loop (6) to the height adjuster (1) on the upper B-pillar (2).
7. Remove the nut that secures the seat belt turning loop to the height adjuster stud on the upper B-pillar.
8. Remove the seat belt turning loop from the height adjuster stud.
9. Remove the upper trim (4) from the inside of the B-pillar. (Refer to 23 - BODY/INTERIOR/B-PILLAR UPPER TRIM - REMOVAL).
10. Remove the lower trim (4) from the inside of the B-pillar. (Refer to 23 - BODY/INTERIOR/B-PILLAR LOWER TRIM - REMOVAL).
11. Disconnect the body wire harness connector from the seat belt tensioner pigtail wire connector (5).
12. Remove the screw that secures the lower retractor (3) bracket to the B-pillar.
13. Disengage the engagement tab on the upper retractor bracket/seat belt web guide from the engagement slot in the B-pillar.
14. Remove the front seat belt and retractor from the B-pillar as a unit.
REAR CENTER
WARNING: To avoid personal injury or death, during and following any seat belt or child restraint anchor service, carefully inspect all seat belts, buckles, mounting hardware, retractors, tether straps, and anchors for proper installation, operation, or damage. Replace any belt that is cut, frayed, or torn. Straighten any belt that is twisted. Tighten any loose fasteners. Replace any belt that has a damaged or ineffective buckle or retractor. Replace any belt that has a bent or damaged latch plate or anchor plate. Replace any child restraint anchor or the unit to which the anchor is integral that has been bent or damaged. Never attempt to repair a seat belt or child restraint component. Always replace damaged or ineffective seat belt and child restraint components with the correct, new and unused replacement parts listed in the DaimlerChrysler Mopar® Parts Catalog.
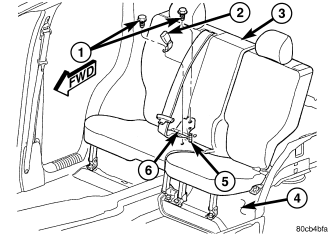
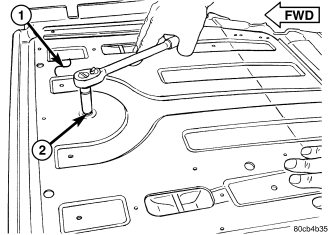
1. Remove the right center seat belt buckle unit (2) from the floor panel. (Refer to 8 - ELECTRICAL/RESTRAINTS/REAR SEAT BELT BUCKLE - REMOVAL).
2. Unlatch and fold the right rear seat back (3) forward and separate the cargo area carpet from the base of the seat back panel.
3. Reach between the base of the right rear seat back and the forward edge of the rear cargo floor to access and remove the screw (1) that secures the rear center seat belt lower anchor to the floor panel.
4. Lift the rear center seat belt lower anchor off of the stud on the rear floor panel.
5. Remove the right rear seat back panel from the vehicle. (Refer to 23 - BODY/SEATS/SEAT BACK - REAR - REMOVAL).
6. Remove the two screws that secure the belt web guide to the top of the right rear seat back panel.
7. Remove the trim from the right rear seat back. (Refer to 23 - BODY/SEATS/SEAT BACK COVER - REAR - REMOVAL).
8. Route the rear seat belt lower anchor and belt web guide through the top of the seat back panel.
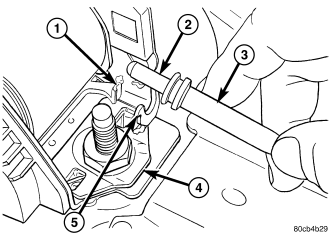
9. Disengage the seat back latch cable fitting (3) from the cable support (5) on the retractor (4), which is a light snap fit.
10. Remove the screw (2) that secures the retractor to the rear seat back panel (1).
11. Remove the rear center seat belt and retractor unit from the seat back panel.
REAR OUTBOARD
WARNING: To avoid personal injury or death, during and following any seat belt or child restraint anchor service, carefully inspect all seat belts, buckles, mounting hardware, retractors, tether straps, and anchors for proper installation, operation, or damage. Replace any belt that is cut, frayed, or torn. Straighten any belt that is twisted. Tighten any loose fasteners. Replace any belt that has a damaged or ineffective buckle or retractor. Replace any belt that has a bent or damaged latch plate or anchor plate. Replace any child restraint anchor or the unit to which the anchor is integral that has been bent or damaged. Never attempt to repair a seat belt or child restraint component. Always replace damaged or ineffective seat belt and child restraint components with the correct, new and unused replacement parts listed in the DaimlerChrysler Mopar® Parts Catalog.
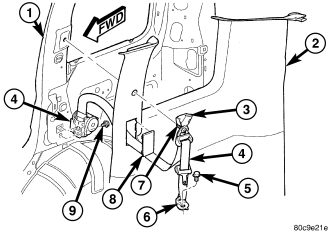
1. Unsnap and lift the trim cover (3) to access the screw (7) that secures the rear outboard seat belt turning loop to the upper C-pillar (1).
2. Remove the screw that secures the seat belt turning loop to the upper C-pillar.
3. Remove the screw (5) that secures the lower seat belt anchor (6) to the bracket on the outboard side of the rear seat cushion frame.
4. Remove the quarter trim panel (2) from the C-pillar. (Refer to 23 - BODY/INTERIOR/QUARTER TRIM PANEL - REMOVAL).
5. Route the seat belt lower anchor and turning loop through the access hole in the quarter trim panel.
6. Remove the screw (9) that secures the retractor (4) bracket to the lower C-pillar.
7. Lift the retractor upward far enough to disengage the retractor tab from the engagement hole in the lower C-pillar.
8. Remove the rear outboard seat belt and retractor from the C-pillar as a unit.