The seat belt retractors used in all seating positions include
an inertia-type, emergency locking mechanism as standard equipment.
However, the retractor locking mechanisms for all seating positions
except for the driver side front are mechanically switchable from
an emergency locking retractor to an automatic locking retractor.
The primary function of this feature is to securely accommodate a
child seat in any of these seating positions of the vehicle without
the need for a self-cinching seat belt tip half latch plate unit or
another supplemental device that would be required to prevent the
seat belt webbing from unwinding freely from the retractor spool of
an inertia-type emergency locking retractor mechanism.
The automatic locking mechanism is integral to the seat belt and
retractor unit and is concealed beneath a molded plastic cover located
on one side of the retractor spool. The automatic locking mechanism
cannot be adjusted or repaired and, if ineffective or damaged, the
entire seat belt and retractor unit must be replaced.
OPERATION
OPERATION
The locked mode of the automatic locking retractor is engaged and
the retractor is switched from operating as a standard inertia-type
emergency locking retractor by first buckling the combination lap
and shoulder belt buckle. Then grasp the shoulder belt and pull all
of the webbing out of the retractor. Once all of the belt webbing
is extracted from the spool, the retractor will automatically become
engaged in the pre-locked automatic locking mode and will make a light,
audible clicking or ratchet-like sound as the shoulder belt is allowed
to retract to confirm that the automatic locking mode is now engaged.
Once the automatic locking mode is engaged, the retractor will remain
locked and the belt will remain tight around whatever it is restraining.
The retractor is returned to standard emergency locking (inertia)
mode by unbuckling the combination lap and shoulder belt buckle and
allowing the belt webbing to be almost fully retracted onto the retractor
spool. The emergency locking mode is confirmed by the absence of the
light, audible clicking or ratchet-like sound as the belt webbing
retracts. This mode will allow the belt to unwind from and wind onto
the retractor spool freely unless and until a predetermined inertia
load is sensed, or until the retractor is again switched to the automatic
locking mode.
FRONT - TWO DOOR
FRONT - TWO
DOOR
WARNING:
To avoid serious or fatal injury on vehicles equipped with airbags, disable the Supplemental Restraint System (SRS) before attempting any steering wheel, steering column, airbag, seat belt tensioner, impact sensor or instrument panel component diagnosis or service. Disconnect and isolate the battery negative (ground) cable, then wait two minutes for the system capacitor to discharge before performing further diagnosis or service. This is the only sure way to disable the SRS. Failure to take the proper precautions could result in accidental airbag deployment.
WARNING:
To avoid serious or fatal injury during and following any seat belt or child restraint anchor service, carefully inspect all seat belts, buckles, mounting hardware, retractors, tether straps, and anchors for proper installation, operation, or damage. Replace any belt that is cut, frayed, or torn. Straighten any belt that is twisted. Tighten any loose fasteners. Replace any belt that has a damaged or ineffective buckle or retractor. Replace any belt that has a bent or damaged latch plate or anchor plate. Replace any child restraint anchor or the unit to which the anchor is integral that has been bent or damaged. Never attempt to repair a seat belt or child restraint component. Always replace damaged or ineffective seat belt and child restraint components with the correct, new and unused replacement parts listed in the Chrysler Mopar® Parts Catalog. Failure to follow these instructions may result in possible serious or fatal injury.
NOTE:
The following procedure
is for replacement of an ineffective or damaged seat belt and retractor
unit. The front retractor also includes a seat belt tensioner. If
the front seat belt or retractor is ineffective or damaged, but the
seat belt tensioner is not deployed, review the recommended procedures
for Handling Non-Deployed Supplemental Restraints. (Refer to 10 - Restraints - Standard
Procedure)
. If the seat belt tensioner has been deployed, review
the recommended procedures for Service After A Supplemental Restraint
Deployment before removing the unit from the vehicle. (Refer to 10 - Restraints - Standard
Procedure)
.
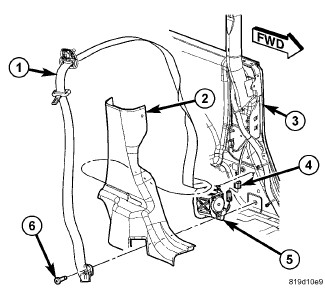
Disengage the seat
belt webbing (1) through the slot from the seat belt opening in the
lower B-pillar trim.
Disconnect the yellow
body wire harness connector (4) from the seat belt tensioner initiator
on the retractor (5).
Remove the screw (6)
that secures the seat belt lower anchor and the retractor lower bracket
to the base of the inner B-pillar.
Remove the front seat
belt and retractor from the B-pillar as a unit.
FRONT - FOUR DOOR
FRONT - FOUR
DOOR
WARNING:
To avoid serious or fatal injury on vehicles equipped with airbags, disable the Supplemental Restraint System (SRS) before attempting any steering wheel, steering column, airbag, seat belt tensioner, impact sensor or instrument panel component diagnosis or service. Disconnect and isolate the battery negative (ground) cable, then wait two minutes for the system capacitor to discharge before performing further diagnosis or service. This is the only sure way to disable the SRS. Failure to take the proper precautions could result in accidental airbag deployment.
WARNING:
To avoid serious or fatal injury during and following any seat belt or child restraint anchor service, carefully inspect all seat belts, buckles, mounting hardware, retractors, tether straps, and anchors for proper installation, operation, or damage. Replace any belt that is cut, frayed, or torn. Straighten any belt that is twisted. Tighten any loose fasteners. Replace any belt that has a damaged or ineffective buckle or retractor. Replace any belt that has a bent or damaged latch plate or anchor plate. Replace any child restraint anchor or the unit to which the anchor is integral that has been bent or damaged. Never attempt to repair a seat belt or child restraint component. Always replace damaged or ineffective seat belt and child restraint components with the correct, new and unused replacement parts listed in the Chrysler Mopar® Parts Catalog. Failure to follow these instructions may result in possible serious or fatal injury.
NOTE:
The following procedure
is for replacement of an ineffective or damaged seat belt and retractor
unit. The front retractor also includes a seat belt tensioner. If
the front seat belt or retractor is ineffective or damaged, but the
seat belt tensioner is not deployed, review the recommended procedures
for Handling Non-Deployed Supplemental Restraints. (Refer to 10 - Restraints - Standard
Procedure)
. If the seat belt tensioner has been deployed, review
the recommended procedures for Service After A Supplemental Restraint
Deployment before removing the unit from the vehicle. (Refer to 10 - Restraints - Standard
Procedure)
.
Disengage the seat
belt webbing (3) through the slot from the seat belt opening in the
lower B-pillar trim.
Disconnect the yellow
body wire harness connector (5) from the seat belt tensioner initiator
on the retractor.
Remove the screw (4)
that secures the lower retractor bracket to the B-pillar.
Remove the front seat
belt and retractor from the B-pillar as a unit.
SECOND ROW - TWO DOOR
SECOND ROW -
TWO DOOR
WARNING:
To avoid serious or fatal injury during and following any seat belt or child restraint anchor service, carefully inspect all seat belts, buckles, mounting hardware, retractors, tether straps, and anchors for proper installation, operation, or damage. Replace any belt that is cut, frayed, or torn. Straighten any belt that is twisted. Tighten any loose fasteners. Replace any belt that has a damaged or ineffective buckle or retractor. Replace any belt that has a bent or damaged latch plate or anchor plate. Replace any child restraint anchor or the unit to which the anchor is integral that has been bent or damaged. Never attempt to repair a seat belt or child restraint component. Always replace damaged or ineffective seat belt and child restraint components with the correct, new and unused replacement parts listed in the Chrysler Mopar® Parts Catalog. Failure to follow these instructions may result in possible serious or fatal injury.
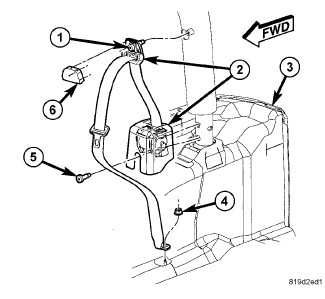
Remove the nut (4)
that secures the second row seat belt lower anchor to the stud on
the rear floor panel.
Unsnap the trim cover
(6) from the second row seat belt turning loop and discard.
Remove the screw (1)
that secures the turning loop to the upper rear sport bar.
Remove the screw (5)
that secures the second row retractor lower bracket to the base of
the rear sport bar.
Remove the second row
seat belt and retractor unit (2) from the rear sport bar.
SECOND ROW - FOUR DOOR - CENTER
SECOND ROW -
FOUR DOOR - CENTER
WARNING:
To avoid serious or fatal injury during and following any seat belt or child restraint anchor service, carefully inspect all seat belts, buckles, mounting hardware, retractors, tether straps, and anchors for proper installation, operation, or damage. Replace any belt that is cut, frayed, or torn. Straighten any belt that is twisted. Tighten any loose fasteners. Replace any belt that has a damaged or ineffective buckle or retractor. Replace any belt that has a bent or damaged latch plate or anchor plate. Replace any child restraint anchor or the unit to which the anchor is integral that has been bent or damaged. Never attempt to repair a seat belt or child restraint component. Always replace damaged or ineffective seat belt and child restraint components with the correct, new and unused replacement parts listed in the Chrysler Mopar® Parts Catalog. Failure to follow these instructions may result in possible serious or fatal injury.
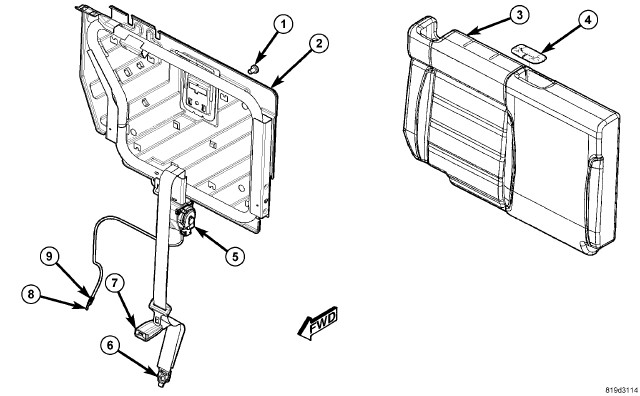
The anchor plates for
the right second row seat belt buckle (7) and the second row center
seat belt anchor (6) are secured to each other by a soft metal grommet
as an assembly aid during the manufacturing process and, once removed,
the grommet does not require reinstallation.
Remove the second row
seat from the vehicle as a unit and place it on a suitable work surface.
Be certain to take the proper precautions to prevent the trim cover
from receiving cosmetic damage during the following procedures. (Refer to 23 - Body/Seats/SEAT - Removal)
.
Disengage the retractor
locking cable housing (9) and cable end (8) from the right outboard
seat back latch mechanism.
Remove the screw (1)
that secures the second row center seat belt retractor (5) to the
seat back panel.
Remove the second row
center seat belt and retractor unit from the seat back panel.
SECOND ROW - FOUR DOOR - OUTBOARD
SECOND ROW -
FOUR DOOR - OUTBOARD
WARNING:
To avoid serious or fatal injury during and following any seat belt or child restraint anchor service, carefully inspect all seat belts, buckles, mounting hardware, retractors, tether straps, and anchors for proper installation, operation, or damage. Replace any belt that is cut, frayed, or torn. Straighten any belt that is twisted. Tighten any loose fasteners. Replace any belt that has a damaged or ineffective buckle or retractor. Replace any belt that has a bent or damaged latch plate or anchor plate. Replace any child restraint anchor or the unit to which the anchor is integral that has been bent or damaged. Never attempt to repair a seat belt or child restraint component. Always replace damaged or ineffective seat belt and child restraint components with the correct, new and unused replacement parts listed in the Chrysler Mopar® Parts Catalog. Failure to follow these instructions may result in possible serious or fatal injury.
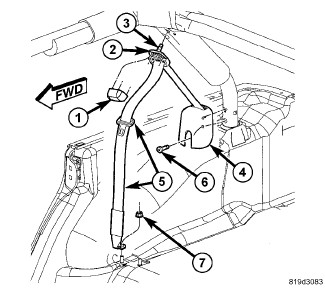
Remove the nut (7)
that secures the second row seat belt (5) lower anchor to the stud
on the rear floor panel.
Unsnap the trim cover
(1) from the second row seat belt turning loop (2) and discard.
Remove the screw (3)
that secures the turning loop to the upper rear sport bar.
Remove the screw (6)
that secures the second row retractor (4) lower bracket to the base
of the rear sport bar.
Remove the second row
seat belt and retractor unit from the rear sport bar.
FRONT - TWO DOOR
FRONT - TWO
DOOR
WARNING:
To avoid serious or fatal injury on vehicles equipped with airbags, disable the Supplemental Restraint System (SRS) before attempting any steering wheel, steering column, airbag, seat belt tensioner, impact sensor or instrument panel component diagnosis or service. Disconnect and isolate the battery negative (ground) cable, then wait two minutes for the system capacitor to discharge before performing further diagnosis or service. This is the only sure way to disable the SRS. Failure to take the proper precautions could result in accidental airbag deployment.
WARNING:
To avoid serious or fatal injury during and following any seat belt or child restraint anchor service, carefully inspect all seat belts, buckles, mounting hardware, retractors, tether straps, and anchors for proper installation, operation, or damage. Replace any belt that is cut, frayed, or torn. Straighten any belt that is twisted. Tighten any loose fasteners. Replace any belt that has a damaged or ineffective buckle or retractor. Replace any belt that has a bent or damaged latch plate or anchor plate. Replace any child restraint anchor or the unit to which the anchor is integral that has been bent or damaged. Never attempt to repair a seat belt or child restraint component. Always replace damaged or ineffective seat belt and child restraint components with the correct, new and unused replacement parts listed in the Chrysler Mopar® Parts Catalog. Failure to follow these instructions may result in possible serious or fatal injury.
NOTE:
The following procedure
is for replacement of an ineffective or damaged seat belt and retractor
unit. The front retractor also includes a seat belt tensioner. If
the front seat belt or retractor is ineffective or damaged, but the
seat belt tensioner is not deployed, review the recommended procedures
for Handling Non-Deployed Supplemental Restraints. (Refer to 10 - Restraints - Standard
Procedure)
. If the seat belt tensioner has been deployed, review
the recommended procedures for Service After A Supplemental Restraint
Deployment before removing the unit from the vehicle. (Refer to 10 - Restraints - Standard
Procedure)
.
Position the seat belt
(1) and retractor (5) to the inner B-pillar (3) as a unit. Be certain
to engage the tab on the upper retractor bracket into the hole in
the B-pillar.
Position the seat belt
lower anchor to the mounting hole in the lower retractor bracket.
Be certain that the seat belt webbing between the retractor and the
lower anchor is not twisted.
Install and tighten
the screw (6) that secures the lower retractor bracket and the seat
belt lower anchor to the base of the inner B-pillar. Tighten the screw
to 40 N·m (30 ft. lbs.).
Reconnect the yellow
body wire harness connector (4) to the seat belt tensioner initiator
on the retractor.
Engage the seat belt
webbing through the slot into the seat belt opening in the lower B-pillar
trim (2).
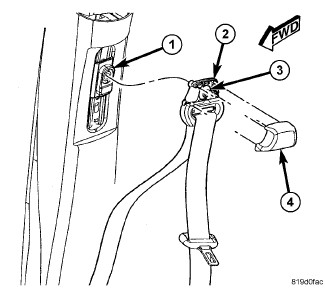
Position the seat belt
turning loop (2) onto the height adjuster (1) on the upper sport bar.
Be certain that the seat belt webbing between the retractor and the
lower anchor is not twisted.
Install and tighten
the screw (3) that secures the turning loop to the height adjuster.
Tighten the screw to 40 N·m (30 ft. lbs.).
Engage the upper edge
of a new trim cover (4) over the top of the turning loop. Then squeeze
the lower end of the trim cover and the turning loop together firmly
and evenly until the engagement tabs of the trim cover snap into the
slots of the turning loop.
Do not reconnect the
battery negative cable at this time. The Supplemental Restraint System
(SRS) Verification Test procedure should be performed following service
of any SRS component. (Refer
to 10 - Restraints - Standard Procedure)
.
FRONT - FOUR DOOR
FRONT - FOUR
DOOR
WARNING:
To avoid serious or fatal injury on vehicles equipped with airbags, disable the Supplemental Restraint System (SRS) before attempting any steering wheel, steering column, airbag, seat belt tensioner, impact sensor or instrument panel component diagnosis or service. Disconnect and isolate the battery negative (ground) cable, then wait two minutes for the system capacitor to discharge before performing further diagnosis or service. This is the only sure way to disable the SRS. Failure to take the proper precautions could result in accidental airbag deployment.
WARNING:
To avoid serious or fatal injury during and following any seat belt or child restraint anchor service, carefully inspect all seat belts, buckles, mounting hardware, retractors, tether straps, and anchors for proper installation, operation, or damage. Replace any belt that is cut, frayed, or torn. Straighten any belt that is twisted. Tighten any loose fasteners. Replace any belt that has a damaged or ineffective buckle or retractor. Replace any belt that has a bent or damaged latch plate or anchor plate. Replace any child restraint anchor or the unit to which the anchor is integral that has been bent or damaged. Never attempt to repair a seat belt or child restraint component. Always replace damaged or ineffective seat belt and child restraint components with the correct, new and unused replacement parts listed in the Chrysler Mopar® Parts Catalog. Failure to follow these instructions may result in possible serious or fatal injury.
NOTE:
The following procedure
is for replacement of an ineffective or damaged seat belt and retractor
unit. The front retractor also includes a seat belt tensioner. If
the front seat belt or retractor is ineffective or damaged, but the
seat belt tensioner is not deployed, review the recommended procedures
for Handling Non-Deployed Supplemental Restraints. (Refer to 10 - Restraints - Standard
Procedure)
. If the seat belt tensioner has been deployed, review
the recommended procedures for Service After A Supplemental Restraint
Deployment before removing the unit from the vehicle. (Refer to 10 - Restraints - Standard
Procedure)
.
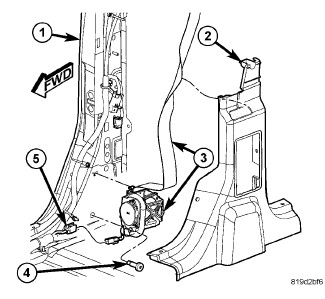
Position the seat belt
and retractor (3) to the inner B-pillar (1) as a unit. Be certain
to engage the tab on the upper retractor bracket into the hole in
the B-pillar.
Install and tighten
the screw (4) that secures the retractor lower bracket to the base
of the inner B-pillar. Tighten the screw to 40 N·m (30 ft. lbs.).
Reconnect the yellow
body wire harness connector (5) to the seat belt tensioner initiator
on the retractor.
Engage the seat belt
webbing through the slot into the seat belt opening in the lower B-pillar
trim (2).
Position the seat belt
turning loop (2) onto the height adjuster (1) on the upper sport bar.
Be certain that the seat belt webbing between the retractor and the
turning loop is not twisted.
Install and tighten
the screw (3) that secures the turning loop to the height adjuster.
Tighten the screw to 40 N·m (30 ft. lbs.).
Engage the upper edge
of a new trim cover (4) over the top of the turning loop. Then squeeze
the lower end of the trim cover and the turning loop together firmly
and evenly until the engagement tabs of the trim cover snap into the
slots of the turning loop.
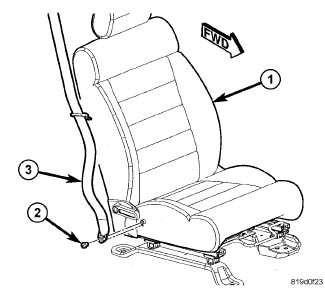
Position the seat belt
(3) lower anchor to the mounting hole on the outboard side of the
front seat (1) cushion frame. Be certain that the seat belt webbing
between the turning loop and the lower anchor is not twisted.
Install and tighten
the screw (2) that secures the lower anchor to the seat. Tighten the
screw to 40 N·m (30 ft. lbs.).
Do not reconnect the
battery negative cable at this time. The Supplemental Restraint System
(SRS) Verification Test procedure should be performed following service
of any SRS component. (Refer
to 10 - Restraints - Standard Procedure)
.
SECOND ROW - TWO DOOR
SECOND ROW -
TWO DOOR
WARNING:
To avoid serious or fatal injury during and following any seat belt or child restraint anchor service, carefully inspect all seat belts, buckles, mounting hardware, retractors, tether straps, and anchors for proper installation, operation, or damage. Replace any belt that is cut, frayed, or torn. Straighten any belt that is twisted. Tighten any loose fasteners. Replace any belt that has a damaged or ineffective buckle or retractor. Replace any belt that has a bent or damaged latch plate or anchor plate. Replace any child restraint anchor or the unit to which the anchor is integral that has been bent or damaged. Never attempt to repair a seat belt or child restraint component. Always replace damaged or ineffective seat belt and child restraint components with the correct, new and unused replacement parts listed in the Chrysler Mopar® Parts Catalog. Failure to follow these instructions may result in possible serious or fatal injury.
Position the second
row seat belt and retractor unit (2) to the base of the rear sport
bar. Be certain to engage the tab on the upper retractor bracket into
the hole in the sport bar.
Install and tighten
the screw (5) that secures the retractor lower bracket to the base
of the rear sport bar. Tighten the screw to 40 N·m (30 ft. lbs.).
Position the second
row seat belt turning loop to the upper rear sport bar. Be certain
the seat belt webbing between the retractor and the turning loop is
not twisted.
Install and tighten
the screw (1) that secures the turning loop to the sport bar. Tighten
the screw to 40 N·m (30 ft. lbs.).
Engage the upper edge
of a new trim cover (6) over the top of the turning loop. Then squeeze
the lower end of the trim cover and the turning loop together firmly
and evenly until the engagement tabs of the trim cover snap into the
slots of the turning loop.
Position the second
row seat belt lower anchor onto the stud on the rear floor panel.
Be certain the seat belt webbing between the turning loop and the
lower anchor is not twisted.
Install and tighten
the nut (4) that secures the lower anchor to the stud on the rear
floor panel. Tighten the nut to 40 N·m (30 ft. lbs.).
SECOND ROW - FOUR DOOR - CENTER
SECOND ROW -
FOUR DOOR - CENTER
WARNING:
To avoid serious or fatal injury during and following any seat belt or child restraint anchor service, carefully inspect all seat belts, buckles, mounting hardware, retractors, tether straps, and anchors for proper installation, operation, or damage. Replace any belt that is cut, frayed, or torn. Straighten any belt that is twisted. Tighten any loose fasteners. Replace any belt that has a damaged or ineffective buckle or retractor. Replace any belt that has a bent or damaged latch plate or anchor plate. Replace any child restraint anchor or the unit to which the anchor is integral that has been bent or damaged. Never attempt to repair a seat belt or child restraint component. Always replace damaged or ineffective seat belt and child restraint components with the correct, new and unused replacement parts listed in the Chrysler Mopar® Parts Catalog. Failure to follow these instructions may result in possible serious or fatal injury.
The anchor plates for
the right second row seat belt buckle (7) and the second row center
seat belt anchor (6) are secured to each other by a soft metal grommet
as an assembly aid during the manufacturing process and, once removed,
the grommet does not require reinstallation.
Position the second
row center seat belt and retractor unit (5) onto the 60 percent seat
back panel (2). Be certain to engage the tab on the retractor frame
into the hole in the back panel.
Install and tighten
the screw (1) that secures the retractor to the seat back panel. Tighten
the screw to 55 N·m (41 ft. lbs.).
Engage the retractor
locking cable end (8) and cable housing with the right outboard seat
back latch mechanism.
To avoid serious or fatal injury during and following any seat belt or child restraint anchor service, carefully inspect all seat belts, buckles, mounting hardware, retractors, tether straps, and anchors for proper installation, operation, or damage. Replace any belt that is cut, frayed, or torn. Straighten any belt that is twisted. Tighten any loose fasteners. Replace any belt that has a damaged or ineffective buckle or retractor. Replace any belt that has a bent or damaged latch plate or anchor plate. Replace any child restraint anchor or the unit to which the anchor is integral that has been bent or damaged. Never attempt to repair a seat belt or child restraint component. Always replace damaged or ineffective seat belt and child restraint components with the correct, new and unused replacement parts listed in the Chrysler Mopar® Parts Catalog. Failure to follow these instructions may result in possible serious or fatal injury.
Position the second
row seat belt and retractor unit (4) to the base of the rear sport
bar. Be certain to engage the tab on the upper retractor bracket into
the hole in the sport bar.
Install and tighten
the screw (6) that secures the retractor lower bracket to the base
of the rear sport bar. Tighten the screw to 40 N·m (30 ft. lbs.).
Position the second
row seat belt turning loop (2) to the upper rear sport bar. Be certain
the seat belt webbing between the retractor and the turning loop is
not twisted.
Install and tighten
the screw (3) that secures the turning loop to the sport bar. Tighten
the screw to 40 N·m (30 ft. lbs.).
Engage the upper edge
of a new trim cover (1) over the top of the turning loop. Then squeeze
the lower end of the trim cover and the turning loop together firmly
and evenly until the engagement tabs of the trim cover snap into the
slots of the turning loop.
Position the second
row seat belt (5) lower anchor onto the stud on the rear floor panel.
Be certain the seat belt webbing between the turning loop and the
lower anchor is not twisted.
Install and tighten
the nut (7) that secures the lower anchor to the stud on the rear
floor panel. Tighten the nut to 40 N·m (30 ft. lbs.).