DOOR, Rear
ADJUSTMENTS
ADJUSTMENTS
| NOTE: |
For four door vehicles, it is recommended that you adjust the rear door before adjusting the front door. (Refer to 23 - Body/Doors - Rear/DOOR, Rear - Adjustments)
|
FORE/AFT
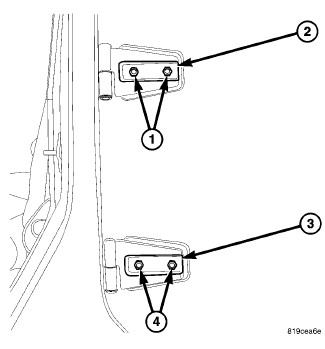 |
| NOTE: |
Fore/aft (lateral) door adjustment is done by loosening the hinge to the door fasteners one hinge at a time and moving the door to the correct position. |
- Support the door with a suitable lifting device.
- Loosen the upper (1) and lower (4) hinge to door fasteners. (Refer to 23 - Body/Door - Front/HINGE, Door - Removal)
- Adjust the door to the correct position. (Refer to 23 - Body/Body Structure/Gap and Flush - Specifications)
-
Tighten the hinge to door bolts to 26 N·m (19 ft. lbs.).
UP/DOWN
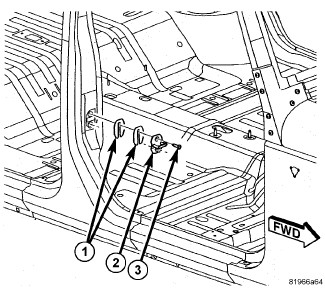 |
| NOTE: |
Up/down door adjustment is done by loosening hinge to the hinge pillar fasteners or the hinge to door fasteners and moving the door to the correct position. |
- Support the door with a suitable lifting device.
-
Loosen the latch striker bolts (3). (Refer to 23 - Body/Door - Front/STRIKER, Door Latch - Removal)
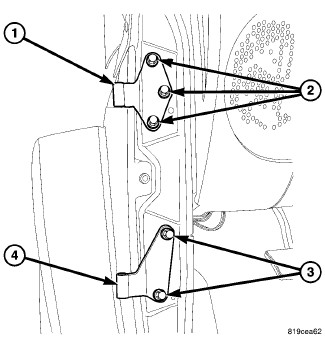
- If necessary, loosen the hinge to hinge pillar fasteners (2) and (3). (Refer to 23 - Body/Door - Front/HINGE, Door - Removal)
-
Tighten the hinge to body fasteners to 28 N·m (21 ft. lbs.).
- If necessary, Loosen the hinge to door fasteners (1) and (4). (Refer to 23 - Body/Door - Front/DOOR - Removal)
- Adjust the door to the correct position. (Refer to 23 - Body/Body Structure/Gap and Flush - Specifications)
-
Tighten the door to hinge fasteners to 26 N·m (19 ft. lbs.).
-
Tighten the latch striker bolts (3) 26 N·m (19 ft. lbs.). (Refer to 23 - Body/Door - Front/STRIKER, Door Latch - Installation)
IN/OUT
|
| NOTE: |
In/out door adjustment is done by loosening the hinge to body fasteners one hinge at a time and moving the door to the correct position. |
- Support the door with a suitable lifting device.
-
Loosen the latch striker bolts (3). (Refer to 23 - Body/Door - Front/STRIKER, Door Latch - Removal)
- Loosen the hinge to body fasteners (2) and (3), (Refer to 23 - Body/Door - Front/DOOR - Removal)
- Adjust the door to the correct position. (Refer to 23 - Body/Body Structure/Gap and Flush - Specifications)
-
Tighten the hinge to body fasteners to 28 N·m (21 ft. lbs.).
-
Tighten the latch striker bolts (3) to 26 N·m (19 ft. lbs.). (Refer to 23 - Body/Door - Front/STRIKER, Door Latch - Installation)
REMOVAL
REMOVAL
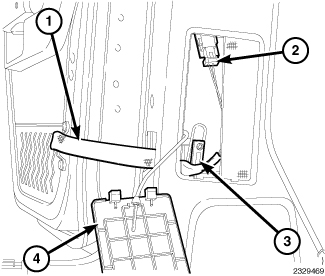 |
- Remove the access door (4) from the interior B-Pillar lower trim.
- Remove the door harness from the footman loop (3) on the B-Pillar.
- Disconnect the door harness connector (2).
-
Pull the door harness (1) out towards the rear of the vehicle through the opening in the interior B-Pillar lower trim side.
-
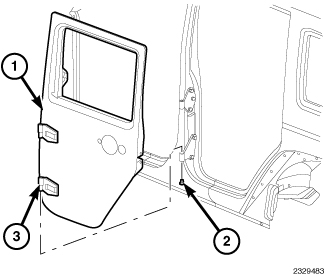
Remove the hinge nuts (2) and lift the door (1) straight up, off the hinges (3) and remove.
INSTALLATION
INSTALLATION
|
- Align pins on door hinge (3) to holes in hinge on body and position door (1) into place.
- Install the nuts (2) and tighten to 8.5 N·m (75 in. lbs.).
-
If necessary, adjust the door (2), (Refer to 23 - Body/Doors - Rear/DOOR, Rear - Adjustments)
- Route the wiring harness (1) through the interior B-Pillar lower trim side.
- Install the harness (1) to the footman loop (3) on the B-Pillar.
- Connect the door harness (2) to the body harness.
-
Install the access door (4) to the B-Pillar lower trim.