COVER, Instrument Panel
REMOVAL
REMOVAL
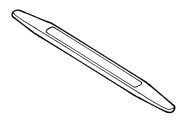
Special Tools: Click to display a list of tools used in this procedure
 |
- Remove the center console, (Refer to 23 - Body/Interior/CONSOLE, Center - Removal) .
-
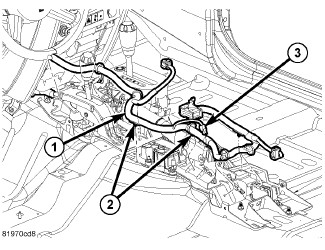
Disconnect the center
harness (1) electrical connectors and position aside.
- Remove the amplifier, if equipped.
-
Remove the steering
column as necessary, (Refer
to 19 - Steering/Column - Removal)
.
-
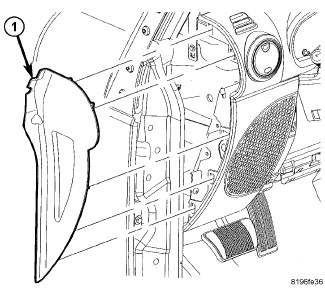
Using a trim stick C-4755 or equivalent, remove the end caps (1).
- Remove the center trim, (Refer to 23 - Body/Instrument Panel/BEZEL, Instrument Panel - Removal) .
- Remove the radio, if necessary.
- Remove the glove box, (Refer to 23 - Body/Instrument Panel/GLOVE BOX, Instrument Panel - Removal) .
- Remove the upper I/P tweeter speakers, if necessary.
- Remove the cluster bezel, (Refer to 23 - Body/Instrument Panel/BEZEL, Instrument Cluster - Removal) .
- Remove the passenger air bag, (Refer to 10 - Restraints/AIR BAG, Passenger - Removal)
- Remove the glove box striker.
- Remove the screws securing the cover to the I/P reinforcement and remove the cover.
INSTALLATION
INSTALLATION
- Position the cover over the I/P reinforcement and install the screws.
- Install the glove box striker.
- Install the passenger air bag, (Refer to 10 - Restraints/AIR BAG, Passenger - Installation) .
- Install the cluster bezel, (Refer to 23 - Body/Instrument Panel/BEZEL, Instrument Cluster - Installation) .
- Install the upper I/P tweeter speakers, if necessary.
- Install the glove box, (Refer to 23 - Body/Instrument Panel/GLOVE BOX, Instrument Panel - Installation) .
- Install the radio, if necessary.
-
Install the center
trim, (Refer to 23 - Body/Instrument
Panel/BEZEL, Instrument Panel - Installation)
.
-
Position the end caps
(1) into place and seat the clips fully.
- Install the steering column, (Refer to 19 - Steering/Column - Installation) .
-
Install the amplifier,
if necessary.
- Position the center harness (1) back into place, secure the support clips and connect the electrical connectors.
-
Install the center
console, (Refer to 23 - Body/Interior/CONSOLE,
Center - Installation)
.