PAN, Oil
DESCRIPTION
DESCRIPTION
 |
| NOTE: |
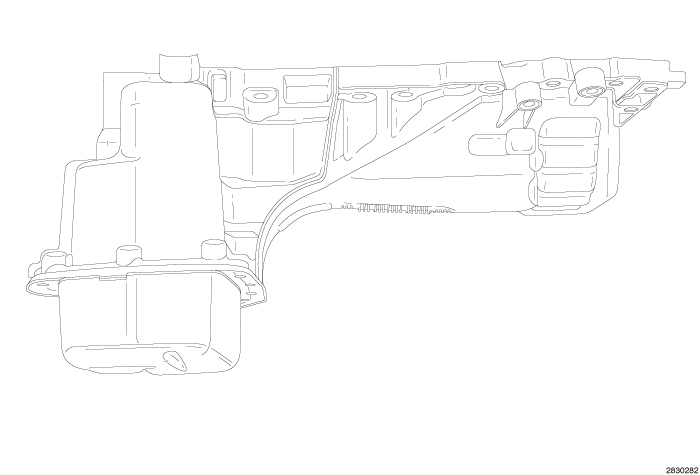
Typical 3.6L engine upper and lower oil pans shown. |
There is an upper and lower oil pan. The upper oil pan is cast aluminum and also serves as the engine lower end structural support. The lower pan is a stamped steel design. Both upper and lower oil pans are sealed using Mopar® Threebond Engine RTV Sealant.
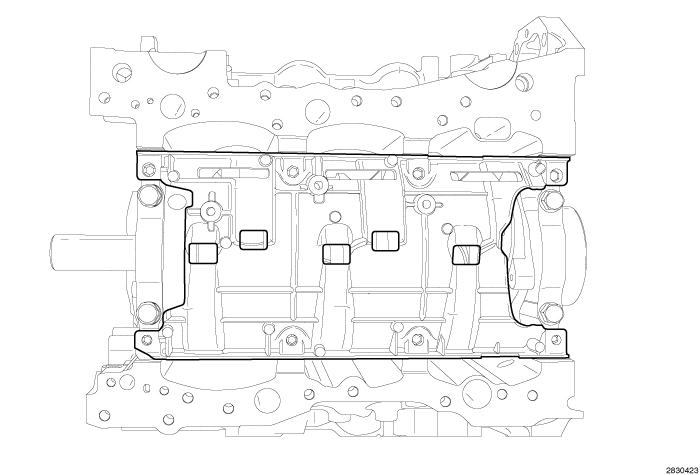 |
Do not attempt to support the
weight of the engine on the windage tray. The windage tray is a thin
cast aluminum construction and can be easily damaged.
CAUTION:
The high pressure die cast aluminum windage tray is mounted to the main bearing caps and is designed to keep oil off of the connecting rods as the crankshaft rotates. When the oil is kept off the connecting rods, the engine rotates easier and oil foaming decreases. Like the oil pan, the windage tray is designed to stiffen the lower end of the engine. The tray is directional and the main bearing cap bolts hold it in place.
LOWER
LOWER
 |
- Raise and support the vehicle (Refer to 04 - Vehicle Quick Reference/Hoisting - Standard Procedure) .
- Drain the engine oil (Refer to 09 - Engine/Lubrication/OIL - Standard Procedure) .
-
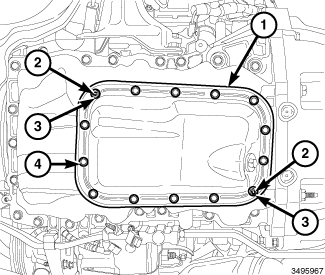
Remove twelve bolts (4), two nuts (3) and two studs (2) from the flange of the lower oil pan (1).
CAUTION: Do not pry on the lower oil pan flange. There are no designated pry points for lower oil pan removal. Prying on only one or a few locations could bend the flange and damage the pan.
- Apply a side force to the lower oil pan (1) in order to shear the sealant bond and remove the pan.
-
Remove all residual sealant from the upper and lower oil pans (Refer to 09 - Engine/Lubrication/PAN, Oil - Cleaning)
UPPER
UPPER
 |
-
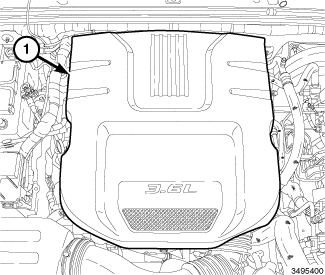
Remove the engine cover (1).
- Raise and support the vehicle (Refer to 04 - Vehicle Quick Reference/Hoisting - Standard Procedure) .
- Remove the right front wheelhouse inner splash shield (Refer to 23 - Body/Exterior/SHIELD, Splash - Removal) .
-
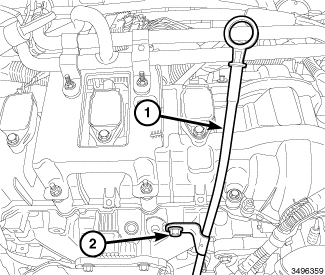
Remove the bolt (2) and remove the oil level indicator (1).
-
Drain the engine oil (Refer to 09 - Engine/Lubrication/OIL - Standard Procedure)
.
NOTE: The lower oil pan (1) does not need to be removed when removing the upper oil pan.
-
If required, remove the lower oil pan (1) (Refer to 09 - Engine/Lubrication/PAN, Oil - Removal)
-
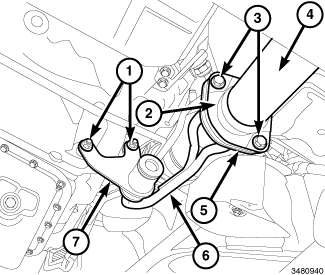
Remove the two nuts (1) and the exhaust hanger bracket (7).
-
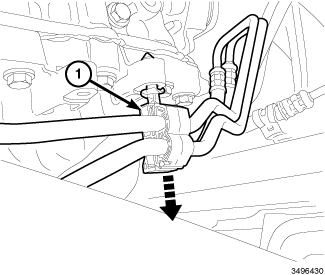
Disengage the transmission cooler line retainer (1) from the oil pan flange.
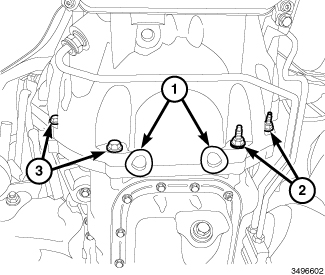
- Remove four transmission to the engine oil pan bolts (2 and 3).
-
Remove two rubber plugs (1) covering the rear oil seal retainer flange bolts.
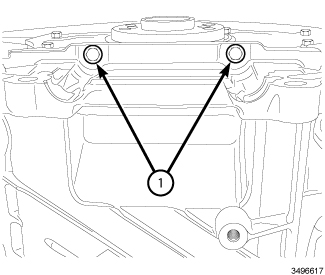
NOTE: Shown with transmission removed for clarity.
CAUTION: There are two hidden M6 bolts that must be removed from the rear of the upper oil pan flange. If these bolts are not removed, the rear oil seal retainer flange will be severely damaged.
-
Remove two M6 bolts (1) from the rear oil seal retainer flange.
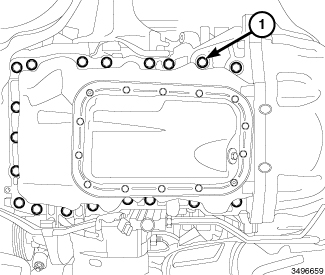
-
Remove nineteen M8 oil pan mounting bolts (1).
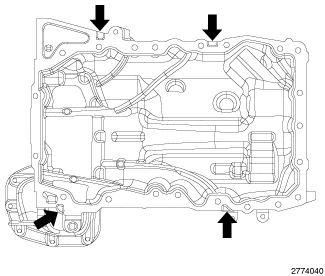
NOTE: WK oil pan shown, JK oil pan similar.
- Using the four indicated pry points, carefully remove the upper oil pan.
-
Remove all residual sealant from the upper and lower oil pans, timing chain cover, rear seal retainer and engine block mating surfaces (Refer to 09 - Engine/Lubrication/PAN, Oil - Cleaning)
.
CLEANING
CLEANING
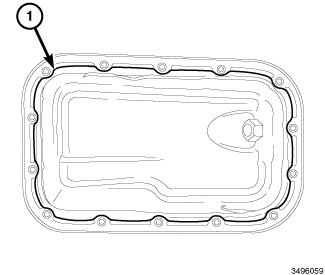
Clean the upper and lower oil pans, timing chain cover, rear seal
retainer and engine block mating surfaces thoroughly with isopropyl
alcohol in preparation for sealant application. All surfaces that
seal with RTV must be oil and contamination free to ensure proper
adhesion of the RTV to the mating surface to prevent leaks.
CAUTION:
 |
| NOTE: |
WK upper oil pan shown,
JK upper oil pan similar. |
 |
-
Clean the oil pan in
solvent and wipe dry with a clean cloth.
CAUTION: Do not use oil based liquids, wire brushes, abrasive wheels or metal scrapers to clean the engine gasket surfaces. Use only isopropyl (rubbing) alcohol, along with plastic or wooden scrapers. Improper gasket surface preparation may result in engine fluid leakage.
-
Remove all residual
sealant (1) from the upper and lower oil pans (Refer to 09 - Engine - Standard Procedure)
LOWER
LOWER
|
-
Clean the upper and lower oil pan mating surfaces with isopropyl alcohol in preparation for sealant application.
CAUTION: Engine assembly requires the use of a unique sealant that is compatible with engine oil. Using a sealant other than Mopar® Threebond Engine RTV Sealant may result in engine fluid leakage.
CAUTION: Following the application of Mopar® Threebond Engine RTV Sealant to the gasket surfaces, the components must be assembled within 20 minutes and the attaching fasteners must be tightened to specification within 45 minutes. Prolonged exposure to the air prior to assembly may result in engine fluid leakage.
-
Apply a 2 to 3 mm wide bead of Mopar® Threebond Engine RTV Sealant (1) to the lower oil pan as shown.
- Install two studs (2) into the upper oil pan flange.
-
Install the lower oil pan (1) to the upper oil pan with twelve bolts (4) and two nuts (3) tightened to 11 N·m (97 in. lbs.).
CAUTION: Following assembly, the Mopar® Threebond Engine RTV Sealant must be allowed to dry for 45 minutes prior to adding oil and engine operation. Premature exposure to oil prior to drying may result in engine fluid leakage.
- If removed, install the oil filter and fill the engine crankcase with the proper oil to the correct level (Refer to 09 - Engine/Lubrication/OIL - Standard Procedure)
-
Start and run the engine until it reaches normal operating temperature.
UPPER
UPPER
|
| NOTE: |
WK oil pan shown, JK oil pan similar. |
Engine assembly requires the use
of a unique sealant that is compatible with engine oil. Using a sealant
other than Mopar® Threebond Engine RTV Sealant may result in engine
fluid leakage.
CAUTION:
Clean the upper and lower oil pans, timing chain cover, rear seal
retainer and engine block mating surfaces thoroughly with isopropyl
alcohol in preparation for sealant application. All surfaces that
seal with RTV must be oil and contamination free to ensure proper
adhesion of the RTV to the mating surface to prevent leaks.
CAUTION:
Following the application of Mopar®
Threebond Engine RTV Sealant to the gasket surfaces, the components
must be assembled within 20 minutes and the attaching fasteners must
be tightened to specification within 45 minutes. Prolonged exposure
to the air prior to assembly may result in engine fluid leakage.
CAUTION:
-
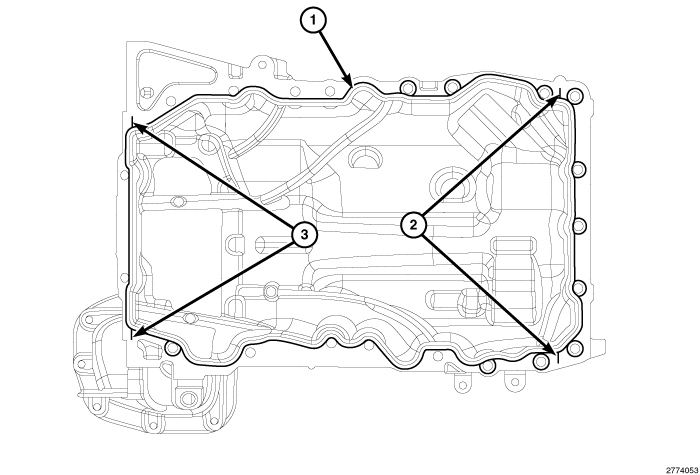
Apply a 2 to 3 mm wide
bead of Mopar® Threebond Engine RTV Sealant to the upper oil pan as
shown in the following locations:
- Oil pan to engine block flange (1)
- Two timing cover to engine block T-joints (2)
-
Two rear seal retainer
to engine block T-joints (3)
CAUTION: Make sure that the rear face of the oil pan is flush to the transmission bell housing before tightening any of the oil pan mounting bolts. A gap between the oil pan and the transmission could crack the oil pan or transmission casting.
-
Install the oil pan
to the engine block and flush to the transmission bell housing. Secure
the oil pan to the engine block with nineteen M8 oil pan mounting
bolts (1) finger tight.
-
Install four transmission
to the engine oil pan bolts (2 and 3) and tighten to 55 N·m (41 ft.
lbs.).
-
Tighten the nineteen
previously installed M8 oil pan mounting bolts (1) to 25 N·m (18 ft.
lbs.).
NOTE: Shown with transmission removed for clarity.
-
Install two M6 bolts
(1) to the rear oil seal retainer flange and tighten to 12 N·m (106
in. lbs.).
-
Install two rubber
plugs (1) covering the rear oil seal retainer flange bolts.
-
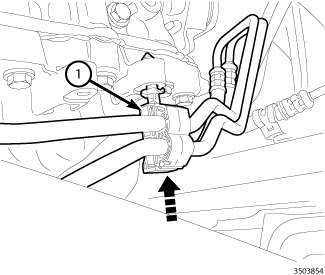
Engage the transmission
cooler line retainer (1) to the oil pan flange.
-
If removed, install
the lower oil pan (Refer to
09 - Engine/Lubrication/PAN, Oil - Installation)
.
- Install the oil level indicator (1) with bolt (2) tightened to 12 N·m (106 in. lbs.).
- Install the right front wheelhouse inner splash shield (Refer to 23 - Body/Exterior/SHIELD, Splash - Installation) .
- Lower the vehicle.
- If removed, install the oil filter and fill the engine crankcase with the proper oil to the correct level (Refer to 09 - Engine/Lubrication/OIL - Standard Procedure)
- Connect the negative battery cable and tighten nut to 5 N·m (45 in. lbs.).
-
Start and run the engine
until it reaches normal operating temperature.