STRIKER
ADJUSTMENTS
Striker
| NOTE: |
Stabilizer insert must be off when adjusting the striker. |
- Remove the stabilizer insert, (Refer to 23 - Body/Decklid/Hatch/Liftgate/Tailgate/STRIKER - Removal)
- Loosen the striker bolts.
- Adjust the striker up/down so that it is centered within the latch opening.
- Adjust the striker fore/aft so the swing gate is under flush to the body -0.5 mm (+/- 1.0 mm).
-
Adjust the striker cross-car engagement to the latch by adding 2.0 mm shims as necessary.
NOTE: Make sure the striker is not twisted within the latch opening. Striker should be parallel to the opening.
- Tighten the striker bolts to 28 N·m (21 ft. lbs.).
- Install the stabilizer insert, (Refer to 23 - Body/Decklid/Hatch/Liftgate/Tailgate/STRIKER - Installation) .
Stabilizer
- Adjust the insert up/down so that it is centered within the stabilizer cup.
- Adjust the insert for/aft so the swing gate is 1.0 mm over flush to the D-pillar when the insert contacts the rubber bumper in the stabilizer cup.
-
Open the tail gate and tighten the bolts to 10 N·m (90 in. lbs.).
NOTE: Make sure the stabilizer cup and insert are parallel to each other and not twisted.
- Close the tail gate and grab the beltline. Confirm minimal for/aft movement and that closing effort is not excessive. Readjust as required.
REMOVAL
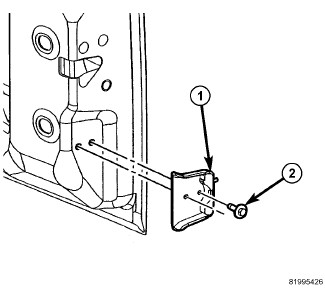 |
- Open the tail gate.
- Using a grease pencil or equivalent, mark the location of the stabilizer cup (1) and insert to aid installation.
-
Remove the bolts for the stabilizer cup and remove the cup.
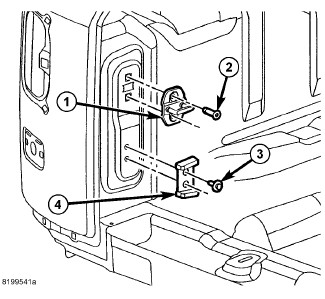
- Using a grease pencil or equivalent, mark the position of the striker (1) to aid installation.
- Remove the bolts (2) attaching the striker (1) to the body.
-
Remove the bolts (3) for the insert (4) and remove the insert.
INSTALLATION
|
- Install the striker and install the bolts.
- Adjust the striker (1) and tighten the bolts (2) to 28 N·m (21 ft. lbs.), (Refer to 23 - Body/Decklid/Hatch/Liftgate/Tailgate/STRIKER - Adjustments) .
- Adjust the tail gate if necessary, (Refer to 23 - Body/Body Structure/Gap and Flush - Specifications) .
- Install the stabilizer insert (4) with the narrow end toward the rear of the vehicle and install the bolts (3).
-
Tighten the bolts to 10 N·m (90 in. lbs.).
- Install the stabilizer cup (1) and loosely install the bolts.
-
Adjust the stabilizer (1) and tighten the bolts (2) to 10 N·m (90 in. lbs.), (Refer to 23 - Body/Decklid/Hatch/Liftgate/Tailgate/STRIKER - Adjustments)
.