TUBE(S), Fuel
DESCRIPTION
Low-Pressure Lines Are:
- the fuel supply line from fuel tank to fuel filter housing.
- the fuel return line back to fuel tank.
- the fuel drain line from each fuel injector.
- the fuel supply line from fuel filter to fuel injection pump.
- the fuel injection pump return line.
High-Pressure Lines Are:
High-pressure fuel lines deliver
fuel under extreme pressure from the injection pump to the injectors.
This may be as high as 1800 bar (26,106 psi). Use extreme caution
when inspecting for high-pressure fuel leaks. Fuel under this amount
of pressure can penetrate skin causing personal injury or death. Inspect
high-pressure fuel leaks with a sheet of cardboard. Wear safety goggles
and adequate protective clothing when servicing fuel system.
WARNING:
OPERATION
High-Pressure Lines
The high-pressure fuel lines
cannot contact each other or other components. Do not attempt to weld
high-pressure fuel lines or to repair lines that are damaged. If lines
are ever kinked or bent, they must be replaced. Use only the recommended
lines when replacement of high-pressure fuel line is necessary.
CAUTION:
High-pressure fuel lines deliver fuel (under pressure) of up to approximately 1800 bar (26,106 psi) from the injection pump to the fuel injectors. The lines expand and contract from the high-pressure fuel pulses generated during the injection process. All high-pressure fuel lines are of the same length and inside diameter. Correct high-pressure fuel line usage and installation is critical to smooth engine operation.
Use extreme caution when inspecting
for high-pressure fuel leaks. Inspect for high-pressure fuel leaks
with a sheet of cardboard. High fuel injection pressure can cause
personal injury if contact is made with the skin.
WARNING:
DIAGNOSIS AND TESTING - HIGH-PRESSURE FUEL LINE LEAKS
 |
Due to extreme fuel pressures of
up to 1800 bar (26,106 psi), use extreme caution when inspecting for
high-pressure fuel leaks. Do not get your hand or a finger near a
suspected leak. Inspect for high-pressure fuel leaks with a sheet
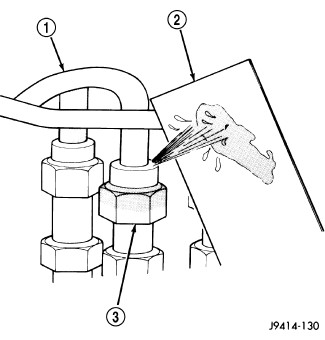
of cardboard (2) (typical picture). High fuel injection pressure can
cause personal injury if contact is made with the skin.
WARNING:
The high-pressure fuel lines cannot
contact each other or other components. Do not attempt to weld high-pressure
fuel lines or to repair lines that are damaged. Only use the recommended
lines when replacement of high-pressure fuel line is necessary.
CAUTION:
High-pressure fuel line leaks can cause starting problems and poor engine performance.
Start the engine. Move the cardboard (2) over the suspected high-pressure fuel line leak, and check for fuel spray onto the cardboard. If line is leaking, retightening line while engine is shutdown. Replace damaged, restricted or leaking high-pressure fuel lines with the correct replacement line.
REMOVAL
Cleanliness cannot be overemphasized
when handling or replacing diesel fuel system components. This especially
includes the fuel injectors, high-pressure fuel lines and fuel injection
pump. Very tight tolerances are used with these parts. Dirt contamination
could cause rapid part wear and possible plugging of fuel injector
nozzle tip holes. This in turn could lead to possible engine misfire.
Always wash/clean any fuel system component thoroughly before disassembly
and then air dry. Cap or cover any open part after disassembly. Before
assembly, examine each part for dirt, grease or other contaminants
and clean if necessary. When installing new parts, lubricate them
with clean engine oil or clean diesel fuel only. DO NOT use any lubricating
or sliding agents that contain water.
CAUTION:
 |
WHEN LOOSENING OR TIGHTENING HIGH-PRESSURE
LINE FITTINGS ATTACHED TO A SEPARATE FITTING, USE A BACK-UP WRENCH
ON FITTING. DO NOT ALLOW FITTING TO ROTATE. DAMAGE TO BOTH FUEL LINE
AND FITTING WILL RESULT.
CAUTION:
- Disconnect the negative battery cable battery.
- Remove the four nuts and the engine cover.
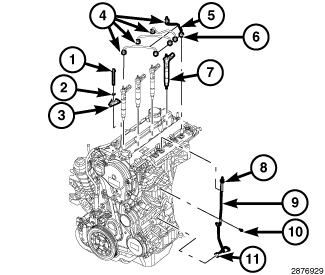
- Disconnect fuel tube fittings (4) and (6) and remove four fuel tubes (5) and install a protective caps on the fuel injector and fuel rail.
- Remove the EGR cooler (Refer to 07 - Cooling/Engine/COOLER, EGR - Removal) .
- Remove bolt securing high pressure tube (10) to intake manifold.
- Remove the fuel quantity solenoid (Refer to 14 - Fuel System/Fuel Delivery/SOLENOID, Fuel Quantity - Removal) .
-
Disconnect rail-to-injection pump high-pressure fuel tube fittings (8) and (11) and remove and discard the fuel tube (9).
INSTALLATION
Cleanliness cannot be overemphasized
when handling or replacing diesel fuel system components. This especially
includes the fuel injectors, high-pressure fuel lines and fuel injection
pump. Very tight tolerances are used with these parts. Dirt contamination
could cause rapid part wear and possible plugging of fuel injector
nozzle tip holes. This in turn could lead to possible engine misfire.
Always wash/clean any fuel system component thoroughly before disassembly
and then air dry. Cap or cover any open part after disassembly. Before
assembly, examine each part for dirt, grease or other contaminants
and clean if necessary. When installing new parts, lubricate them
with clean engine oil or clean diesel fuel only. DO NOT use any lubricating
or sliding agents that contain water.
CAUTION:
|
WHEN LOOSENING OR TIGHTENING HIGH-PRESSURE
LINE FITTINGS ATTACHED TO A SEPARATE FITTING, USE A BACK-UP WRENCH
ON FITTING. DO NOT ALLOW FITTING TO ROTATE. DAMAGE TO BOTH FUEL LINE
AND FITTING WILL RESULT.
CAUTION:
| NOTE: |
All high-pressure fuel lines are of the same length and inside diameter. Correct high-pressure fuel line usage and installation is critical to smooth engine operation. When ever a fuel tube connection is loosened, new fuel tubes MUST be used. |
- Remove the protective caps from the fuel injectors and install new high pressure fuel tubes (5). Only hand tighten the high pressure fuel line (4) and (6).
- Tighten the high pressure fuel tube (4) on the fuel injector to 28 N·m (20 ft. lbs.).
- Tighten the high pressure fuel tube (6) on the fuel rail to 5 N·m (44 in. lbs) plus an additional 75 degrees.
- Install the new fuel tube (9) and connect rail-to-injection pump high-pressure fuel line fittings (8) and (11).
- Tighten the high pressure fuel feed tube at the high pressure pump (11) to 28 N·m (20 ft. lbs.).
- Tighten the high pressure fuel feed tube at the fuel rail (8) to 5 N·m (44 in. lbs) plus an additional 75 degrees.
- Install the fuel quantity solenoid (Refer to 14 - Fuel System/Fuel Delivery/SOLENOID, Fuel Quantity - Installation) .
- Install fuel tube clamp bolt (10). Tighten to 15 N·m (133 in. lbs.).
- Install the EGR cooler (Refer to 07 - Cooling/Engine/COOLER, EGR - Installation) .
- Install the engine cover and securely tighten the four nuts.
-
Connect the negative battery cable.