TUBE, Fuel Tank Filler
REMOVAL
Risk of injury to eyes and skin
from contact with fuel. Wear protective clothing and eye protection.
Risk of poisoning from inhaling and swallowing fuel. Pour fuel only
into appropriately marked and approved containers. Failure to follow
these instructions may result in possible serious or fatal injury.
WARNING:
 |
- Disconnect and isolate the negative battery cable.
- Remove the fuel filler cap to relieve tank pressure.
-
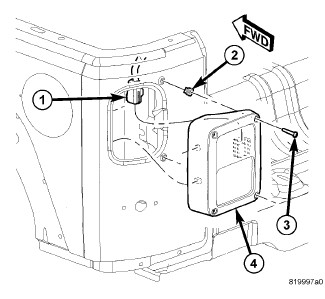
Remove the left rear lamp unit (4) (Refer to 08 - Electrical/8L - Lamps and Lighting/Lamps/Lighting - Exterior/LAMP, Tail Stop Turn - Removal)
.
- Raise and support the vehicle (Refer to 04 - Vehicle Quick Reference/Hoisting - Standard Procedure) .
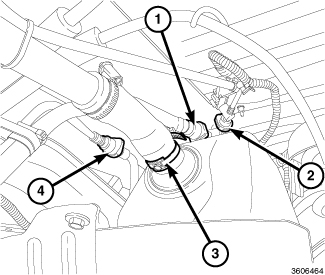
- Loosen the fuel filler tube hose clamp (3) at the fuel tank.
-
Disconnect the On-Board Refueling Vapor Recovery (ORVR) vacuum line quick-connect fitting (2) from the ORVR control valve (Refer to 14 - Fuel System/Fuel Delivery/FITTING, Quick Connect - Standard Procedure)
.
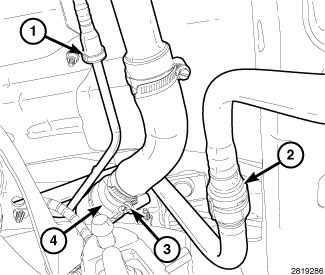
- Disconnect the ORVR vacuum line quick-connect fitting (1) from the fuel filler tube (Refer to 14 - Fuel System/Fuel Delivery/FITTING, Quick Connect - Standard Procedure) .
- Disconnect the Evaporative System Integrity Monitor (ESIM) fresh air line quick-connect fitting (2) from the fuel filler tube (Refer to 14 - Fuel System/Fuel Delivery/FITTING, Quick Connect - Standard Procedure) .
-
Loosen the fuel filler tube hose clamp (3) at the upper fuel filler tube (4) and remove the lower fuel filler tube from the fuel tank.
- Remove the wheel and tire.
-
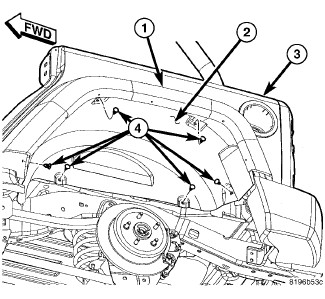
Remove the left rear wheelhouse splash shield (2) (Refer to 23 - Body/Exterior/SHIELD, Splash - Removal)
.
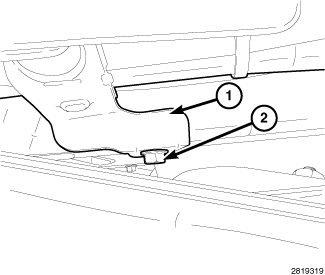
-
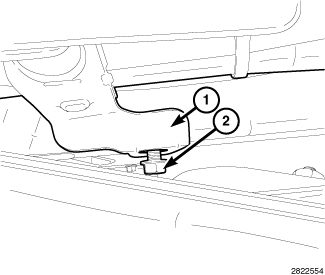
Remove the retaining bolt (2) from the fuel filler tube support bracket (1).
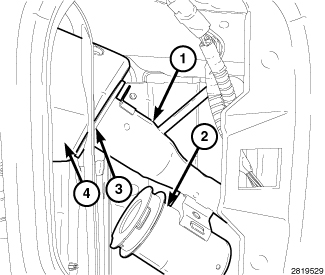
-
Reach in through the rear lamp body opening and disconnect the fuel filler tube (1), ESIM fresh air hose and the ESIM fresh air filter (2) from the rubber grommet (3) of the fuel fill housing (4) as an assembly.
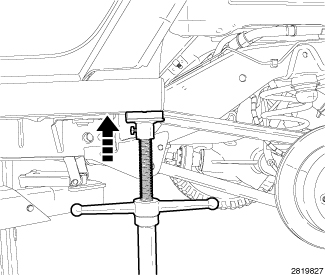
- Remove the four left side body isolators (Refer to 23 - Body/Exterior/ISOLATOR, Body - Removal) .
-
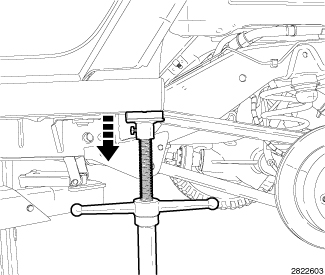
Using a suitable screw jack, raise the body enough to gain clearance for fuel filler tube removal.
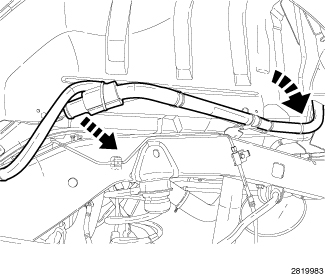
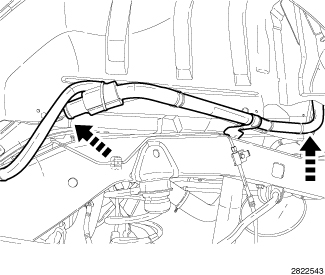
- Slide the fuel filler tube out from under the body.
-
Using a downward rotation, remove the fuel filler tube, ORVR vacuum line, ESIM fresh air hose and the ESIM fresh air filter as an assembly.
INSTALLATION
 |
-
Position the fuel filler
tube, ESIM fresh air hose and the ESIM fresh air filter as an assembly
into the vehicle.
-
Reach in through the
rear lamp body opening and connect the fuel filler tube (1) into the
rubber grommet (3) of the fuel fill housing (4).
NOTE: Install the fuel filler tube support bracket retaining bolt while the body is still in the raised position.
-
Position the fuel filler
tube support bracket (1), install the retaining bolt (2) and tighten
to 19 N·m (14 ft. lbs.).
-
Lower the body onto
the frame and install the body isolators (Refer to 23 - Body/Exterior/ISOLATOR,
Body - Installation)
.
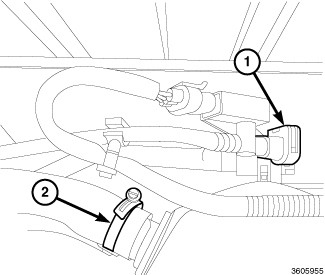
- Connect the lower fuel filler tube to the fuel tank and tighten the hose clamp (2) to 3 N·m (30 in. lbs.).
-
Connect the ORVR vacuum
line quick-connect fitting (1) to the ORVR control valve (Refer to 14 - Fuel System/Fuel Delivery/FITTING,
Quick Connect - Standard Procedure)
.
- Connect the lower fuel filler tube to the upper fuel filler tube (4) and tighten the hose clamp (3) to 3 N·m (30 in. lbs.).
- Connect the ESIM fresh air hose quick-connect fitting (2) to the fuel filler tube (Refer to 14 - Fuel System/Fuel Delivery/FITTING, Quick Connect - Standard Procedure) .
-
Connect the ORVR vacuum
line quick-connect fitting (1) to the fuel filler tube (Refer to 14 - Fuel System/Fuel Delivery/FITTING,
Quick Connect - Standard Procedure)
.
- Install the left rear wheelhouse splash shield (2) (Refer to 23 - Body/Exterior/SHIELD, Splash - Installation) .
-
Install the wheel and
tire (Refer to 22 - Tires and
Wheels/Wheels - Standard Procedure)
.
- Lower the vehicle.
- Install the fuel filler cap.
- Install the left rear lamp unit (4) (Refer to 08 - Electrical/8L - Lamps and Lighting/Lamps/Lighting - Exterior/LAMP, Tail Stop Turn - Installation) .
- Connect the negative battery cable and tighten nut to 5 N·m (45 in. lbs.).
-
Start the vehicle and
check for leaks.