LINE, A/C Discharge
REMOVAL
Review the warnings and cautions
for this system before performing the procedure. Failure to follow
these instructions may result in serious injury or death.
WARNING:
| NOTE: |
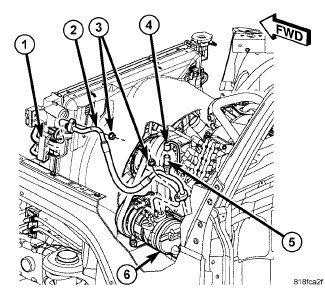
2.8L engine model shown. 3.6L engine model similar. |
 |
- Disconnect and isolate the negative battery cable.
- Recover the refrigerant from the refrigerant system (Refer to 24 - Heating and Air Conditioning/Plumbing - Standard Procedure) .
- Remove the coolant recovery container (Refer to 07 - Cooling/Engine/BOTTLE, Coolant Recovery - Removal) .
- On 2.8L engine models, disconnect the charge air cooler outlet hose from the throttle body and position the hose out of the way (Refer to 09 - Engine/Turbocharger System/COOLER and HOSES, Charge Air - Removal) .
- On 2.8L engine models, disconnect the wire harness connector (4) from the A/C pressure transducer (5) and remove the transducer, if required (Refer to 24 - Heating and Air Conditioning/Controls/TRANSDUCER, A/C Pressure - Removal) .
- Remove the nuts (3) that secure the A/C discharge line (2) to the A/C condenser (1) and the A/C compressor (6).
- Disconnect the A/C discharge line from the A/C condenser and A/C compressor and remove and discard the O-ring seals and gaskets.
-
Install plugs in, or
tape over the opened discharge line fittings and condenser and compressor
ports.
INSTALLATION
Be certain to adjust the refrigerant
oil level when servicing the A/C refrigerant system .
Failure to properly adjust the refrigerant oil level will prevent
the A/C system from operating as designed and can cause serious A/C
compressor damage.
CAUTION:
| NOTE: |
When replacing multiple A/C system components, see the Refrigerant Oil Capacities chart to determine how much oil should be added to the refrigerant system (Refer to 24 - Heating and Air Conditioning/Plumbing/OIL, Refrigerant - Standard Procedure) . |
| NOTE: |
Replacement of the refrigerant line O-ring seals and gaskets is required anytime a refrigerant line is disconnected. Failure to replace the rubber O-ring seals and metal gaskets could result in a refrigerant system leak. |
| NOTE: |
2.8L engine model shown. 3.6L engine model similar. |
|
- Position the A/C discharge line (2) into the engine compartment.
- Remove the tape or plugs from the discharge line fittings and the condenser and compressor ports.
- Lubricate new rubber O-ring seals with clean refrigerant oil and install them and new gaskets onto the discharge line fittings. Use only the specified O-rings as they are made of a special material for the R-134a system. Use only refrigerant oil of the type recommended for the A/C compressor in the vehicle.
- Connect the A/C discharge line to the A/C condenser (1) and A/C compressor (6).
- Install the nuts (3) that secure the A/C discharge line to the A/C condenser and the A/C compressor. Tighten the nuts to 23 N·m (17 ft. lbs.).
- On 2.8L engine models, reconnect the air intake hose to the throttle body.
- On 2.8L engine models, install the A/C pressure transducer (5) onto the A/C discharge line using a new O-ring seal. Tighten the A/C pressure transducer securely.
- On 2.8L engine models, connect the wire harness connector (4) to the A/C pressure transducer.
- Reconnect the negative battery cable.
- Evacuate the refrigerant system (Refer to 24 - Heating and Air Conditioning/Plumbing - Standard Procedure) .
- Adjust the refrigerant oil level (Refer to 24 - Heating and Air Conditioning/Plumbing/OIL, Refrigerant - Standard Procedure) .
-
Charge the refrigerant system (Refer to 24 - Heating and Air Conditioning/Plumbing - Standard Procedure)
.