INSTALLATION
Removal / installation
| 1. INSTALL ENGINE REAR OIL SEAL |

Using SST and a hammer, tap in the oil seal until its surface is flush with the rear oil seal retainer edge.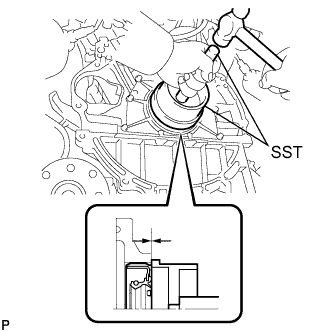

- SST
- 09223-15030
09950-70010 (09951-07150)
- NOTICE:
- Wipe off extra grease of the crankshaft.
- Keep the lip free of foreign matter.
- Do not tap on the oil seal at an angle.
- Wipe off extra grease of the crankshaft.
| 2. INSTALL FLYWHEEL SUB-ASSEMBLY (for Manual Transmission) |
Hold the crankshaft with SST.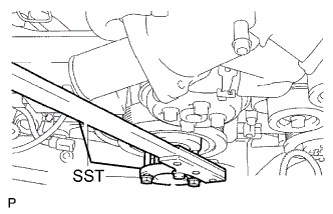
- SST
- 09213-70011
(09213-70020)
09330-00021
Using several steps, install and tighten 8 new bolts uniformly in the sequence shown in the illustration.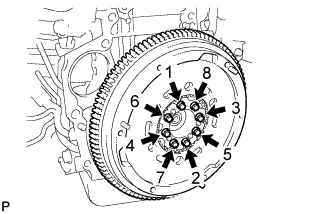
- Torque:
- 73 N*m{ 741 kgf*cm , 54 ft.*lbf }
- NOTICE:
- Do not reuse the flywheel installation bolts. Be sure to check the tightening torque within 5 minutes after tightening.
- Do not impact or damage the flywheel installation bolts. Be sure to handle them carefully.
- Make sure that the seating surface of the flywheel installation bolts and installation surfaces of the crankshaft and flywheel are free of oil or foreign matter.
- Do not reuse the flywheel installation bolts. Be sure to check the tightening torque within 5 minutes after tightening.
| 3. INSTALL DRIVE PLATE AND RING GEAR SUB-ASSEMBLY (for Automatic Transmission) |
Using SST, hold the crankshaft.
- SST
- 09213-70011
(09213-70020)
09330-00021
Apply adhesive to 2 or 3 threads of the mounting bolts ends.
- Adhesive:
- Part No. 08833-00070, THREE BOND 1324 or equivalent
Install the front spacer, drive plate and rear spacer on the crankshaft.
Install and tighten the 8 mounting bolts uniformly in several steps.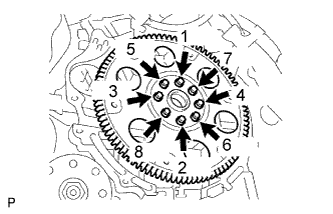
- Torque:
- 83 N*m{ 846 kgf*cm , 61 ft.*lbf }
- NOTICE:
- Do not start the engine for at least 1 hour after installing.
| 4. INSTALL MANUAL TRANSMISSION ASSEMBLY (for Manual Transmission) |
- HINT:
- Click here.
| 5. INSTALL AUTOMATIC TRANSMISSION ASSEMBLY (for Automatic Transmission) |
- HINT:
- Click here.
| 6. CHECK FOR ENGINE OIL LEAKS |