INSTALLATION
Removal / installation
| 1. INSTALL TRANSMISSION UPPER COVER SUB-ASSEMBLY |

Install the transmission upper cover sub-assembly with the 2 bolts.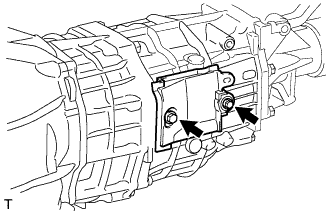

- Torque:
- 12 N*m{ 120 kgf*cm , 9 ft.*lbf }
| 2. INSTALL REAR NO. 1 ENGINE MOUNTING INSULATOR |
Install the rear No. 1 engine mounting insulator to the manual transmission with the 4 bolts.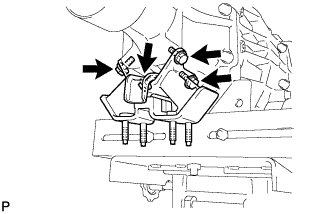
- Torque:
- 25 N*m{ 255 kgf*cm , 18 ft.*lbf }
| 3. INSTALL CLUTCH COVER ASSEMBLY |
Apply clutch spline grease to the input shaft spline.
- Sealant:
- Part No. 08887-01706, CLUTCH SPLINE GREASE or equivalent
Install the clutch cover assembly to the input shaft.
| 4. INSTALL CLUTCH DISC ASSEMBLY |
Install the clutch disc assembly to the transmission unit.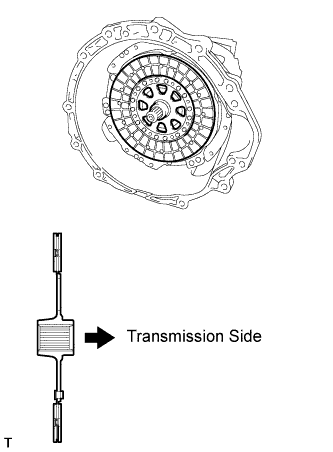
- NOTICE:
- Take care not to insert the clutch disc assembly in the wrong direction.
| 5. INSTALL CLUTCH RELEASE FORK SUB-ASSEMBLY |
Apply release hub grease to the contact surface between, the release fork and release bearing hub, the contact surface between the release fork and push rod, and release fork pivot points as shown in the illustration.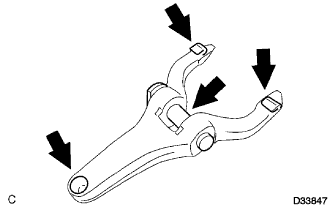
- Sealant:
- Part No. 08887-01806, RELEASE HUB GREASE or equivalent
Install the clutch release fork sub-assembly to the release fork support.
- NOTICE:
- Do not use excess force to install the clutch release fork sub-assembly.
- After installation, move the fork back and forth to check that the clutch release bearing hub slides smoothly.
- Do not use excess force to install the clutch release fork sub-assembly.
| 6. INSTALL MANUAL TRANSMISSION ASSEMBLY |
Install the manual transmission to the engine with the 9 bolts.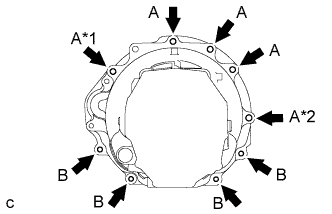
- Torque:
- Bolt A:
- 72 N*m{ 730 kgf*cm , 53 ft.*lbf }
- Bolt B:
- 37 N*m{ 380 kgf*cm , 28 ft.*lbf }
- NOTICE:
- Temporarily tighten bolt *1, fully tighten bolt *2, lift the rear end of the transmission, and fully tighten bolt *1 and the other bolts. Make sure that excessive force is not applied to the knock pins when lifting the rear end of the transmission.
| 7. INSTALL ENGINE REAR MOUNTING MEMBER |
Install the engine rear mounting member with the 4 bolts and 4 nuts.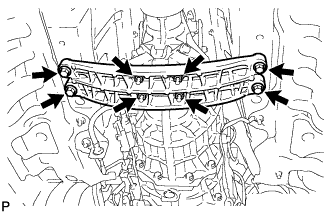
- Torque:
- Nut:
- 13 N*m{ 130 kgf*cm , 10 ft.*lbf }
- Bolt:
- 26 N*m{ 265 kgf*cm , 19 ft.*lbf }
| 8. INSTALL FLOOR SHIFT LEVER ASSEMBLY |
Install the 2 bushings to the shift lever assembly.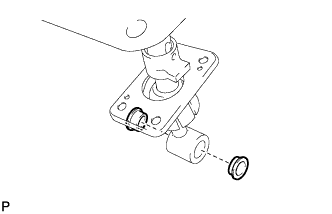
Install the washer to the floor shift lever assembly.
Install the shift lever assembly with a new E-ring.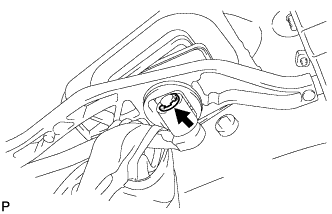
Install the shift and select lever boot.
| 9. INSTALL FLOOR SHIFT CONTROL SHIFT LEVER RETAINER SUB-ASSEMBLY |
Install the floor shift control shift lever retainer sub-assembly with the 2 nuts.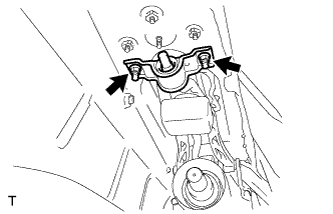
- Torque:
- 20 N*m{ 204 kgf*cm , 15 ft.*lbf }
| 10. INSTALL CLUTCH COVER ASSEMBLY |
Align the matchmarks on the clutch cover assembly and the flywheel sub-assembly.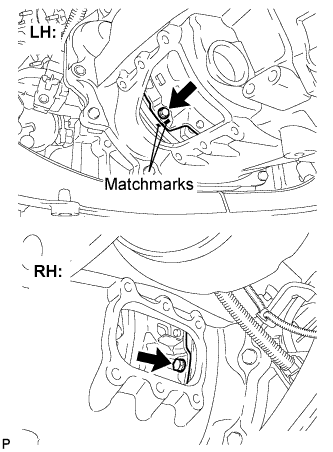
Install the clutch cover to the flywheel sub-assembly with the new 6 bolts.
- Torque:
- 19 N*m{ 195 kgf*cm , 14 ft.*lbf }
- NOTICE:
- Tighten the bolts a little at a time in a diagonal pattern until they are all tightened.
| 11. INSTALL NO. 1 CLUTCH HOUSING COVER |
Install the No. 1 clutch housing cover with the 4 bolts.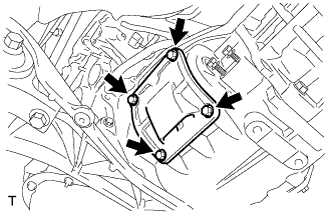
- Torque:
- 18 N*m{ 184 kgf*cm , 13 ft.*lbf }
- Bolt length:
- 20 mm (0.79 in.)
| 12. INSTALL NO. 2 CLUTCH HOUSING COVER |
Install the No. 2 clutch housing cover with the 4 bolts.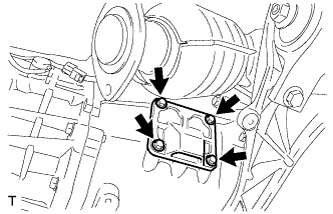
- Torque:
- 18 N*m{ 184 kgf*cm , 13 ft.*lbf }
- Bolt length:
- 16 mm (0.63 in.)
| 13. CONNECT WIRE HARNESS |
Connect the back-up light switch connector and install the wire harness.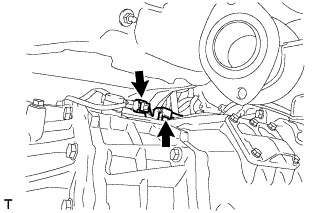
| 14. CONNECT GROUND CABLE |
Connect the ground cable with the bolt.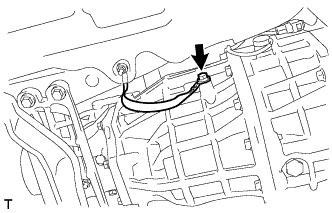
- Torque:
- 5.4 N*m{ 55 kgf*cm , 48 in.*lbf }
| 15. INSTALL CLUTCH RELEASE CYLINDER ASSEMBLY |
Install the clutch release cylinder assembly with the 2 bolts.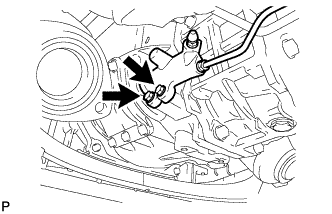
- Torque:
- 12 N*m{ 120 kgf*cm , 9 ft.*lbf }
| 16. INSTALL CLUTCH ACCUMULATOR ASSEMBLY |
Install the clutch accumulator assembly with the 2 bolts and 2 nuts.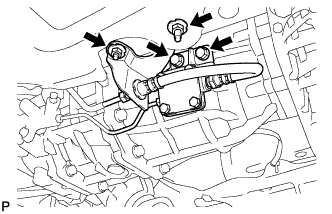
- Torque:
- Bolt:
- 12 N*m{ 120 kgf*cm , 9 ft.*lbf }
- Nut:
- 5.4 N*m{ 55 kgf*cm , 48 in.*lbf }
| 17. INSTALL STARTER ASSEMBLY |
| 18. INSTALL ENGINE UNDER COVER AIR GUIDE BRACKET |
Install the engine under cover air guide bracket with the 2 bolts.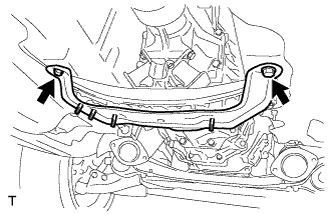
- Torque:
- 26 N*m{ 260 kgf*cm , 19 ft.*lbf }
| 19. INSTALL PROPELLER SHAFT WITH CENTER BEARING ASSEMBLY |
Remove the SST from the transmission.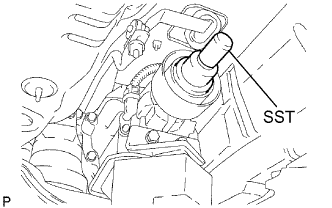
- SST
- 09325-40010
Insert the yoke of the intermediate shaft into the transmission.
- HINT:
- Be careful not to damage the oil seal.
Install the 2 center support bearing washers and center support bearing. (for automatic transmission)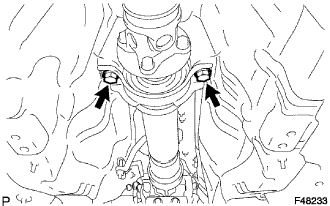
Install the 2 center support bearing washers, center support bearing and 2 center support bearing dampers. (for manual transmission)
Temporarily tighten the 2 bolts.
Align the matchmarks on the propeller shaft flange and differential companion flange, and connect the shaft with the 4 bolts, washers and nuts.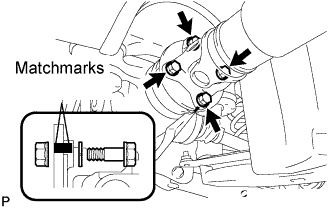
- Torque:
- 74 N*m{ 750 kgf*cm , 54 ft.*lbf }
Adjust the dimension between the edge surface of the center support bearing and the edge surface of the cushion to 11.5 to 13.5 mm (0.4528 to 0.5315 in.) as shown in illustration.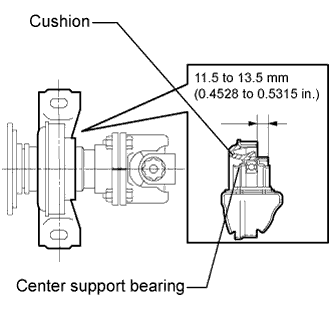
Check that the center line of the bracket is perpendicular to the shaft axial direction.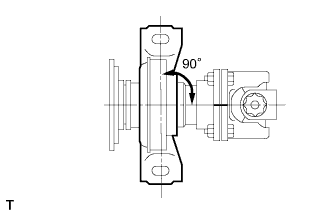
Tighten the 2 bolts.
- Torque:
- 49 N*m{ 500 kgf*cm , 36 ft.*lbf }
| 20. INSPECT AND ADJUST NO. 2 AND NO. 3 JOINT ANGLE |
Stabilize the propeller shaft and differential.
Turn the propeller shaft several times by hand to stabilize the center support bearing.
Check both the No. 2 and No. 3 joint angles.
Using SST, measure the installation angle of the intermediate shaft and propeller shaft.
- SST
- 09370-50010
- HINT:
- The SST should be set directly on the bottom of the shaft.
Using SST, measure the installation angle of the differential.
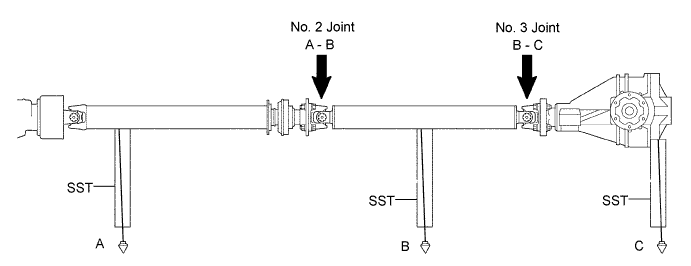
- SST
- 09370-50010
- HINT:
- Measure the installation angle by placing the SST in the positions shown in the illustration.
Calculate the No. 2 joint angle.
- No. 2 joint angle:
- A - B = -1°13' to -0°13'
- A:
- Intermediate shaft installation angle
- B:
- Propeller shaft installation angle
Calculate the No. 3 joint angle.
- No. 3 joint angle:
- B - C = 1°30' to 2°30'
- B:
- Propeller shaft installation angle
- C:
- Differential installation angle
- HINT:
- If the measured angle is not within the specified range, adjust it with the center support bearing washers.
Adjust the No. 2 joint angle .
Select the center support bearing washers for adjustment.
Adjustment washer (for manual transmission) Thickness mm (in)
2 (0.078)
4.5 (0.1772)
6.5 (0.2559)
9.0 (0.3543)
11 (0.4331)
Adjustment washer (for automatic transmission) Thickness mm (in)
2 (0.078)
4.5 (0.1772)
6.5 (0.2559)
9.0 (0.3543)
11 (0.4331)
13.5 (0.5315)
- NOTICE:
- The 2 washers should be the same thickness.
| 21. INSTALL FRONT FLOOR NO. 1 HEAT INSULATOR |
Install the No. 1 heat insulator with the 4 nuts.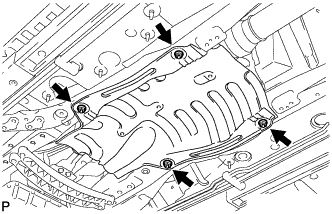
- Torque:
- 5.4 N*m{ 55 kgf*cm , 48 in.*lbf }
| 22. INSTALL OUTSIDE AIR GUIDE PLATE RH |
Install the air guide plate outside RH with the 4 nuts.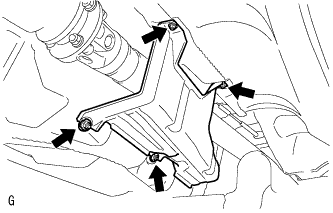
- Torque:
- 5.4 N*m{ 55 kgf*cm , 48 in.*lbf }
| 23. INSTALL FRONT EXHAUST PIPE ASSEMBLY |
Using a vernier caliper, measure the free length of the compression springs.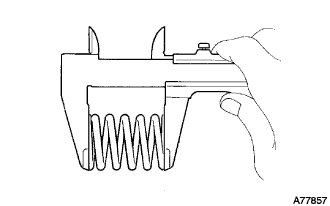
- Minimum length:
- 38.5 mm (1.516 in.)
Install a new gasket to the rear end of the front exhaust pipe.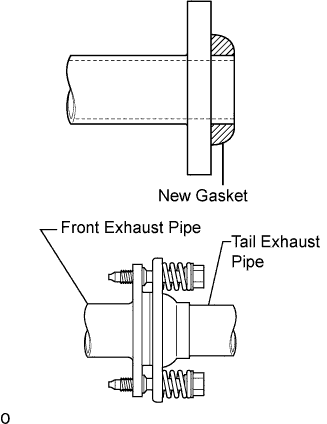
- NOTICE:
- Be careful with the installation direction of the gasket.
- Be careful with the installation direction of the gasket.
- Do not reuse the gasket.
- Do not reuse the gasket.
- To ensure a proper seal, do not use the tail exhaust pipe to force the gasket onto the front exhaust pipe.
- HINT:
- Using a plastic hammer, uniformly strike the gasket so that the gasket and front exhaust pipe are properly fit.
- To ensure a proper seal, do not use the tail exhaust pipe to force the gasket onto the front exhaust pipe.
Install 3 new gaskets and front exhaust pipe assembly.
- CAUTION:
- Do not reuse the gaskets.
Install the 2 bolts and 2 compression springs.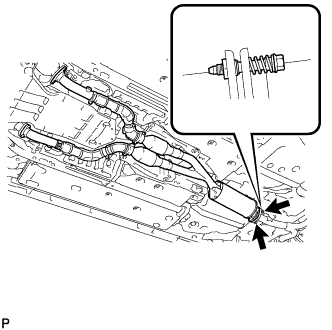
- Torque:
- 43 N*m{ 438 kgf*cm , 32 ft.*lbf }
Install 4 new nuts and 4 bolts.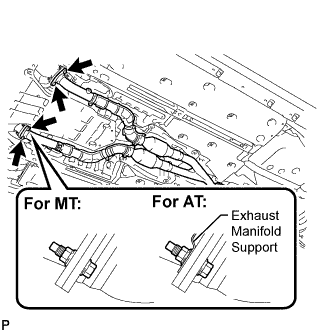
- Torque:
- 62 N*m{ 632 kgf*cm , 46 ft.*lbf }
- NOTICE:
- Do not reuse the nuts.
| 24. INSTALL HEATED OXYGEN SENSOR |
Before installing the heated oxygen sensors, twist the sensor wires counterclockwise 4 turns.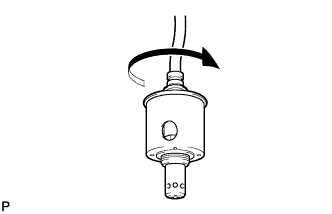
Using the SST, install the heated oxygen sensors to the front exhaust pipe.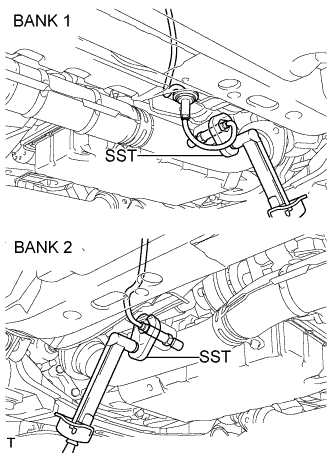
- SST
- 09224-00010
- Torque:
- 44 N*m{ 449 kgf*cm , 33 ft.*lbf }
After installing the sensors, check that the sensor wires are not twisted.
If the sensor wires are twisted, reinstall them.
Install the grommets of the heated oxygen sensors.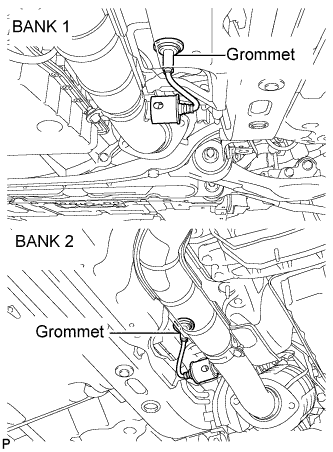
| 25. INSTALL FRONT CENTER FLOOR BRACE |
Install the front center floor brace with the 4 bolts.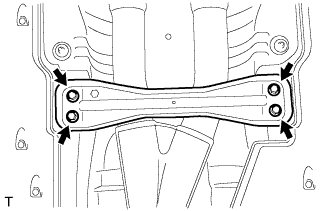
- Torque:
- 7.4 N*m{ 75 kgf*cm , 65 in.*lbf }
| 26. INSTALL NO. 1 REAR FLOOR PANEL BRACE |
Install the rear No. 1 floor panel brace with the 4 bolts.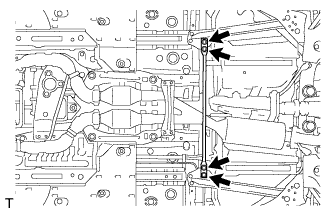
- Torque:
- 19 N*m{ 194 kgf*cm , 14 ft.*lbf }
| 27. INSTALL NO. 2 ENGINE UNDER COVER |
| 28. INSTALL ENGINE UNDER COVER |
| 29. INSTALL SHIFT LEVER CAP |
Move the shift lever to the 2nd gear position. Adjust the guide plate so that dimension A is as shown in the illustration with the shift lever cap pushed toward neutral (select direction).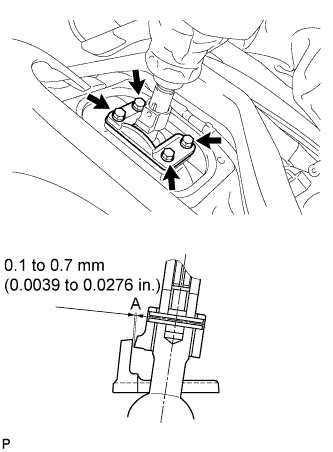
- Torque:
- 10 N*m{ 102 kgf*cm , 7 ft.*lbf }
| 30. INSTALL NO. 1 SHIFT AND SELECT LEVER BOOT |
Install the shift lever boot with the 4 bolts.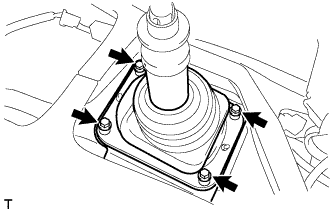
| 31. INSTALL NO. 2 CONSOLE BOX DUCT |
Install the No. 2 console box duct with the clip.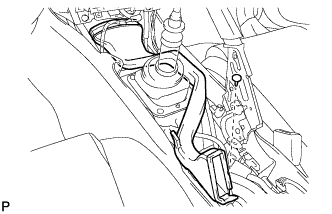
| 32. INSTALL CONSOLE BOX |
Engage the 2 claws and 2 clips.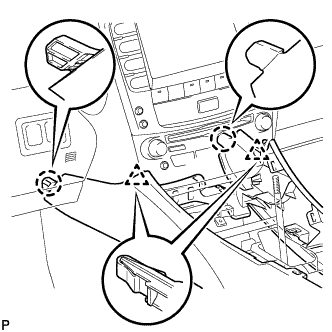
Install the 2 bolts <C>.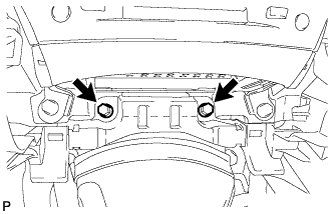
Install the 2 bolts <C>.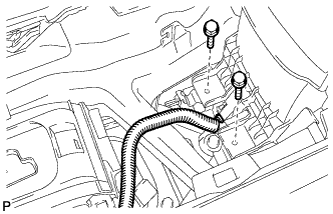
Connect the connector.
Connect the connectors.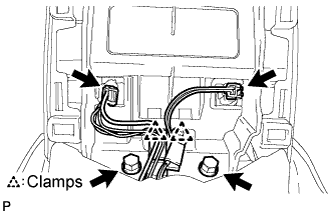
Engage the 2 clamps.
Install the 2 bolts <C>.
| 33. INSTALL CONSOLE BOX REGISTER ASSEMBLY |
Engage the 2 claws and 4 clips, and then install the console box register assembly.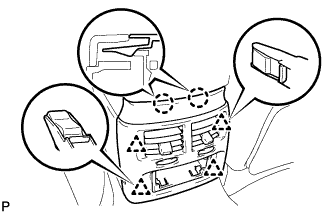
Install the rear ash receptacle assembly.
| 34. INSTALL FRONT ASH RECEPTACLE SUB-ASSEMBLY |
Connect the connectors.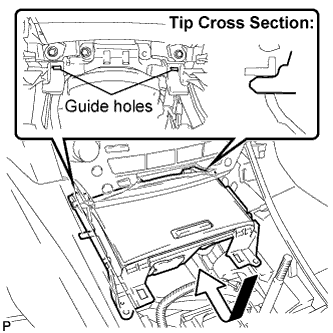
Insert the protruding parts of the front ash receptacle sub-assembly into the 2 guide holes as shown in the illustration.
Install the front ash receptacle sub-assembly with the 2 screws <F>.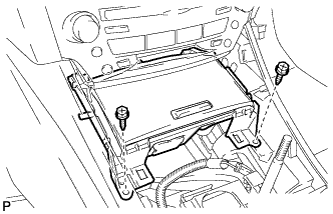
| 35. INSTALL FRONT CONSOLE PANEL SUB-ASSEMBLY |
Engage the 6 clips.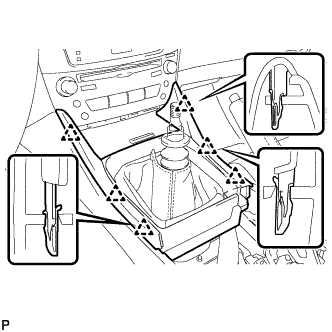
Close the snap.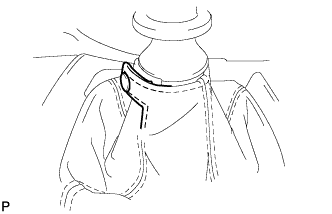
| 36. INSTALL REAR CONSOLE PANEL SUB-ASSEMBLY |
Engage the 7 claws and 2 clips.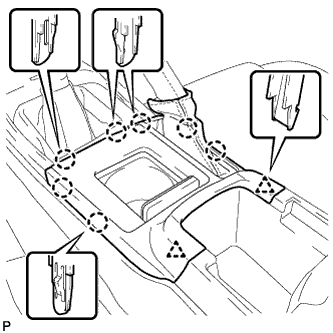
Close the snap.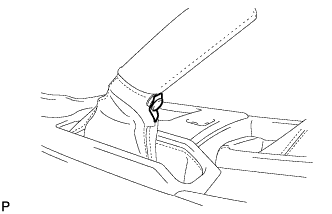
| 37. INSTALL SHIFT LEVER KNOB SUB-ASSEMBLY |
| 38. ADD MANUAL TRANSMISSION OIL |
Park the vehicle in a level place.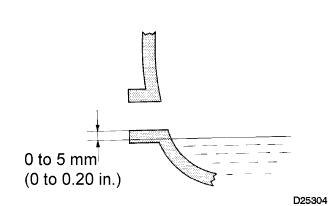
Remove the transmission filler plug and gasket.
Check that the oil surface is within 5 mm (0.20 in.) below the lowest point of the transmission filler plug opening.
- Oil grade:
- API GL-4 or GL-5
- Viscosity:
- SAE 75W-90
- NOTICE:
- Problems may occur when the oil level is too high or too low.
- After replacing the oil, drive the vehicle and check the oil level again.
- Problems may occur when the oil level is too high or too low.
Check for oil leakage if the oil level is low.
Install the transmission filler plug and a new gasket.
- Torque:
- 37 N*m{ 377 kgf*cm , 27 ft.*lbf }
| 39. CHECK FOR EXHAUST GAS LEAKS |
| 40. INSPECT AND ADJUST MANUAL TRANSMISSION OIL LEVEL |
Park the vehicle on a level surface.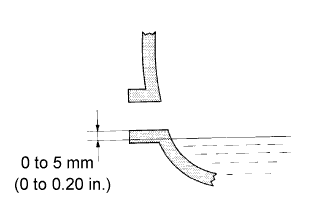
Remove the transmission filler plug and gasket.
Check that the oil surface is within 5 mm (0.20 in.) of the lowest point of the transmission filler plug opening.
- NOTICE:
- Problems may occur if the oil level is too high or low.
- After replacing the oil, drive the vehicle and check the oil level again.
- Problems may occur if the oil level is too high or low.
Check for oil leakage when the oil level is low.
Install the transmission filler plug and a new gasket.
- Torque:
- 37 N*m{ 377 kgf*cm , 27 ft.*lbf }