INSTALLATION
Removal / installation
| 1. INSTALL SLIDING ROOF WEATHERSTRIP |

Install the sliding roof weatherstrip as follows:
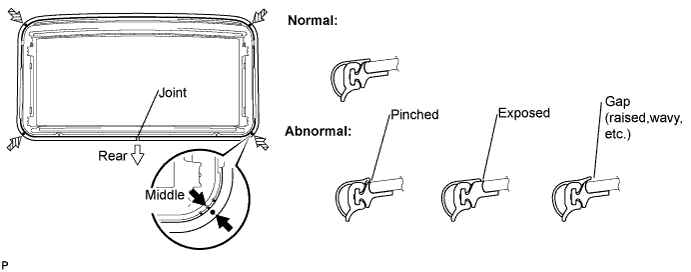

Position the joint of the weatherstrip at the rear center.
Align the marks on the weatherstrip with the middle marks at the corners of the plastic on the edge of the sliding roof panel and install the weatherstrip. Make sure that the marks on the weatherstrip are positioned within the area indicated by the marks at the corners of the plastic on the edge of the sliding roof panel.
Install the lip of the weatherstrip firmly.
| 2. INSTALL SLIDING ROOF HOUSING SUB-ASSEMBLY |
Install the sliding roof housing sub-assembly with the 6 bolts and 8 nuts.
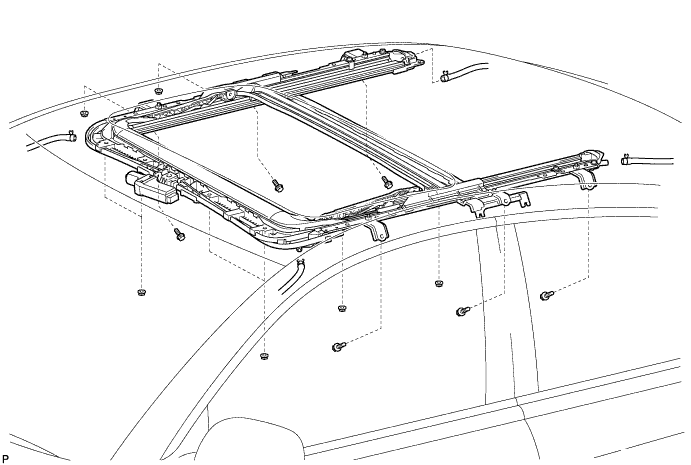
- Torque:
- Nut:
- 5.5 N*m{ 56 kgf*cm , 49 in.*lbf }
- Bolt:
- 8.0 N*m{ 82 kgf*cm , 71 in.*lbf }
Connect the 4 sliding roof drain hoses.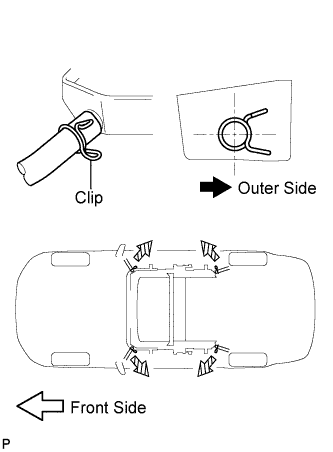
- NOTICE:
- The clip must face toward the outside of the vehicle and also be above the lower surface of the sliding roof housing when installing the drain hoses.
| 3. INSTALL SLIDING ROOF GLASS SUB-ASSEMBLY |
Using a T25 "torx" driver, temporarily install the sliding roof glass sub-assembly with the 4 screws.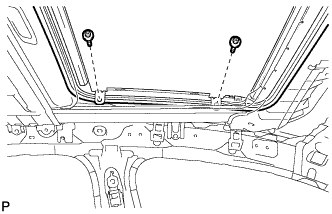
Perform a level check.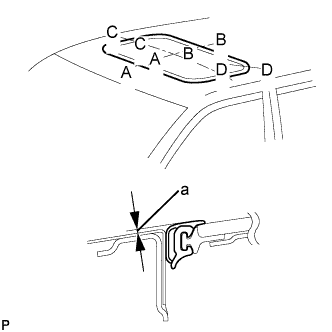
Check the difference in level for "a" between the roof panel and the upper surface of the weatherstrip when the sliding roof glass is fully closed.
- Standard:
Area
Measurement
A - A
0 + 1.0 mm (0 + 0.039 in.)
0 - 2.0 mm (0 - 0.079 in.)
B - B
0 + 2.0 mm (0 + 0.079 in.)
0 - 1.0 mm (0 - 0.039 in.)
C - C
0 + 1.5 mm (0 + 0.059 in.)
0 - 1.5 mm (0 - 0.059 in.)
D - D
0 + 1.5 mm (0 + 0.059 in.)
0 - 1.0 mm (0 - 0.039 in.)
- HINT:
- "+" represents the condition that the glass is above the panel level. "-" represents the condition that the glass is below the panel level.
Perform a gap check.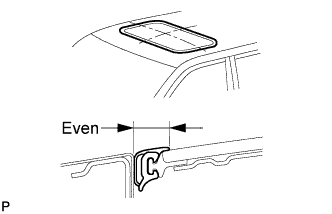
Check the gap between the roof panel and roof glass.
- NOTICE:
- The gap must be even all around.
After adjusting the sliding roof glass, using a T25 "torx" driver, install the sliding roof glass sub-assembly with the 4 screws.
- Torque:
- 5.5 N*m{ 56 kgf*cm , 49 in.*lbf }
| 4. CHECK FOR WATER LEAKS |
After adjusting the sliding roof glass sub-assembly, check for water leaks.
If there are any leaks, readjust the sliding roof glass sub-assembly.
| 5. INSTALL SLIDING ROOF SIDE GARNISH LH |
Engage the 5 claws and install the sliding roof side garnish LH.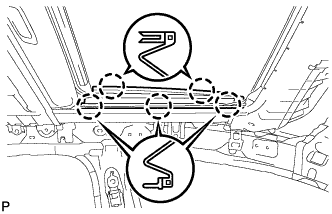
| 6. INSTALL SLIDING ROOF SIDE GARNISH RH |
| 7. INSTALL CURTAIN SHIELD AIRBAG ASSEMBLY LH |
Install the curtain shield airbag assembly with the 2 clips and 9 new bolts.
- Torque:
- 11 N*m{ 110 kgf*cm , 8 ft.*lbf }
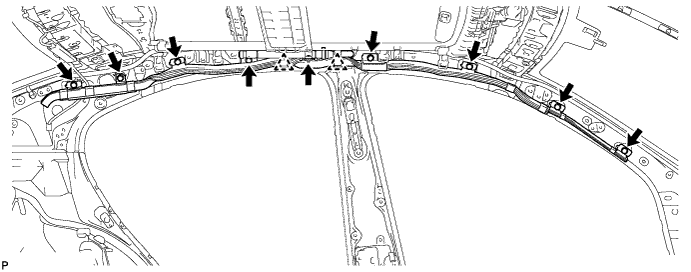
- NOTICE:
- Do not twist the curtain shield airbag assembly when installing it.
Connect the connector.
- NOTICE:
- When handling the airbag connector, take care not to damage the airbag wire harness.
| 8. INSTALL CURTAIN SHIELD AIRBAG ASSEMBLY RH |
| 9. INSTALL ROOF HEADLINING ASSEMBLY |
| 10. RESET SLIDING ROOF DRIVE GEAR SUB-ASSEMBLY |
| 11. CHECK SLIDING ROOF SYSTEM |