| Last Modified: 11-27-2007 | 1.6 A | |
| Service Category: Vehicle Exterior | Section: Sliding Roof/Convertible | |
| Model Year: 2008 | Model: LX570 | Doc ID: RM000002LP900BX |
| Title: SLIDING ROOF / CONVERTIBLE: SLIDING ROOF HOUSING: INSTALLATION (2008 LX570) | ||
INSTALLATION
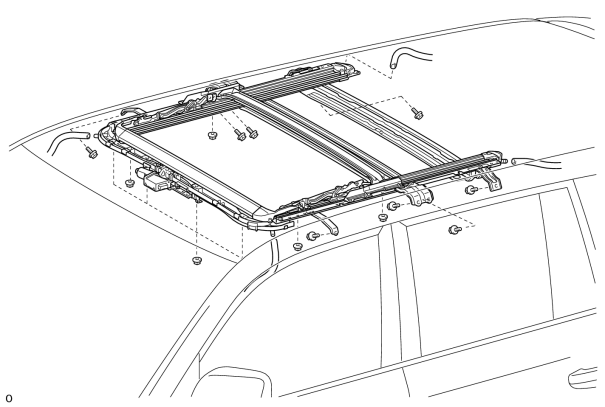
1. INSTALL SLIDING ROOF HOUSING SUB-ASSEMBLY
(a) Temporarily install the housing with the 8 bolts (vehicle body side) and 8 nuts.
(b) Tighten the 8 nuts.
Torque: 5.5 N·m (56 kgf·cm, 49 in·lbf)
(c) Tighten the 8 bolts.
Torque: 5.5 N·m (56 kgf·cm, 49 in·lbf)
(d) Connect the 4 sliding roof drain hoses.
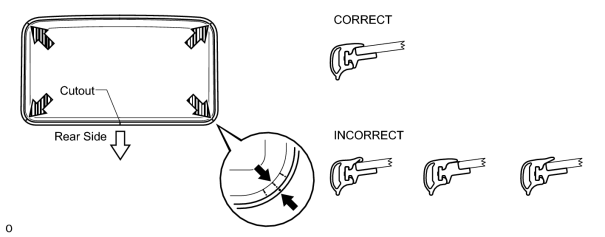
2. INSTALL SLIDING ROOF WEATHERSTRIP
(a) Install the sliding roof weatherstrip as described below.
(1) Attach each corner of the weatherstrip so that each weatherstrip mark is aligned with the sliding roof glass center mark. After attaching the entire weatherstrip, check that all weatherstrip marks are within the sliding roof glass end marks.
(2) Make sure the weatherstrip cutout is toward the rear side of the vehicle and centered.
(3) Make sure the weatherstrip is securely installed as shown in the illustration.
3. INSTALL SLIDING ROOF GLASS SUB-ASSEMBLY
|
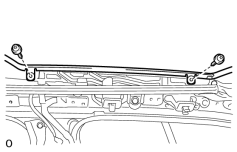
(a) Using a T25 "TORX" driver, temporarily install the glass with the 4 screws. |
(b) Perform a level check.
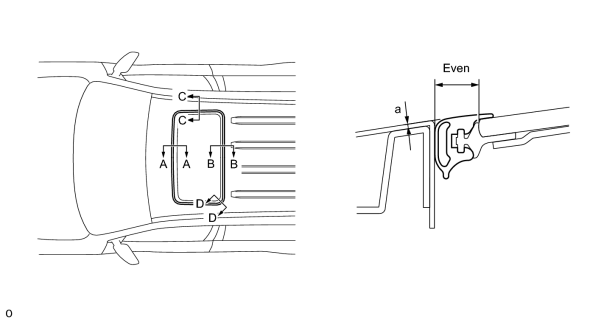
(1) Check the difference in the level between the roof panel and the upper surface of the weatherstrip labeled "a" when the sliding roof glass is fully closed.
Standard:
|
Area |
Specified Condition |
|---|---|
|
A - A |
0 +/-1.5 mm (0 +/-0.0591 in.) |
|
B - B |
|
|
C - C |
|
|
D - D |
HINT:
"+" represents the condition that the glass is above the panel level. "-" represents the condition that the glass is below the panel level.
(2) Perform a gap check.
Check the gap between the roof panel and roof glass.
NOTICE:
The gap must be even all around.
|
|
(c) Tighten the 4 screws. Torque: 5.5 N·m (56 kgf·cm, 49 in·lbf) |
4. CHECK FOR WATER LEAK
(a) After adjusting the sliding roof glass sub-assembly, check for water leaks.
If there are any leaks, readjust the sliding roof glass sub-assembly.
5. INSTALL SLIDING ROOF SIDE GARNISH LH
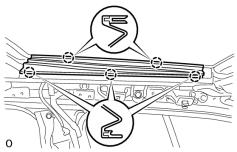
(a) Attach the 5 claws to install the sliding roof side garnish.
6. INSTALL SLIDING ROOF SIDE GARNISH RH
HINT:
Use the same procedures described for the LH side.
7. INSTALL REAR NO. 5 ROOF AIR DUCT
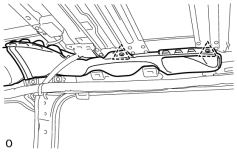
|
(a) Attach the 2 clips to install the duct. |
8. INSTALL REAR NO. 4 ROOF AIR DUCT
HINT:
Use the same procedures described for the No. 5 roof air duct.
9. INSTALL CURTAIN SHIELD AIRBAG ASSEMBLY LH
(a) Install the curtain shield airbag
 .
.
10. INSTALL CURTAIN SHIELD AIRBAG ASSEMBLY RH
HINT:
Use the same procedures described for the LH side.
11. INSTALL ROOF HEADLINING ASSEMBLY
(a) Install the roof headlining
.
12. CONNECT CABLE TO NEGATIVE BATTERY TERMINAL
NOTICE:
When disconnecting the cable, some systems need to be initialized after the cable is reconnected
.
13. CHECK SRS WARNING LIGHT
(a) Check the SRS warning light
.
14. INSTALL ENGINE ROOM SIDE COVER LH

|

|