| Last Modified: 11-27-2007 | 1.6 A | |
| Service Category: Vehicle Exterior | Section: Door/Hatch | |
| Model Year: 2008 | Model: LX570 | Doc ID: RM000002M8100DX |
| Title: DOOR / HATCH: REAR DOOR: REASSEMBLY (2008 LX570) | ||
REASSEMBLY
HINT:
- Use the same procedures for the RH side and LH side.
- The procedures listed below are for the LH side.
-
A bolt without a torque specification is shown in the standard bolt chart
 .
.
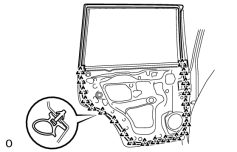
1. INSTALL REAR DOOR WEATHERSTRIP LH
|
(a) Attach the 21 clips to install the weatherstrip. HINT:
If clips are damaged during installation, replace them. |
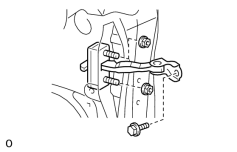
2. INSTALL REAR DOOR CHECK ASSEMBLY LH
(a) Apply MP grease to the sliding areas of the door check.
|
(b) Install the door check to the door panel with the 2 nuts. Torque: 8.0 N·m (82 kgf·cm, 71 in·lbf) |
(c) Apply adhesive to the threads of the bolt.
Adhesive:
Toyota Genuine Adhesive 1324, Three Bond 1324 or equivalent
(d) Install the bolt.
Torque: 27 N·m (275 kgf·cm, 20 ft·lbf)
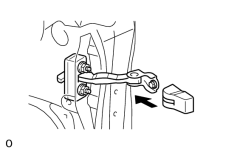
3. INSTALL REAR DOOR CHECK COVER LH
|
(a) Install the door check cover. |
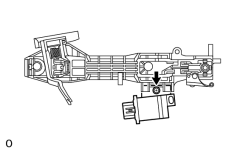
4. INSTALL DOOR ELECTRICAL KEY OSCILLATOR
|
(a) Install the door electrical key oscillator with the screw. |
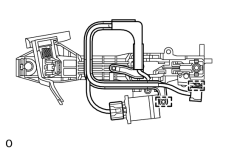
5. INSTALL NO. 4 ELECTRICAL KEY WIRE HARNESS
|
(a) Connect the connector. |
(b) Attach the 2 clamps to install the wire harness to the frame.
6. INSTALL REAR DOOR OUTSIDE HANDLE FRAME SUB-ASSEMBLY LH
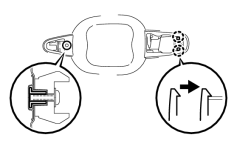
(a) Apply MP grease to the sliding parts on the rear door outside handle frame sub-assembly.
|
(b) Attach the 2 claws to install the rear door outside handle frame sub-assembly. |
|
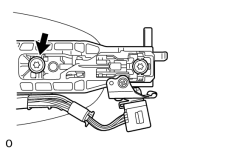
(c) Using a T30 "TORX" wrench, tighten the screw. Torque: 4.0 N·m (41 kgf·cm, 35 in·lbf) |
|
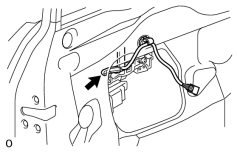
(d) Attach the clamp. |
7. INSTALL REAR NO. 2 DOOR OUTSIDE HANDLE PAD LH
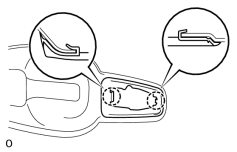
|
(a) Attach the 2 claws to install the rear No. 2 door outside handle pad. |
8. INSTALL REAR NO. 1 DOOR OUTSIDE HANDLE PAD LH
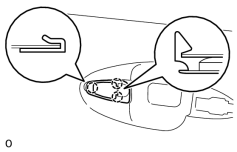
|
(a) Attach the 3 claws to install the rear No. 1 door outside handle pad. |
9. INSTALL REAR DOOR OUTSIDE HANDLE ASSEMBLY LH
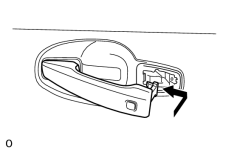
|
(a) Insert the front end of the rear door outside handle assembly into the rear door outside handle frame. NOTICE:
If the bellcrank lever is not pulled and held when installing the outside handle, the bellcrank lever will interfere with the outside handle and the release plate may be damaged. |
(b) Insert the rear end of the rear door outside handle assembly into the rear door outside handle frame. Next, slide the rear door outside handle assembly toward the front of the vehicle to install it.
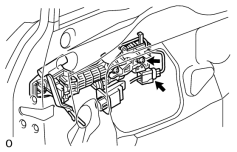
|
(c) Using a T30 "TORX" socket, tighten the screw. |
(d) Connect the connector.
10. INSTALL REAR DOOR OUTSIDE HANDLE COVER LH
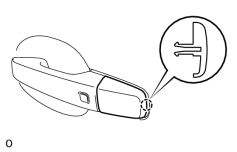
|
(a) Attach the claw to install the rear door outside handle cover. |
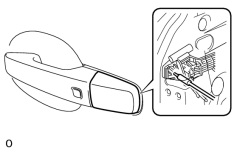
|
(b) Using a T30 "TORX" socket, tighten the screw. |
11. INSTALL REAR DOOR INSIDE LOCKING CABLE ASSEMBLY LH
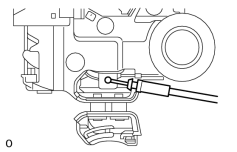
|
(a) Install the rear door inside locking cable assembly. |
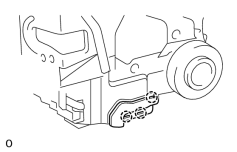
|
(b) Attach the 3 claws. |
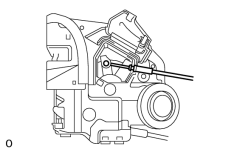
12. INSTALL REAR DOOR LOCK REMOTE CONTROL CABLE ASSEMBLY LH
|
(a) Install the rear door lock remote control cable assembly. |
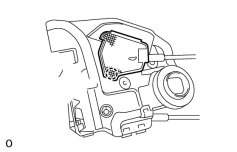
|
(b) Attach the claw. |
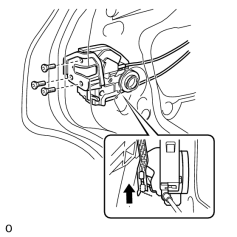
13. INSTALL REAR DOOR LOCK ASSEMBLY LH
(a) Apply MP grease to the sliding parts of the rear door lock assembly.
|
(b) Insert the rear door lock assembly into the rear door outside handle release plate, and set it to the rear door panel. |
(c) Make sure that the rear door outside handle frame release plate is securely connected to the rear door lock assembly.
(d) Using a T30 "TORX" wrench, install the door lock with the 3 screws.
Torque: 5.0 N·m (51 kgf·cm, 44 in·lbf)
14. INSTALL REAR DOOR FRONT WINDOW FRAME MOULDING LH
15. INSTALL REAR DOOR BELT MOULDING ASSEMBLY LH
16. INSTALL REAR NO. 3 DOOR WEATHERSTRIP LH
(a) Clean the vehicle body surface.
(1) Using a heat light, heat the vehicle body surface.
(2) Remove the double-sided tape from the vehicle body surface.
(3) Wipe off any tape adhesive residue with cleaner.
(b) Install a new rear No. 3 door weatherstrip.
(1) Using a heat light, heat a new rear No. 3 door weatherstrip and the vehicle body surface.
(2) Remove the peeling paper from the face of the rear No. 3 door weatherstrip.
HINT:
After removing the peeling paper, keep the exposed adhesive free from foreign matter.
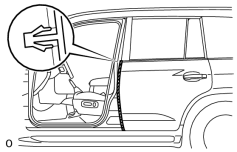
|
(3) Attach the claw and double-sided tape to install the rear No. 3 door weatherstrip. HINT:
Press the rear No. 3 door weatherstrip firmly to install it. |
17. INSTALL REAR NO. 1 POWER WINDOW REGULATOR MOTOR ASSEMBLY LH
(a) Apply MP grease to the sliding and rotating areas of the regulator motor.
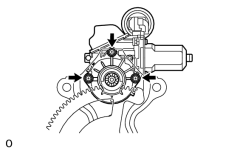
|
(b) Using a T25 "TORX" driver, install the motor with the 3 screws. Torque: 5.4 N·m (55 kgf·cm, 48 in·lbf) HINT:
A new rear window regulator uses self-tapping screws to thread new installation holes when the self-tapping screws are inserted. |
18. INSTALL REAR DOOR WINDOW REGULATOR SUB-ASSEMBLY LH
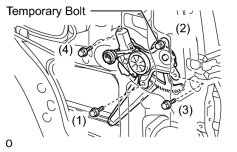
|
(a) Apply MP grease to the sliding parts of the rear door window regulator sub-assembly. |
(b) Temporarily install the temporary bolt onto the window regulator.
(c) Insert the window regulator into the door panel. Use the temporary bolt to hang the window regulator on the door panel.
NOTICE:
Be careful not to drop the window regulator as it may become damaged.
(d) Temporarily install the window regulator with the 3 bolts.
(e) Tighten the 4 bolts in the order shown in the illustration.
Torque: 8.0 N·m (82 kgf·cm, 71 in·lbf)
19. INSTALL REAR NO. 2 DOOR FRAME GARNISH LH
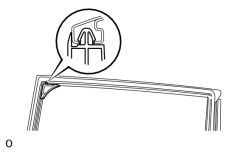
|
(a) Attach the clip to install a new rear door frame garnish. |
20. INSTALL REAR DOOR FRAME GARNISH LH
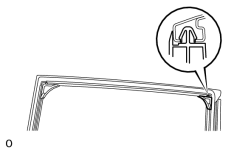
|
(a) Attach the clip to install a new rear door frame garnish. |
21. INSTALL REAR DOOR GLASS SUB-ASSEMBLY LH
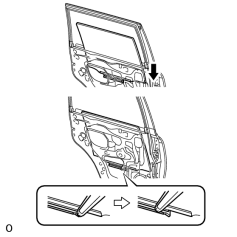
|
(a) Slide the rear door glass sub-assembly as shown in the illustration to install it. |
22. INSTALL REAR DOOR QUARTER WINDOW WEATHERSTRIP LH
(a) Install the rear door quarter window weatherstrip to the rear door quarter window glass.
23. INSTALL REAR DOOR QUARTER WINDOW GLASS LH
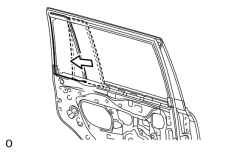
|
(a) Install the quarter glass together with the rear door quarter window weatherstrip in the direction indicated by the arrow in the illustration. |
24. INSTALL REAR DOOR REAR LOWER WINDOW FRAME SUB-ASSEMBLY LH
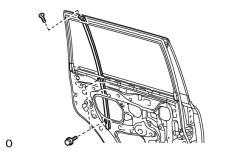
|
(a) Install the rear door rear lower window frame with the 2 bolts and screw. |
25. INSTALL REAR DOOR GLASS RUN LH
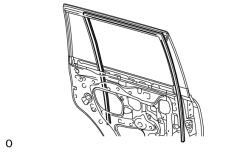
|
(a) Install the rear door glass run. |
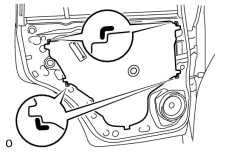
26. INSTALL REAR DOOR SERVICE HOLE COVER LH
(a) Apply butyl tape to the door.
|
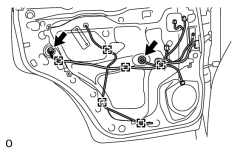
(b) Pass the rear door lock remote control cable and rear door inside locking cable through a new rear door service hole cover. NOTICE:
|
|
(c) Connect the 2 connectors. |
(d) Attach the 6 clamps.
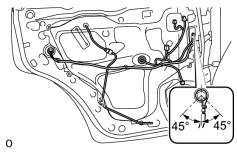
|
(e) Install the bolt as shown in the illustration. Torque: 8.4 N·m (86 kgf·cm, 74 in·lbf) |
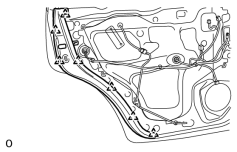
27. INSTALL REAR DOOR TRIM COVER LH
|
(a) Attach the 7 clips to install the door trim cover. |
28. INSTALL REAR SPEAKER SET
29. INSTALL REAR INNER DOOR GLASS WEATHERSTRIP LH
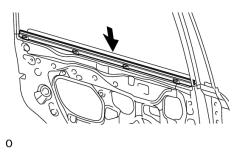
|
(a) Install the rear inner door glass weatherstrip to the door panel. |
30. INSTALL COURTESY LIGHT ASSEMBLY
31. INSTALL REAR DOOR INSIDE HANDLE SUB-ASSEMBLY LH
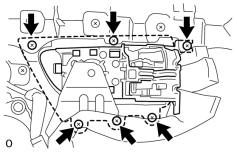
|
(a) Install the inside handle to the trim board with the 6 screws. |
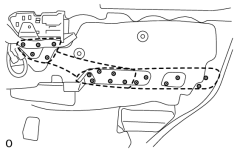
|
(b) Install the rear door armrest assembly to the trim board with the 17 screws. |
32. INSTALL REAR NO. 3 SPEAKER ASSEMBLY (for 19 Speakers)
33. INSTALL REAR NO. 2 SPEAKER ASSEMBLY (for 19 Speakers)
34. INSTALL REAR DOOR INSIDE HANDLE ILLUMINATION LIGHT ASSEMBLY LH
35. INSTALL REAR DOOR TRIM BOARD SUB-ASSEMBLY LH
(a) Connect the connector.
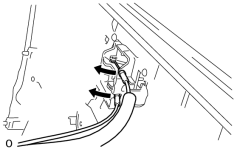
|
(b) Connect the rear door lock remote control cable and rear door inside locking cable to the rear door inside handle sub-assembly. |
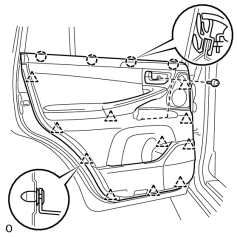
|
(c) Attach the 4 claws and 11 clips to install the rear door trim board sub-assembly. |
(d) Install the 2 screws.
36. INSTALL REAR LOWER DOOR ARMREST BASE PANEL LH
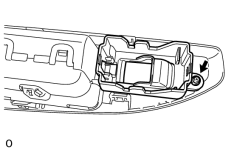
|
(a) Install the rear lower door armrest base panel with the screw. |
37. INSTALL REAR POWER WINDOW REGULATOR SWITCH ASSEMBLY
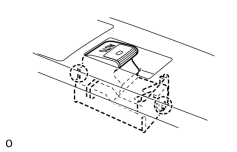
|
(a) Attach the 2 claws to install the window regulator switch. |
38. INSTALL REAR UPPER DOOR ARMREST BASE PANEL LH
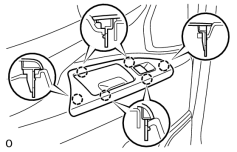
|
(a) Connect the connector. |
(b) Attach the 6 claws to install the rear upper door armrest base panel.
39. INSTALL REAR DOOR INSIDE HANDLE BEZEL PLUG LH
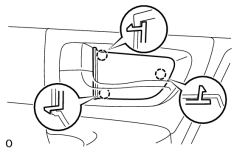
|
(a) Attach the 3 claws to install the bezel plug. |
40. CONNECT CABLE TO NEGATIVE BATTERY TERMINAL
NOTICE:
When disconnecting the cable, some systems need to be initialized after the cable is reconnected
.
41. INSTALL ENGINE ROOM SIDE COVER LH

|

|