| Last Modified: 11-27-2007 | 1.6 A | |
| Service Category: Vehicle Interior | Section: Seat Belt | |
| Model Year: 2008 | Model: LX570 | Doc ID: RM0000039EP004X |
| Title: SEAT BELT: REAR NO. 1 SEAT OUTER BELT ASSEMBLY: INSTALLATION (2008 LX570) | ||
INSTALLATION
HINT:
- Use the same procedures for the LH side and RH side.
- The procedures listed below are for the LH side.
-
A bolt without a torque specification is shown in the standard bolt chart
 .
.
1. INSTALL REAR SHOULDER BELT ANCHOR PLATE SUB-ASSEMBLY
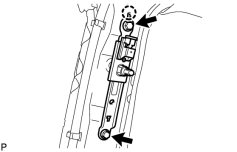
(a) Align the anchor plate positioning hole with the claw, and install the anchor plate with the 2 bolts.
HINT:
First install the lower bolt, and then install the upper bolt.
Torque: 42 N·m (428 kgf·cm, 31 ft·lbf)
2. INSTALL REAR NO. 1 SEAT OUTER BELT ASSEMBLY
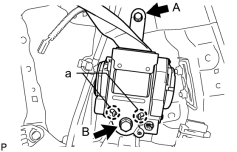
NOTICE:
When installing the retractor, make sure the claws of the vehicle (labeled "a" in the illustration) only contact the installation areas of the retractor.
(a) Align the claws with the seat belt positioning holes and install the retractor of the seat belt as shown in the illustration.
(b) Install the seat belt with the 2 bolts.
HINT:
First install bolt A, and then install bolt B.
Torque: 8.5 N·m (87 kgf·cm, 75 in·lbf)
Torque: 42 N·m (428 kgf·cm, 31 ft·lbf)
|
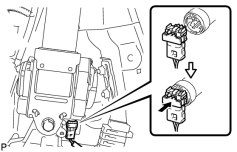
(c) Connect the pretensioner connector, as shown in the illustration. |
|
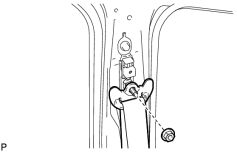
(d) Install the seat belt shoulder anchor with the nut. Torque: 42 N·m (428 kgf·cm, 31 ft·lbf) |
3. INSTALL REAR FRONT QUARTER TRIM GARNISH
4. INSTALL FRONT QUARTER TRIM PANEL ASSEMBLY
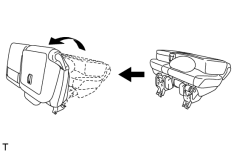
HINT:
When installing the front quarter trim panel, operate the reclining adjuster release handle and move the No. 1 rear seat to the position shown in the illustration.
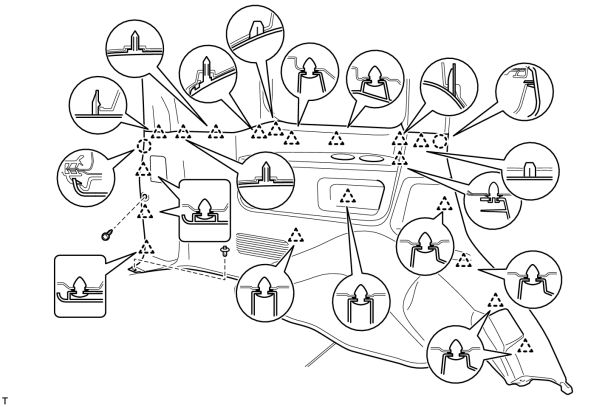
(a) w/ Manual Folding-up Function:
(1) Connect the thermistor connector, power outlet socket connector and rear seat lock control lever cable.
(2) Attach the 19 clips and 2 claws to install the quarter trim panel.
(3) Install the screw, clip and bolt.
Torque: 12 N·m (122 kgf·cm, 9 ft·lbf)
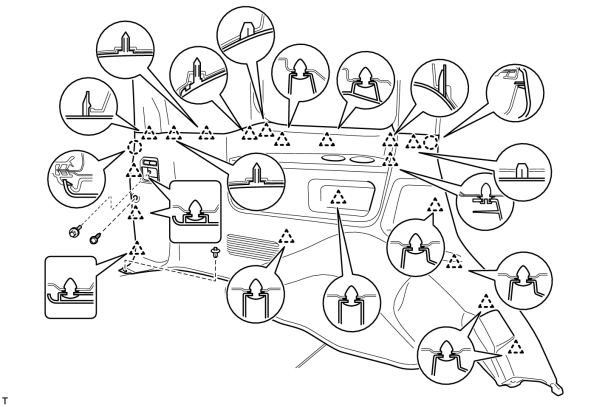
(b) w/ Automatic Folding-up Function:
(1) Connect the thermistor connector and power outlet socket connector.
(2) Attach the 19 clips and 2 claws to install the quarter trim panel.
(3) Install the screw and clip.
|
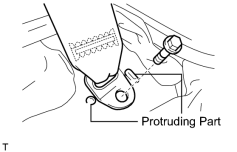
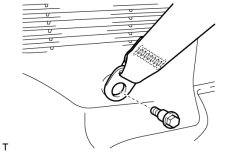
(c) for LH side: (1) Install the rear No. 2 seat belt anchor LH with the bolt. Torque: 42 N·m (428 kgf·cm, 31 ft·lbf) NOTICE:
Do not overlap the anchor part of the seat belt and protruding parts of the vehicle body. |
|
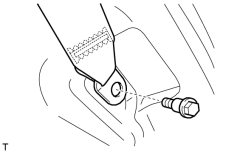
(d) for RH side: (1) Install the rear No. 2 seat belt anchor with the bolt. Torque: 42 N·m (428 kgf·cm, 31 ft·lbf) (2) Attach the 3 claws to install the cover. |
|
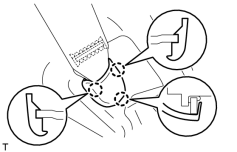
(e) Install the rear No. 1 seat belt anchor with the bolt. Torque: 42 N·m (428 kgf·cm, 31 ft·lbf) |
|
(f) Attach the 3 claws to install the cover. |
5. INSTALL REAR SEAT COVER CAP (w/ Manual Folding-up Function)
6. INSTALL NO. 1 LUGGAGE COMPARTMENT TRIM HOOK
7. INSTALL REAR DOOR SCUFF PLATE
8. INSTALL REAR STEP COVER
9. INSTALL REAR FLOOR MAT REAR SUPPORT PLATE
10. INSTALL REAR NO. 2 SEAT ASSEMBLY
(a) w/ Automatic Folding-up Function:
Install the rear No. 2 seat assembly
.
(b) w/ Manual Folding-up Function:
Install the rear No. 2 seat assembly
.
11. CONNECT CABLE TO NEGATIVE BATTERY TERMINAL
NOTICE:
When disconnecting the cable, some systems need to be initialized after the cable is reconnected
.
12. CHECK SRS WARNING LIGHT
(a) Check the SRS warning light
.

|

|