INSTALLATION
Removal / installation
| 1. INSTALL SLIDING ROOF HOUSING SUB-ASSEMBLY |

Install the sliding roof housing sub-assembly with the 4 bolts and 8 nuts.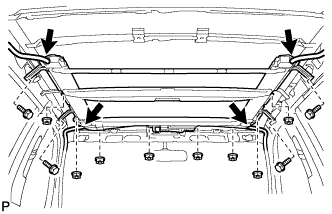

Connect the 4 sliding roof drain hoses.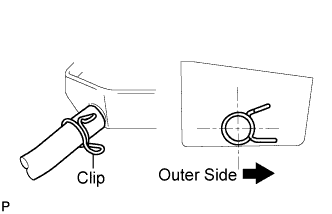
- NOTICE:
- The clip must face toward the exterior of the vehicle when installing the drain hoses.
| 2. INSTALL SLIDING ROOF GLASS SUB-ASSEMBLY |
Using a T25 "torx" driver, temporarily install the sliding roof glass sub-assembly with the 4 screws.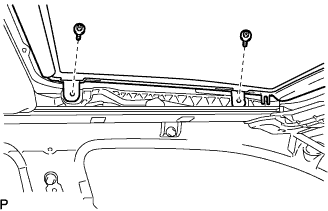
Perform a level check.
Check the difference in level for "a" between the roof panel and roof glass when the sliding roof glass is fully closed.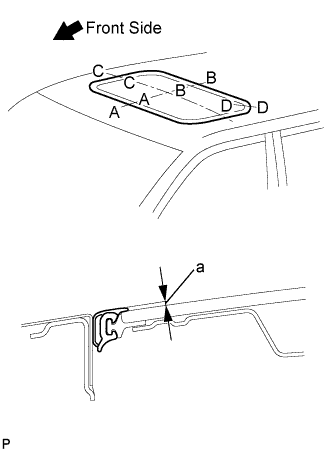
- Standard:
Area
Measurement
A - A
1 + 1.0 mm (0.039 + 0.039 in.)
1 - 2.0 mm (0.039 - 0.079 in.)
B - B
1 + 2.0 mm (0.039 + 0.079 in.)
1 - 1.0 mm (0.039 - 0.039 in.)
C - C
1 + 1.5 mm (0.039 + 0.059 in.)
1 - 1.5 mm (0.039 - 0.059 in.)
D - D
1 + 1.5 mm (0.039 + 0.059 in.)
1 - 1.0 mm (0.039 - 0.039 in.)
- HINT:
- "+" represents the condition that the glass is above the panel level. "-" represents the condition that the glass is below the panel level.
Perform a gap check.
Check the gap between the roof panel and roof glass.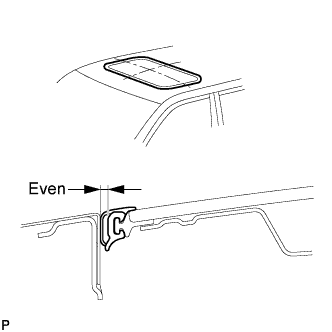
- NOTICE:
- The gap must be even all around.
After adjusting the sliding roof glass, using a T25 "torx" driver, install the sliding roof glass sub-assembly with the 4 screws.
| 3. CHECK FOR WATER LEAKS |
After adjusting the sliding roof glass sub-assembly, check for water leaks.
If there are any leaks, readjust the sliding roof glass sub-assembly.
| 4. INSTALL SLIDING ROOF SIDE LH GARNISH |
Engage the 5 claws and install the sliding roof side garnish.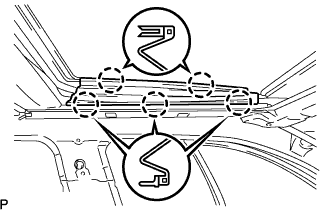
| 5. INSTALL SLIDING ROOF SIDE RH GARNISH |
| 6. INSTALL CURTAIN SHIELD LH AIRBAG ASSEMBLY |
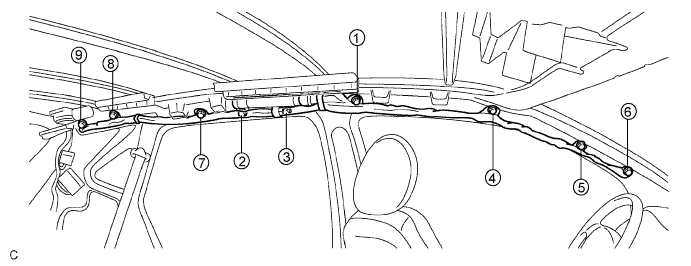
Install the curtain shield airbag assembly LH with the 9 bolts in the order shown in the illustration.
- Torque:
- 14 N*m{ 143 kgf*cm , 10 ft.*lbf }
- NOTICE:
- Do not twist the curtain shield airbag assembly LH when installing it.
Connect the connector to the curtain shield airbag assembly LH.
- NOTICE:
- When handling the airbag connector, take care not to damage the airbag wire harness.
| 7. INSTALL CURTAIN SHIELD RH AIRBAG ASSEMBLY |
| 8. INSTALL ROOF HEADLINING ASSEMBLY |
| 9. CONNECT CABLE TO NEGATIVE BATTERY TERMINAL |
| 10. PERFORM INITIALIZATION |
| 11. RESET SLIDING ROOF DRIVE GEAR SUB-ASSEMBLY |
| 12. CHECK SLIDING ROOF SYSTEM |
| 13. INSPECT SLIDE ADJUSTER LOCK |