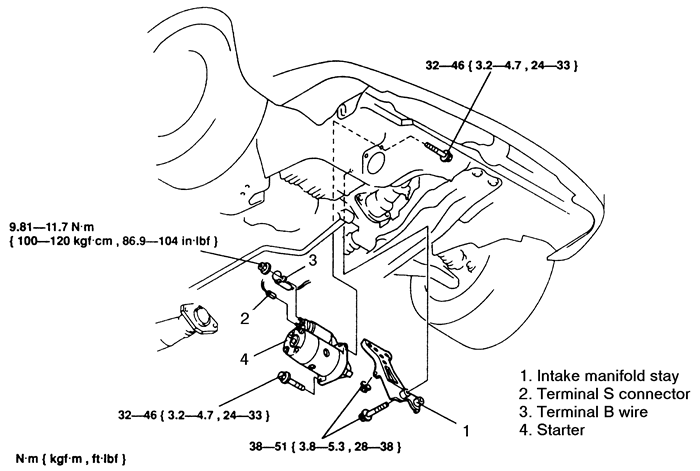
| Fig. 1: Starter motor removal and installation --
Protege 1.5L (Z5D) and 1.8L (BPD) engines
|
CAUTION
Fuel injection systems remain under pressure after the engine has been
turned OFF. Properly relieve fuel pressure before disconnecting any fuel
lines. Failure to do so may result in fire or personal injury. Do not
allow fuel spray or fuel vapors to come in contact with a spark or open
flame. Keep a dry chemical fire extinguisher nearby. Never store fuel
in an open container due to risk of fire or explosion.
NOTE: Always disconnect the negative battery cable first!
- Disconnect the negative then positive battery cables.
Remove the battery and battery tray.
- Raise and safely support the vehicle. Remove the
engine undercover.
- Remove the intake manifold bracket.
- Remove the starter bracket, if equipped.
- Label and disconnect the wiring from the starter.
-
Remove the starter mounting bolts and remove the starter.
To install:
- Position the starter and loosely tighten the lower
mounting bolt.
- Connect the electrical wiring to the starter.
- Install the intake manifold support bracket bolts
and the bracket. Tighten the bolts to 28-38 ft. lbs. (38-51 Nm).
- Install the upper starter mounting bolts. Tighten
all starter mounting bolts to 28-38 ft. lbs. (38-51 Nm). The upper mounting
bolts must be tightened first.
- Install the battery and tray.
- Connect the negative battery cable.
- Disconnect the negative battery cable.
- Remove the air cleaner.
- Raise and safely support the vehicle.
- Disconnect the catalytic converter pipe from the
front pipe.
- Remove the intake manifold support bracket bolts
and the bracket.
- Disconnect the electrical connectors from the starter
and solenoid.
-
Remove the starter mounting bolts, and remove the starter.
To install:
- Position the starter and loosely tighten the lower
starter mounting bolt.
- Connect the electrical connectors to the starter
solenoid and the starter.
- Install the intake manifold support bracket bolts
and the bracket. Tighten the bolts to 28-38 ft. lbs. (38-51 Nm).
- Install the upper starter mounting bolts. Tighten
all starter mounting bolts to 24-33 ft. lbs. (32-46 Nm). The upper mounting
bolts must be tightened first.
- Connect the catalytic converter pipe to the front
pipe. Tighten the bolts to 28-38 ft. lbs. (38-51 Nm).
- Lower the vehicle.
- Install the air cleaner.
- Connect the negative battery cable.
- On automatic transaxles, relieve the fuel system
pressure.
- Disconnect the negative battery cable.
- On manual transaxles, remove the strut bar.
- Remove the intake air hose.
- Remove the S-terminal wire from the starter solenoid.
Remove the nut and the B-terminal wire from the starter solenoid.
- Remove the fuel filter.
-
Remove the starter mounting bolts and remove the starter.
To install:
- Position the starter and tighten the starter mounting
bolts to 28-38 ft. lbs. (38-51 Nm).
- Install the fuel filter if removed.
- Install the B-terminal wire and nut. Tighten the
nut to 7-9 ft. lbs. (10-12 Nm).
- Install the S-terminal wire to the solenoid.
- Install the intake air hose.
- On manual transaxles, install the strut bar.
- Connect the negative battery cable.
- Disconnect the negative battery cable.
- Remove the air duct and air cleaner assembly.
- Remove the upper starter mounting bolts.
- Raise and safely support the vehicle.
- Remove the intake manifold support bracket bolts
and the bracket.
- Disconnect the electrical connectors from the starter
and solenoid.
-
Remove the lower starter mounting bolt and remove the starter.
To install:
- Position the starter and loosely tighten the lower
starter mounting bolt.
- Connect the electrical connectors to the starter
solenoid and the starter.
- Install the intake manifold support bracket bolts
and the bracket. Tighten the bolts to 28-38 ft. lbs. (38-51 Nm).
- Lower the vehicle and install the upper starter mounting
bolts. Tighten all starter mounting bolts to 24-33 ft. lbs. (32-46 Nm).
The upper mounting bolts must be tightened first.
- Install the air duct and air cleaner assembly.
- Connect the negative battery cable.
- Disconnect the negative battery cable.
- Remove the air duct and air cleaner assembly.
- Remove the S-terminal wire from the starter solenoid.
- Remove the nut and the B-terminal wire from the starter
solenoid.
- Remove the starter mounting bolts and remove the
starter.
- Installation is the reverse of removal. Torque the
mounting bolts to 24-43 ft. lbs. (32-46 Nm).
- Properly relieve the fuel system pressure.
- Disconnect the negative battery cable.
- Remove the air duct and air cleaner assembly.
- Remove the shift cable from the selector lever using
a screwdriver or suitable tool.
- Squeeze the lock tabs on the shift cable and remove
the cable from the bracket.
- Disconnect the coolant hose and the two fuel lines.
- Disconnect the electrical connectors from the starter
solenoid.
- Position the wiring harness out of the way.
- Remove the two selector cable bracket mounting bolts
and the bracket.
- Remove the two nuts and the bolt from the starter
bracket and remove the bracket.
- Disconnect the S-terminal wire from the starter solenoid.
- Remove the nut and the B-terminal wire from the starter
solenoid.
-
Remove the starter mounting bolts and remove the starter.
To install:
- Position the starter and tighten the starter mounting
bolts to 24-33 ft. lbs. (32-46 Nm).
- Install the B-terminal wire and nut. Tighten the
nut to 12-16 ft. lbs. (16-22 Nm).
- Connect the S-terminal wire to the solenoid.
- Position the starter bracket and install the bolt
and nuts.
- Install the selector cable bracket and tighten the
bolts to 60.8-86.8 inch lbs. (7-10 Nm).
- Connect the electrical connectors to the starter
solenoid.
- Connect the fuel lines and coolant hose.
- Install the shift cable into the cable bracket and
into the selector lever.
- Install the air duct and air cleaner assembly.
- Connect the negative battery cable.
- Disconnect the negative battery cable.
- Raise and safely support the vehicle. Remove the
engine undercover.
- Label and disconnect the wiring from the starter.
- Remove the starter mounting bolts, and remove the
starter.
- Installation is the reverse of the removal procedure.
Tighten the starter mounting bolts to 24-33 ft. lbs. (32-46 Nm). Tighten
the B-terminal nut to 87-104 inch lbs. (10-11 Nm).
- Disconnect the negative battery cable.
- Remove the charge air cooler duct.
- Remove the battery clamp, box, and battery. Remove
the battery tray.
- Remove the rear charge air cooler.
- Remove the bolt from the pipe bracket and remove
the bracket.
- Remove the S-terminal wire from the starter solenoid.
- Remove the nut and the B-terminal wire from the starter
solenoid.
-
Remove the starter mounting bolts and remove the starter.
To install:
- Position the starter and tighten the starter mounting
bolts to 24-33 ft. lbs. (32-46 Nm).
- Install the B-terminal wire and nut. Tighten the
nut to 12-16 ft. lbs. (16-22 Nm).
- Install the S-terminal wire to the solenoid.
- Position the pipe bracket and install the bolt. Tighten
the bolt to 14-18 ft. lbs. (19-25 Nm).
- Install the rear charge air cooler, using new O-rings.
Tighten the nuts to 14-18 ft. lbs. (19-25 Nm).
- Install the battery tray. Install the battery, box,
and clamp.
- Install the charge air cooler duct.
- Connect the negative battery cable.
- Disconnect the negative battery cable.
- Remove the battery clamp, box, and battery. Remove
the battery tray.
- Remove the shift cable from the selector lever using
a screwdriver or suitable tool.
- Squeeze the lock tabs on the shift cable and remove
the cable from the bracket.
- Disconnect the electrical connectors from the starter
solenoid.
- Position the wiring harness out of the way.
- Remove the two selector cable bracket mounting bolts
and the bracket.
- Remove the two nuts and the bolt from the starter
bracket and remove the bracket.
- Remove the S-terminal wire from the starter solenoid.
- Remove the nut and the B-terminal wire from the starter
solenoid.
-
Remove the starter mounting bolts and remove the starter.
To install:
- Position the starter and tighten the starter mounting
bolts to 24-33 ft. lbs. (32-46 Nm).
- Install the B-terminal wire and nut. Tighten the
nut to 12-16 ft. lbs. (16-22 Nm).
- Install the S-terminal wire to the solenoid.
- Position the starter bracket and install the bolt
and nuts.
- Install the selector cable bracket and tighten the
bolts to 5-7 ft. lbs. (7-9 Nm).
- Connect the electrical connectors to the starter
solenoid.
- Install the shift cable into the cable bracket and
into the selector lever.
- Install the battery tray. Install the battery, box,
and clamp.
- Connect the negative battery cable.
- Disconnect the negative battery cable.
- Disconnect the electrical connectors from the starter
and solenoid.
- For (M/T), remove the starter bracket.
- Safely raise and support the vehicle.
-
Remove the starter mounting bolts, and remove the starter.
To install:
- Position the starter and tighten the starter mounting
bolts to 28-38 ft. lbs. (38-51 Nm).
- Lower the vehicle.
- Install the starter bracket (M/T) and tighten the
lower bolt to 28-38 ft. lbs. (38-51 Nm), and the upper bolt to 12-16 ft.
lbs. (16-22 Nm).
- Connect the electrical connectors to the starter
solenoid and the starter.
- Connect the negative battery cable.
- Disconnect the negative battery cable.
- Raise and safely support the vehicle.
- Remove the engine undercover.
- Label and disconnect the wiring from the starter.
- Remove the starter mounting bolts and remove the
starter.
- Installation is the reverse of the removal procedure.