Previous Next

ENGINE REPAIR


Engine Repair

ENGINE COOLING

Radiator

REMOVAL AND INSTALLATION

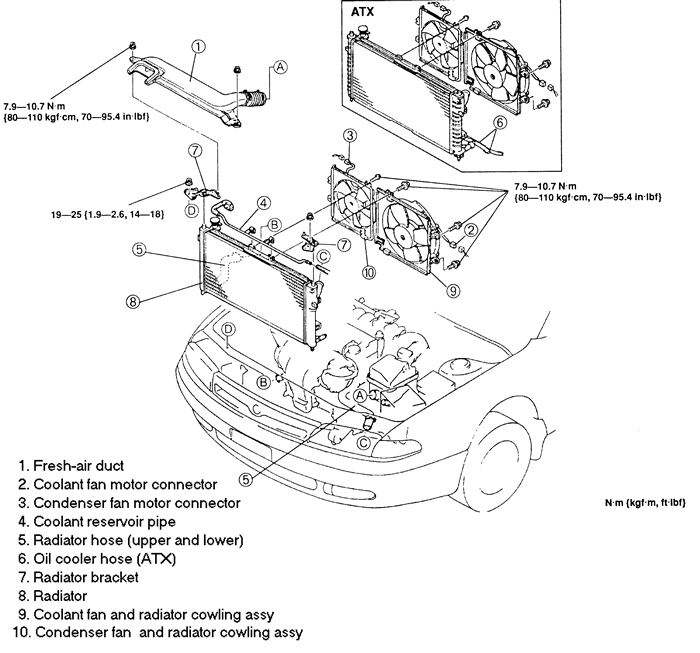
Fig. 1: Exploded view of the radiator and related components -- 626 and MX6 with 2.0L (FS) engine

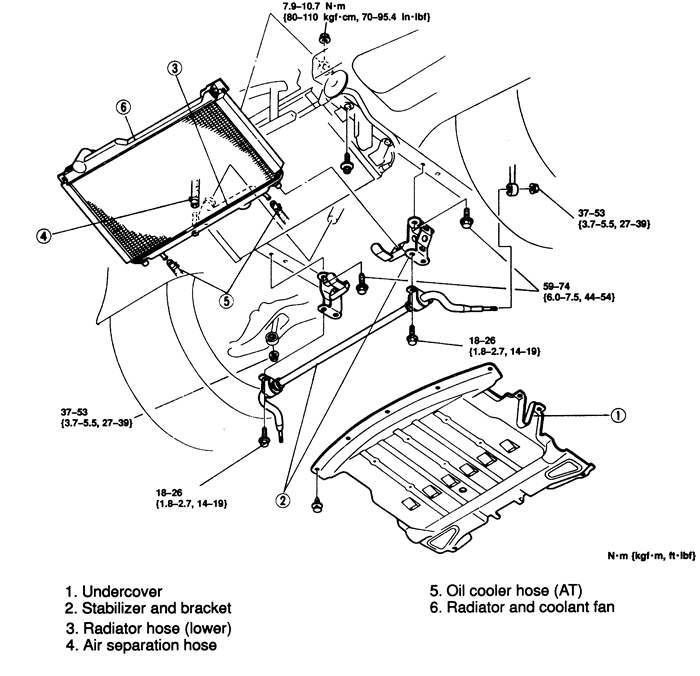
Fig. 2: Exploded view of the radiator and related components -- RX7 with 1.3L (BPD) engine

1993-94 323 1.6 (B6E), 626/MX6 2.0L (FS), 2.5L (KL) and Protege 1.8L (BPE, BPD) engines
  1. Disconnect the negative battery cable.
  2. Remove the engine undercover, if equipped and drain the cooling system.
  3. Remove the necessary air ducts.
  4. Disconnect the electric cooling fan connector and, if equipped, temperature sensor connector.
  5. Disconnect the coolant reservoir and upper and lower radiator hoses. If equipped with automatic transaxle or transmission, disconnect the oil cooler lines and plug the hoses.
  6. Remove the upper radiator mounting brackets.
  7. Lift the radiator/cooling fan(s) assembly from the vehicle. Remove the radiator/cooling fans assembly.
  8. If necessary, remove the cooling fan(s)/shroud assembly from the radiator.

    To install:

  9. If removed, install the fan and shroud assembly. Tighten the mounting bolts to 61-87 inch lbs. (7-10 Nm).
  10. Install the radiator, making sure the lower tank engages the insulators.
  11. Install the upper radiator insulators and tighten the retaining bolts to 69-95 inch lbs. (8-11 Nm).
  12. Unplug and connect the cooler lines, if required.
  13. Reattach the wiring harness to the routing clips and install the upper and lower radiator hoses to the radiator.
  14. Connect the overflow tube to the radiator and connect the cooling fan wiring connectors.
  15. Close the radiator drain valve and fill the system with coolant. Install the pressure cap to the first stop only.
  16. Connect the negative battery cable. Start the engine and run it at fast idle until the upper radiator hose feels warm, indicating the thermostat has opened and coolant is flowing throughout the system.
  17. Stop the engine. Carefully remove the radiator cap and top off the radiator with coolant, if required.
  18. Install the radiator cap securely and fill the coolant reservoir to the FULL mark.
  19. Run the engine and check for leaks.
1995 MX3 1.6L (B6-ZE), 1995-97 Protege 1.5L (Z5D) and 1.8L (BPE, BPD) Engines
  1. Disconnect the negative battery cable.
  2. Drain the cooling system.
  3. Remove the upper seal board and radiator grille.
  4. Remove the hood safety lever.
  5. Disconnect the coolant reservoir and upper and lower radiator hoses. If equipped with automatic transaxle, disconnect the oil cooler lines and plug the hoses.
  6. Disconnect the electric cooling fan connector.
  7. Remove the cooling fan/shroud assembly from the radiator. Move the assembly to the side of the engine to gain clearance space.
  8. Remove the radiator brackets.
  9. Lift and remove the radiator from the vehicle.

    To install:

  10. Install the radiator, making sure the lower tank engages the insulators.
  11. Install the radiator brackets. Tighten the mounting bolts to 70-95 inch lbs. (8-11 Nm).
  12. Install the fan and shroud assembly. Tighten the mounting bolts to 70-95 inch lbs. (8-11 Nm).
  13. Unplug and connect the cooler lines, if required.
  14. Reattach the wiring harness to the routing clips, and install the upper and lower radiator hoses to the radiator.
  15. Connect the overflow tube to the radiator, and connect the cooling fan wiring connector.
  16. Install the hood safety lever. Tighten the mounting bolts to 70-95 inch lbs. (8-11 Nm).
  17. Install the radiator grille and upper seal board.
  18. Close the radiator drain valve and fill the system with coolant. Install the pressure cap to the first stop only.
  19. Connect the negative battery cable. Start the engine and run it at fast idle until the upper radiator hose feels warm, indicating the thermostat has opened and coolant is flowing throughout the system.
  20. Stop the engine. Carefully remove the radiator cap and top off the radiator with coolant, if required.
  21. Install the radiator cap securely and fill the coolant reservoir to the FULL mark.
  22. Run the engine and check for leaks.
1994-95 MX3 1.8L (K8) Engine
  1. Disconnect the negative battery cable.
  2. Drain the cooling system.
  3. Remove the fresh air duct.
  4. Disconnect the electric cooling fan connector.
  5. Disconnect the coolant reservoir and upper and lower radiator hoses. If equipped with automatic transaxle, disconnect the oil cooler lines and plug the hoses.
  6. Remove the shroud upper panel.
  7. Lift the radiator/cooling fan assembly from the vehicle. Remove the radiator/cooling fan assembly.
  8. If necessary, remove the cooling fan/shroud assembly from the radiator.

    To install:

  9. If removed, install the fan and shroud assembly. Tighten the mounting bolts to 70-95 inch lbs. (8-11 Nm).
  10. Install the radiator, making sure the lower tank engages the insulators.
  11. Install the shroud upper panel.
  12. Unplug and connect the cooler lines, if required.
  13. Reattach the wiring harness to the routing clips, and install the upper and lower radiator hoses to the radiator.
  14. Connect the overflow tube to the radiator and connect the cooling fan wiring connector.
  15. Install the air duct. Tighten the mounting bolts to 70-95 inch lbs. (8-11 Nm).
  16. Close the radiator drain valve and fill the system with coolant. Install the pressure cap to the first stop only.
  17. Connect the negative battery cable. Start the engine and run it at fast idle until the upper radiator hose feels warm, indicating the thermostat has opened and coolant is flowing throughout the system.
  18. Stop the engine. Carefully remove the radiator cap and top off the radiator with coolant, if required.
  19. Install the radiator cap securely and fill the coolant reservoir to the FULL mark.
  20. Run the engine and check for leaks.
1995-97 626 and MX6 Engines
  1. Disconnect the negative battery cable.
  2. Drain the cooling system.
  3. Remove the fresh air duct.
  4. Disconnect the electric cooling fan and condenser connectors.
  5. Disconnect the coolant reservoir and upper and lower radiator hoses.
  6. Remove the upper radiator mounting brackets.
  7. Lift the radiator/cooling fans assembly from the vehicle.
  8. If necessary, remove the cooling fan(s)/shroud assembly from the radiator.

    To install:

  9. If removed, install the fan and shroud assembly. Tighten the mounting bolts to 70-95 inch lbs. (8-11 Nm).
  10. Install the radiator/fan assembly, making sure the lower tank engages the insulators.
  11. Install the upper radiator mounting brackets, and tighten the retaining bolts to 14-18 ft. lbs. (19-25 Nm).
  12. Reattach the wiring harness to the routing clips, and install the upper and lower radiator hoses to the radiator.
  13. Connect the overflow tube to the radiator and connect the cooling fan wiring connectors.
  14. Install the air duct, and tighten the mounting nuts to 70-95 inch lbs. (8-11 Nm).
  15. Close the radiator drain valve and fill the system with coolant. Install the pressure cap to the first stop only.
  16. Connect the negative battery cable. Start the engine and run it at fast idle until the upper radiator hose feels warm, indicating the thermostat has opened and coolant is flowing throughout the system.
  17. Stop the engine. Carefully remove the radiator cap and top off the radiator with coolant, if required.
  18. Install the radiator cap securely and fill the coolant reservoir to the FULL mark.
  19. Run the engine and check for leaks.
1993-95 929 3.0L (JE-ZE) Engine
  1. Disconnect the negative battery cable and drain the coolant.
  2. Remove the air inlet duct.
  3. Remove the upper and lower radiator hoses and the coolant reservoir hose. If equipped with an automatic transmission, disconnect and plug the cooling hoses.
  4. Remove the shroud mounting nuts, and move it back towards the engine to access the nuts holding the fan/clutch assembly.
  5. Remove the fasteners for the fan and shroud, and lift them out together.
  6. Remove the bolts and lift the radiator out of the vehicle.

    To install:

  7. Position the radiator. Install the cooling fan and shroud. Tighten the mounting bolts to 70-95 inch lbs. (8-11 Nm), and the nuts to 14-18 ft. lbs. (19-25 Nm).
  8. On automatic transmissions, connect the oil cooler lines.
  9. Connect the coolant reservoir hose, and the upper and lower coolant hoses.
  10. Install the air inlet duct.
  11. After installation, make sure the fan turns without contacting the shroud. Fill the cooling system, start the engine and bring to normal operating temperature. Check for leaks.
Millenia 2.3L (KJS) Engine
  1. Disconnect the negative battery cable.
  2. Drain the cooling system.
  3. If equipped, remove the right-hand splash shield.
  4. If necessary, remove the charge air cooler.
  5. If necessary, remove the radiator grill.
  6. Remove the upper seal board.
  7. Disconnect the coolant reservoir hose. Remove the coolant reservoir.
  8. Disconnect the cooling fan electrical connector.
  9. Remove the cooling and condenser fan assembly shroud (cowling) mounting bolts, and remove the shrouds from the radiator.
  10. Disconnect the upper and lower radiator hoses.
  11. Disconnect the oil cooler lines and plug the hoses.
  12. Remove the upper radiator mounting brackets.
  13. Remove the radiator from the vehicle.

    To install:

  14. Install the radiator, making sure the lower tank engages the insulators.
  15. Install the upper radiator mounting brackets, and tighten the retaining bolts to 70-95 inch lbs. (8-11 Nm).
  16. Unplug and connect the cooler lines.
  17. Install the upper and lower radiator hoses to the radiator.
  18. Install the coolant and condenser fan assemblies onto the radiator.
  19. Connect the cooling fan electrical connector.
  20. Install the coolant reservoir. Connect the coolant reservoir hose.
  21. If removed, install the radiator grill.
  22. If removed, install the charge air cooler.
  23. Install the right-hand splash shield, if equipped.
  24. Install the upper seal board.
  25. Properly fill the cooling system.
  26. Connect the negative battery cable.
Millenia 2.5L (KLD) Engine
  1. Disconnect the negative battery cable.
  2. Drain the cooling system.
  3. Remove the upper seal board.
  4. Disconnect the coolant reservoir hose. Remove the coolant reservoir.
  5. Disconnect the cooling fan electrical connector.
  6. Remove the cooling and condenser fan assembly shroud (cowling) mounting bolts, and remove the shrouds from the radiator.
  7. Disconnect the oil cooler lines and plug the hoses.
  8. Disconnect the upper and lower radiator hoses.
  9. Remove the upper radiator mounting brackets.
  10. Remove the radiator from the vehicle.

    To install:

  11. Install the radiator, making sure the lower tank engages the insulators.
  12. Install the upper radiator mounting brackets, and tighten the retaining bolts to 70-95 inch lbs. (8-11 Nm).
  13. Install the upper and lower radiator hoses to the radiator.
  14. Unplug and connect the cooler lines.
  15. Install the coolant and condenser fan assemblies onto the radiator.
  16. Connect the cooling fan electrical connector.
  17. Install the coolant reservoir. Connect the coolant reservoir hose.
  18. Install the upper seal board.
  19. Properly fill the cooling system.
  20. Connect the negative battery cable.
1993-97 Miata 1.6L (B6E) and 1.8L (BPD) Engine
  1. Disconnect the negative battery cable.
  2. Drain the cooling system.
  3. Remove the splash shield.
  4. Remove the air intake pipe.
  5. Disconnect the coolant reservoir and upper and lower radiator hoses. If equipped with automatic transaxle, disconnect the oil cooler lines and plug the hoses.
  6. Disconnect the electric cooling fan connector.
  7. Lift the radiator/cooling fan assembly from the vehicle. Remove the radiator/cooling fan assembly.
  8. If necessary, remove the cooling fan/shroud assembly from the radiator.

    To install:

  9. If removed, install the fan and shroud assembly. Tighten the mounting bolts to 70-95 inch lbs. (8-11 Nm).
  10. Install the radiator, making sure the lower tank engages the insulators.
  11. Unplug and connect the cooler lines, if required.
  12. Reattach the wiring harness to the routing clips, and install the upper and lower radiator hoses to the radiator.
  13. Connect the overflow tube to the radiator, and connect the cooling fan wiring connector.
  14. Install the air intake pipe. Tighten the mounting bolts to 70-95 inch lbs. (8-11 Nm).
  15. Install the splash shield.
  16. Close the radiator drain valve and fill the system with coolant. Install the pressure cap to the first stop only.
  17. Connect the negative battery cable. Start the engine and run it at fast idle until the upper radiator hose feels warm, indicating the thermostat has opened and coolant is flowing throughout the system.
  18. Stop the engine. Carefully remove the radiator cap and top off the radiator with coolant, if required.
  19. Install the radiator cap securely and fill the coolant reservoir to the FULL mark.
  20. Run the engine and check for leaks.
1993-95 RX7 1.3L (13B) Engine
  1. Disconnect the negative battery cable.
  2. Raise and safely support the vehicle.
  3. Drain the cooling system.
  4. Remove the fresh air duct and the air cleaner assembly.
  5. Remove the battery box, battery and battery tray.
  6. Remove the upper radiator hose.
  7. Remove the relay box and position aside, leaving the wiring connected.
  8. Disconnect the cooling fan electrical connectors.
  9. Remove the engine undercover.
  10. Remove the stabilizer bar and brackets assembly.
  11. Remove the lower radiator hose and the air separation hose.
  12. If equipped with automatic transmission, disconnect and plug the oil cooler hoses.
  13. Remove the A/C condenser mounting bolts, position the condenser away from the radiator and secure it with wire. Do not disconnect the A/C lines.
  14. Remove the power steering oil line bracket and the A/C high pressure line bracket.
  15. Remove the radiator brackets and radiator mounting bolts and remove the radiator/cooling fans assembly. Be careful not to damage the condenser during radiator removal.
  16. If necessary, remove the cooling fans/shroud assembly from the radiator.

    To install:

  17. Install the cooling fans/shroud assembly to the radiator, if removed.
  18. Install the radiator/cooling fans assembly into the vehicle and tighten the radiator bracket mounting bolts to 95 inch lbs. (11 Nm).
  19. Install the power steering and A/C line brackets.
  20. Install the A/C condenser and secure with the mounting bolts.
  21. If equipped with automatic transmission, unplug and connect the oil cooler hoses.
  22. Install the air separation and lower radiator hoses.
  23. Install the stabilizer bar/brackets assembly. Tighten the stabilizer bar end nuts to 39 ft. lbs. (53 Nm) and the bracket bolts to 19 ft. lbs. (25 Nm).
  24. Install the engine undercover.
  25. Connect the cooling fan electrical connectors.
  26. Install the relay box and tighten the mounting bolt to 95 inch lbs. (11 Nm).
  27. Install the upper radiator hose.
  28. Install the battery tray, battery and battery box.
  29. Install the air cleaner assembly and connect the ducts.
  30. Connect the battery cables.
  31. Fill the cooling system, start the engine and bring to normal operating temperature. Check for leaks.
 
Previous Next