Previous Next

Water Pump

REMOVAL AND INSTALLATION

1993-94 323 1.6L (B6E), Miata 1.6L (B6E) 1.8L (BPD), Protege 1.8L (BPE, BPD), 1993-95 MX3 1.6L (B6E, B6-ZE) and 1995-97 Protege 1.5L (Z5D) and 1.8L (BPE, BPD) Engines
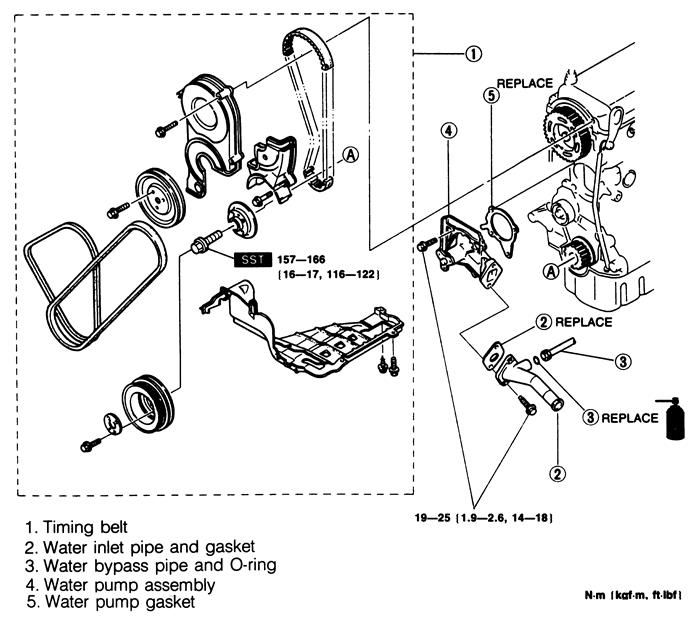
Fig. 1:Water pump removal and installation -- 1993-94 323 1.6L (B6E), Miata 1.6L (B6E) 1.8L (BPD), Protege 1.8L (BPE, BPD) 1993-95 MX3 1.6L (B6E, B6-ZE) and 1995-97 Protege1.5L (Z5D) and 1.8L (BPD) engines

CAUTION
When draining the coolant, keep in mind that cats and dogs are attracted by the ethylene glycol antifreeze, and are quite likely to drink any that is left in an uncovered container or in puddles on the ground. This will prove fatal in sufficient quantity. Always drain the coolant into a sealable container. Coolant should be reused unless it is contaminated or several years old.

  1. Disconnect the negative battery cable. Drain the cooling system.
  2. Remove the timing belt covers, and remove the timing belt.
  3. Disconnect the coolant inlet pipe and gasket.
  4. Remove the timing belt idler pulleys still attached to the water pump.
  5. Remove the water pump mounting bolts, and remove the water pump.

    To install:

  6. Clean all gasket mating surfaces.
  7. Install a new rubber seal on the water pump.
  8. Using a new gasket, install the water pump on the engine. Tighten the mounting bolts to 14-18 ft. lbs. (19-25 Nm). Tighten the bolt from the water pump to the alternator bracket to 28-38 ft. lbs. (38-51 Nm).
  9. Install the timing belt idler pulleys that were removed.
  10. Install the coolant inlet pipe, using a new gasket. Tighten the bolts to 14-18 ft. lbs. (19-25 Nm).
  11. Install the timing belt and the timing belt covers.
  12. Fill and bleed the cooling system. Connect the negative battery cable, start the engine and bring to normal operating temperature. Check for leaks.
1993-95 MX3 1.8L (K8) and 1993-97 626/MX6 2.5L (KL) Engines
  1. Disconnect the negative battery cable. Drain the cooling system.
  2. Remove the timing belt.
  3. Remove the No.3 engine mount bracket.
  4. Position a drain pan under the water pump.
  5. Remove the 5 water pump mounting bolts, and remove the water pump.

    To install:

  6. Clean the mating surfaces of the water pump and the engine block.
  7. Install a NEW rubber seal onto the water pump.
  8. Install the water pump and torque the bolts 14-18 ft. lbs. (19-25 Nm).
  9. Install the engine mount bracket, and tighten the mounting bolt to 32-44 ft. lbs. (44-60 Nm).
  10. Install the timing belt.
  11. Connect the negative battery cable. Fill and bleed the cooling system.
  12. Start the engine and bring to normal operating temperature. Check for leaks.
1993-97 626 and MX6 2.0L (FS) Engines
  1. Disconnect the negative battery cable. Drain the cooling system.
  2. Remove the timing belt.
  3. Remove the power steering oil pump adjuster.
  4. Remove the 5 water pump mounting bolts and remove the water pump.

    To install:

  5. Clean all gasket mating surfaces.
  6. Install a NEW gasket on the water pump and install the water pump on the engine. Install the mounting bolts and tighten to 14-18 ft. lbs. (19-25 Nm).
  7. Install the power steering oil pump adjuster, torque the mounting bolts to 12-16 ft. lbs. (16-22 Nm).
  8. Install the timing belt.
  9. Connect the negative battery cable. Fill and bleed the cooling system.
  10. Start the engine and bring to normal operating temperature. Check for leaks.
1993-95 929 3.0L (JE-ZE) Engines
  1. Disconnect the negative battery cable and drain the cooling system.
  2. Turn the crankshaft to place the No. 1 piston at TDC of the compression stoke.
  3. Remove the timing belt.
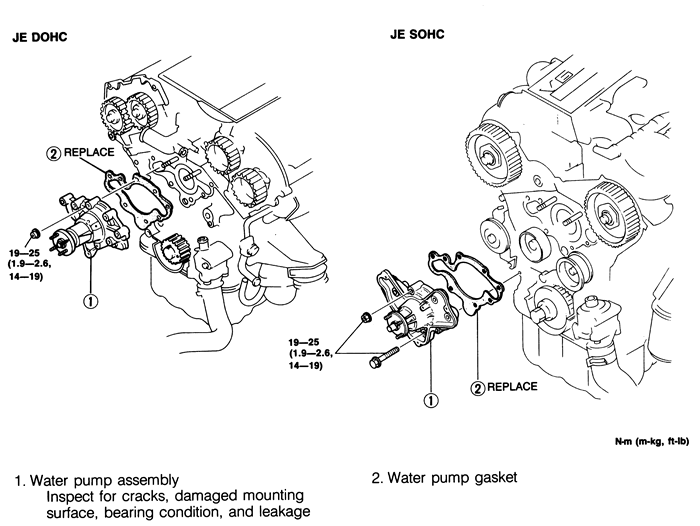
  4. Remove the retaining bolts and nuts and separate the water pump from the cylinder block. Remove the gasket and purchase a new one.
  5. Remove all the old gasket material from the water pump and cylinder block contact surfaces.

    To install:

  6. Install the gasket onto the water pump and position the water pump onto the block. Install the retaining nuts and bolts. Torque the nuts and bolts to 14-19 ft. lbs.
  7. Install the timing belt.
  8. Fill the cooling system to the proper level and connect the negative battery cable. Start the engine and check for leaks.
    Fig. 2:Water pump assembly -- 1993-95 929 3.0L (JE-ZE) engines

1995-97 Millenia
  1. Disconnect the negative battery cable. Drain the cooling system.
  2. Remove the timing belt covers and the timing belt.
  3. On the 2.5L engine, remove the engine mount bracket.
  4. Use a pulley removal tool to hold the water pump pulley and remove the bolts. Remove the water pump pulley.
  5. Position a drain pan under the water pump.
  6. Remove the water pump mounting bolts, and remove the water pump.

    To install:

  7. Clean the mating surfaces of the water pump and the engine block.
  8. Install a new O-ring onto the water pump.
  9. Install the water pump and torque the bolts 18 ft. lbs. (25 Nm).
  10. Install the water pump pulley with the bolts. Hold the pulley with the tool and tighten the bolts to 88 inch lbs. (10 Nm).
  11. On the 2.5L engine, install the engine mount bracket, and tighten the mounting bolt to 32-44 ft. lbs. (44-60 Nm).
  12. Install the timing belt and timing covers.
  13. Connect the negative battery cable. Fill and bleed the cooling system.
  14. Start the engine and bring to normal operating temperature. Check for leaks.
1995-97 Miata 1.8L (BPD) Engine
  1. Disconnect the negative battery cable. Drain the cooling system.
  2. Remove the timing belt covers, and remove the timing belt.
  3. Remove the power steering pump with the hoses still connected, and position it out of the way.
  4. Disconnect the coolant inlet pipe and gasket.
  5. Remove the timing belt idler pulleys still attached to the water pump.
  6. Remove the water pump mounting bolts, and remove the water pump.

    To install:

  7. Clean all gasket mating surfaces.
  8. Install a new rubber seal on the water pump.
  9. Using a new gasket, install the water pump on the engine. Tighten the mounting bolts to 14-18 ft. lbs. (19-25 Nm).
  10. Install the timing belt idler pulleys that were removed.
  11. Install the coolant inlet pipe, using a new gasket. Tighten the bolts to 14-18 ft. lbs. (19-25 Nm).
  12. Install the power steering pump.
  13. Install the timing belt and the timing belt covers.
  14. Fill and properly bleed the cooling system. Connect the negative battery cable, start the engine and bring to normal operating temperature. Check for leaks.
1993-95 RX7 1.3L (13B) Engines
  1. Disconnect the battery cables and remove the battery box, battery and battery tray.
  2. Drain the cooling system.
  3. Remove the fresh air duct and the air cleaner assembly.
  4. Remove the intercooler-to-throttle body hose and funnel.
  5. Disconnect the accelerator cable.
  6. Disconnect the filler port coolant hose from the water pump.
  7. Remove the turbocharger-to-intercooler pipe and hose.
  8. Remove the water pump pulley and drive belt.
  9. Remove the water pump body coolant hose from the rear of the water pump.
  10. Label and disconnect the electrical connectors and remove the alternator and alternator bracket.
  11. Remove the air pump and air pump bracket.
  12. Remove the upper radiator hose.
  13. Remove the intercooler and air separation tank, but do not remove the air duct from the body.
  14. Remove the subframe at the front of the vehicle.
  15. Remove the lower radiator hose.
  16. Remove the remaining coolant hoses from the water pump. Disconnect the metering oil lines.
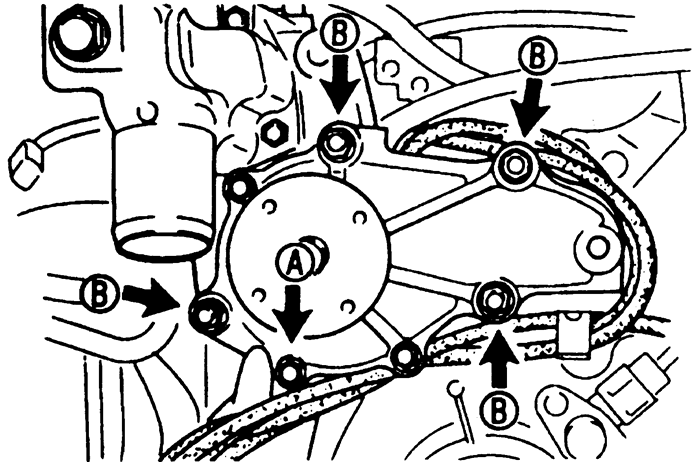
  17. Remove the metering oil pump connector from the engine hanger. Remove bolt A, then position the metering oil line and metering oil pump harness under the lower radiator hose.
  18. Remove nuts B and remove the water pump.
    Fig. 3:Water pump attaching bolt locations -- 1993-97 RX7 1.3L (13B) engine

    To install:

  19. Clean all gasket mating surfaces.
  20. Install the water pump, using a new gasket. Tighten the nuts to 19 ft. lbs. (25 Nm).
  21. Reposition the metering oil pump harness and line and install the bolt in the water pump. Tighten to 19 ft. lbs. (25 Nm).
  22. Install the metering oil pump connector to the engine hanger. Connect the metering oil lines, using new gaskets, and tighten the bolts to 10 ft. lbs. (13 Nm).
  23. Install the coolant hose at the rear of the water pump and connect the heater hose. Install the lower radiator hose.
  24. Install the subframe at the front of the vehicle and tighten the bolts to 95 inch lbs. (11 Nm).
  25. Install the intercooler and air separation tank. Tighten the bolts to 95 inch lbs. (11 Nm).
  26. Install the upper radiator hose.
  27. Install the air pump and alternator with the brackets.
  28. Connect the remaining coolant hose at the rear of the water pump. Install the water pump pulley and drive belt. Tighten the pulley bolts to 95 inch lbs. (11 Nm).
  29. Install the turbocharger-to-intercooler hose and pipe.
  30. Connect the filler port coolant hose at the water pump. Install the air cleaner assembly and fresh air duct.
  31. Connect and adjust the accelerator cable.
  32. Install the intercooler-to-throttle body hose and funnel.
  33. Install the battery tray, battery and battery box. Connect the battery cable.
  34. Fill and bleed the cooling system.
  35. Start the engine and bring to normal operating temperature. Check for leaks and check the coolant level.
 
Previous Next